19
2013Aperture: Free Beginner Photography Class
Shutter Speed Assignment Images
This is just a friendly reminder to critique each others’ images in the Flickr group. If you’re posting there, take the time to critique at least one image per class member Our class is small so the time commitment there is maybe 10-15 minutes. But more importantly, when your’e critiquing other images you’re learning to articulate what you do and do not like about images; this makes you a better photographer. And by critique I don’t mean “Great job!” Really work a bit to use the Oreo Method we talked about in our first assignment. Tell them why it caught your eye, one area you would do differently/could use improvement, and one thing they really rocked at. It’s just three sentences 🙂
And if you’re new to the class, please jump in on the current lesson and work backwards if you want. There’s no grading and no roll call, do what you can with each week’s assignments 🙂
Those things said, here’s a sampling of what class members produced this week!
1. Freeze the Action (Fast Shutter Speed)

Amanda froze the action of this mother/son duo with this beautiful sunlight streaming down. I think jumping was such a fun idea for this age that sort of fears the crazy lady with the camera. I also love the lighting here!
2. Don’t Freeze the Action (Slow Shutter Speed)

Jessica got her camera as a Valentine’s present! How sweet! So at the time of this image she’d barely held it for three days. I’m so glad she has the courage to jump in on this (Actually, I’m still humbled that I have a ‘class’ at all!). This is an image of her daughter being pulled in a makeshift sled. The captured motion makes me feel the shrieks of joy.

One word: Dreamy. I’m so glad you went for the ultra slow shutter speed, TeddyBouch! It’s a great exposure and I always adore images of the red tail lights where you can’t see the car. There’s just this lonesome feeling about how fast time really does pass right before our eyes.
3. Give Panning a Try (Slow Shutter Speed)

I love this panning shot by CraftLea. I love the colors, the fabulous blur on the couch, the tack sharp hair, the giggles she must have been hearing. But mostly I like how this is such a metaphor for mothering: how we can freeze just a momentary memory, but all the moments just keep on going as the kids keep growing.

Andrew isn’t entirely new to the idea of panning. He does the camera motion all the time only with a very fast shutter speed to freeze the action. His favorite subjects (birds) lend themselves well to this technique with a slower shutter speed, don’t you think?

I may or may not end up being at fault for TeddyBouch getting a distracted driving ticket. Ahem. Very creative use of the panning technique!
Aperture: What is it?
When we looked at how cameras work, we defined aperture as “the hole that lets in light,” and really that’s what it is. Aperture is an opening (usually where the lens joins the camera body) that controls the amount of light that enters the camera.
Aperture is deceptively simple, but understanding how aperture affects your final image is pretty difficult because of the ridiculous amount of vocabulary connected to it! In fact, the sheer amount of vocabulary is going to tempt you all to skip reading this, but don’t give into temptation! If you do, you’ll have no idea how to complete the assignment!
Aperture Vocabulary Graphic
In a second, we’re going to work through all of that vocabulary, but first I’m going to present it to you in a graphic. Keep in mind I’m neither an artist nor a graphic designer, but this should get the job done for you visual folks.

I warned you about my graphic art skills…
Aperture: Wide or Closed
Aperture can be wide opened or closed/stopped down. These two terms mean exactly what you’d think they mean. A wide open aperture means that the opening letting light in is very large. A closed down aperture means the opening letting light in is very small.
Measuring Aperture: F-stops
Aperture is measured in a scale by F-Stops. On the arrow above you see a listing of full stops from f/2.8-f/22. I’m not going to blow your mind (or mine) explaining why the numbers are so far apart. There are other stops in between these numbers which some of your cameras will be able to access.
The difficult thing about the F-stops is that the lower numbers are more wide open than the bigger number which are closed down. This is opposite of what our brains want to tell us; in this case, a bigger number does NOT equal a more wide open f/stop.
Fast or Slow Aperture
This is more pertinent in a discussion on the full exposure triangle or on lenses, but you might also hear it in conjunction to the f/stop scale so I thought it worth mentioning here. A wide open aperture of f/2.8 (or f/1.4 or wider) is considered fast because it lets in a large amount of light at one time. A stopped down aperture of f/22 is considered slow because it doesn’t let in as much light. This is in conjunction with shutter speed. As we’ll find out soon, wide open apertures generally allow for faster shutter speeds while stopped down ones do not. Does that help the vocabulary make sense?
Aperture and Depth of Field (or the creative side)
Aperture is my favorite part of the exposure triangle because it controls depth of field. If you’ve read along this far, then this is where things start getting a little oddly complicated. The vocabulary for describing aperture seems almost opposite the vocabulary describing depth of field.
Depth of field is the amount of the image that is in relatively good focus. A shallow depth of field has very little in sharp focus around your focus point. A wide depth of field has the back, front, and middle grounds all in relatively good focus.
Here’s the metaphor that helped me work out how depth of field related to aperture.
Let’s imagine you’re stumbling back to your bed after getting a midnight snack. So while you’re focused completely on making it to the stairs in front of you, what you don’t see is that the toddlers moved the coffee table during the day and it’s right in front of your shin. BAM! Yeah, that hurt. And the worst part is that you didn’t even see it. Why? You pupil (the aperture of your eye) was wide open to absorb all of the available light. So while you could see the stairs you were focusing on with perfect clarity, you couldn’t see the coffee table in the foreground because a wide open aperture produces a shallow depth of field.
Now lets say you head out to the local scenic mountain overlook. It’s high noon without a cloud in the sky and all that light in the sky is reflecting off a nearby lake. You remembered to wear your contacts that day so you notice at the next peak over a mile away there’s a bald eagle flying. You can see the eagle, the next peak, the nearby lake, and your significant other (or toddlers) all with pretty much equal clarity. Because the sun is so bright the pupil (the aperture) has contracted to nearly a pinhole to let in less light and that closed down aperture produces a wide depth of field.
Do you see how this is initially confusing? It’s all really the crazy vocabulary attached to it all that makes it hard to understand. That’s where the crazy drawings on the bottom of my graphic come in handy. I know… they’re kind of hard to make out… so I’ll explain it further here.

Because I know you wanted to see my toddler art skills one more time!
A Depth of Field Study for Portraits
So you’re shooting a bride. She standing in a field a flowers and you want to have her in sharp focus but blur out the field giving the image a shallow depth of field: Choose somewhere around f/2.8
You add in her groom. They’re cuddling at an angle to each other. You want a wider depth of field to make sure they’re both in focus, but you still want a bit of blur on all those flowers: Choose somewhere around f/5.6-f/8.
You add in the whole ginormous bridal party. There’s now dozens of faces! You definitely want to make sure you capture all of their faces in sharp focus and no longer care about blurring out the dumb flowers. You’re sweating at the prospect of messing this up. You definitely want the widest depth of field possible: Choose somewhere between f/16-f/22.
A Depth of Field Study for Nature/Still Life.
You’re taking a picture of a flower in your yard. It’s the most beautiful dandelion you’ve ever seen, but you want to make sure when you post it on Facebook that no one knows about the weeds below it: Choose a shallow depth of field to keep the flower in focus but the nasty lawn out of focus.
You’re hiking when you see this really cool tree on an island in the middle of a lake. You want to showcase how gnarly this tree is without drawing too much attention to the lake: Choose a middle range aperture around f/5.6-f/8 to make sure all of the tree is in focus while not drawing too much attention to the back and fore grounds.
You’re standing on that overlook in the mountains and want to capture everything you see from the sheer drop off in front of you, to the peak in the middle ground, and the beautiful clouds in the back ground. You want a really wide depth of field: Choose an aperture between f/16-f/22 (or higher).
Questions about Aperture
So if you’ve made it this far you’re a serious reader. Congratulations!!! I think aperture is the hardest part of the exposure triangle because it has all this seemingly contradictory vocabulary associated with it. Does my fabulously awesome graphic help with understanding how all these words relate? Do you have any questions still? Please hop down to the comments section right now and ask away.
This post is already super long… so pause if you must to process and come back to hear about changing aperture on your camera and this week’s assignment. Whatever you do, make sure you understand the above explanations before heading off to complete an assignment!
How to Change Aperture on Your Camera.
Digital Point and Shoot
Sadly there’s a lot less flexibility with aperture settings in a point and shoot. Really dive into your camera manual (or Google search about your camera model and aperture) to make sure you don’t have any other way to change aperture than what I’m saying here.
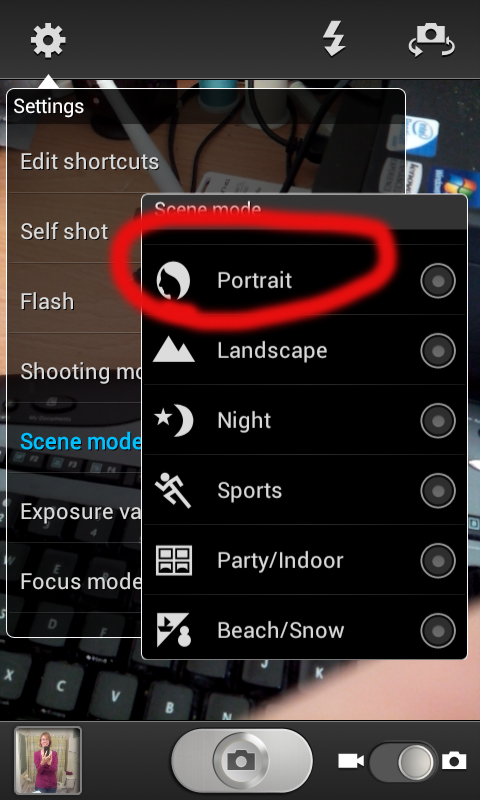
Portrait Mode Has a Wider Aperture on a Point and Shoot
The two modes that actively change aperture on a typical point and shoot are Portrait with the person icon and Landscape with the mountain icon. Portrait mode will produce a wide open aperture for a shallower depth of field. Landscape will choose a closed/stopped down aperture for a wider depth of field.
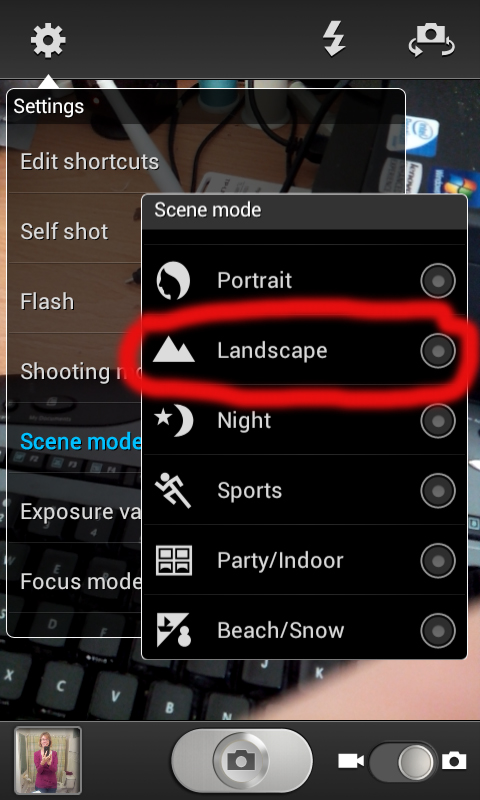
Landscape Mode has the most Closed Down Aperture on a Point and Shoot
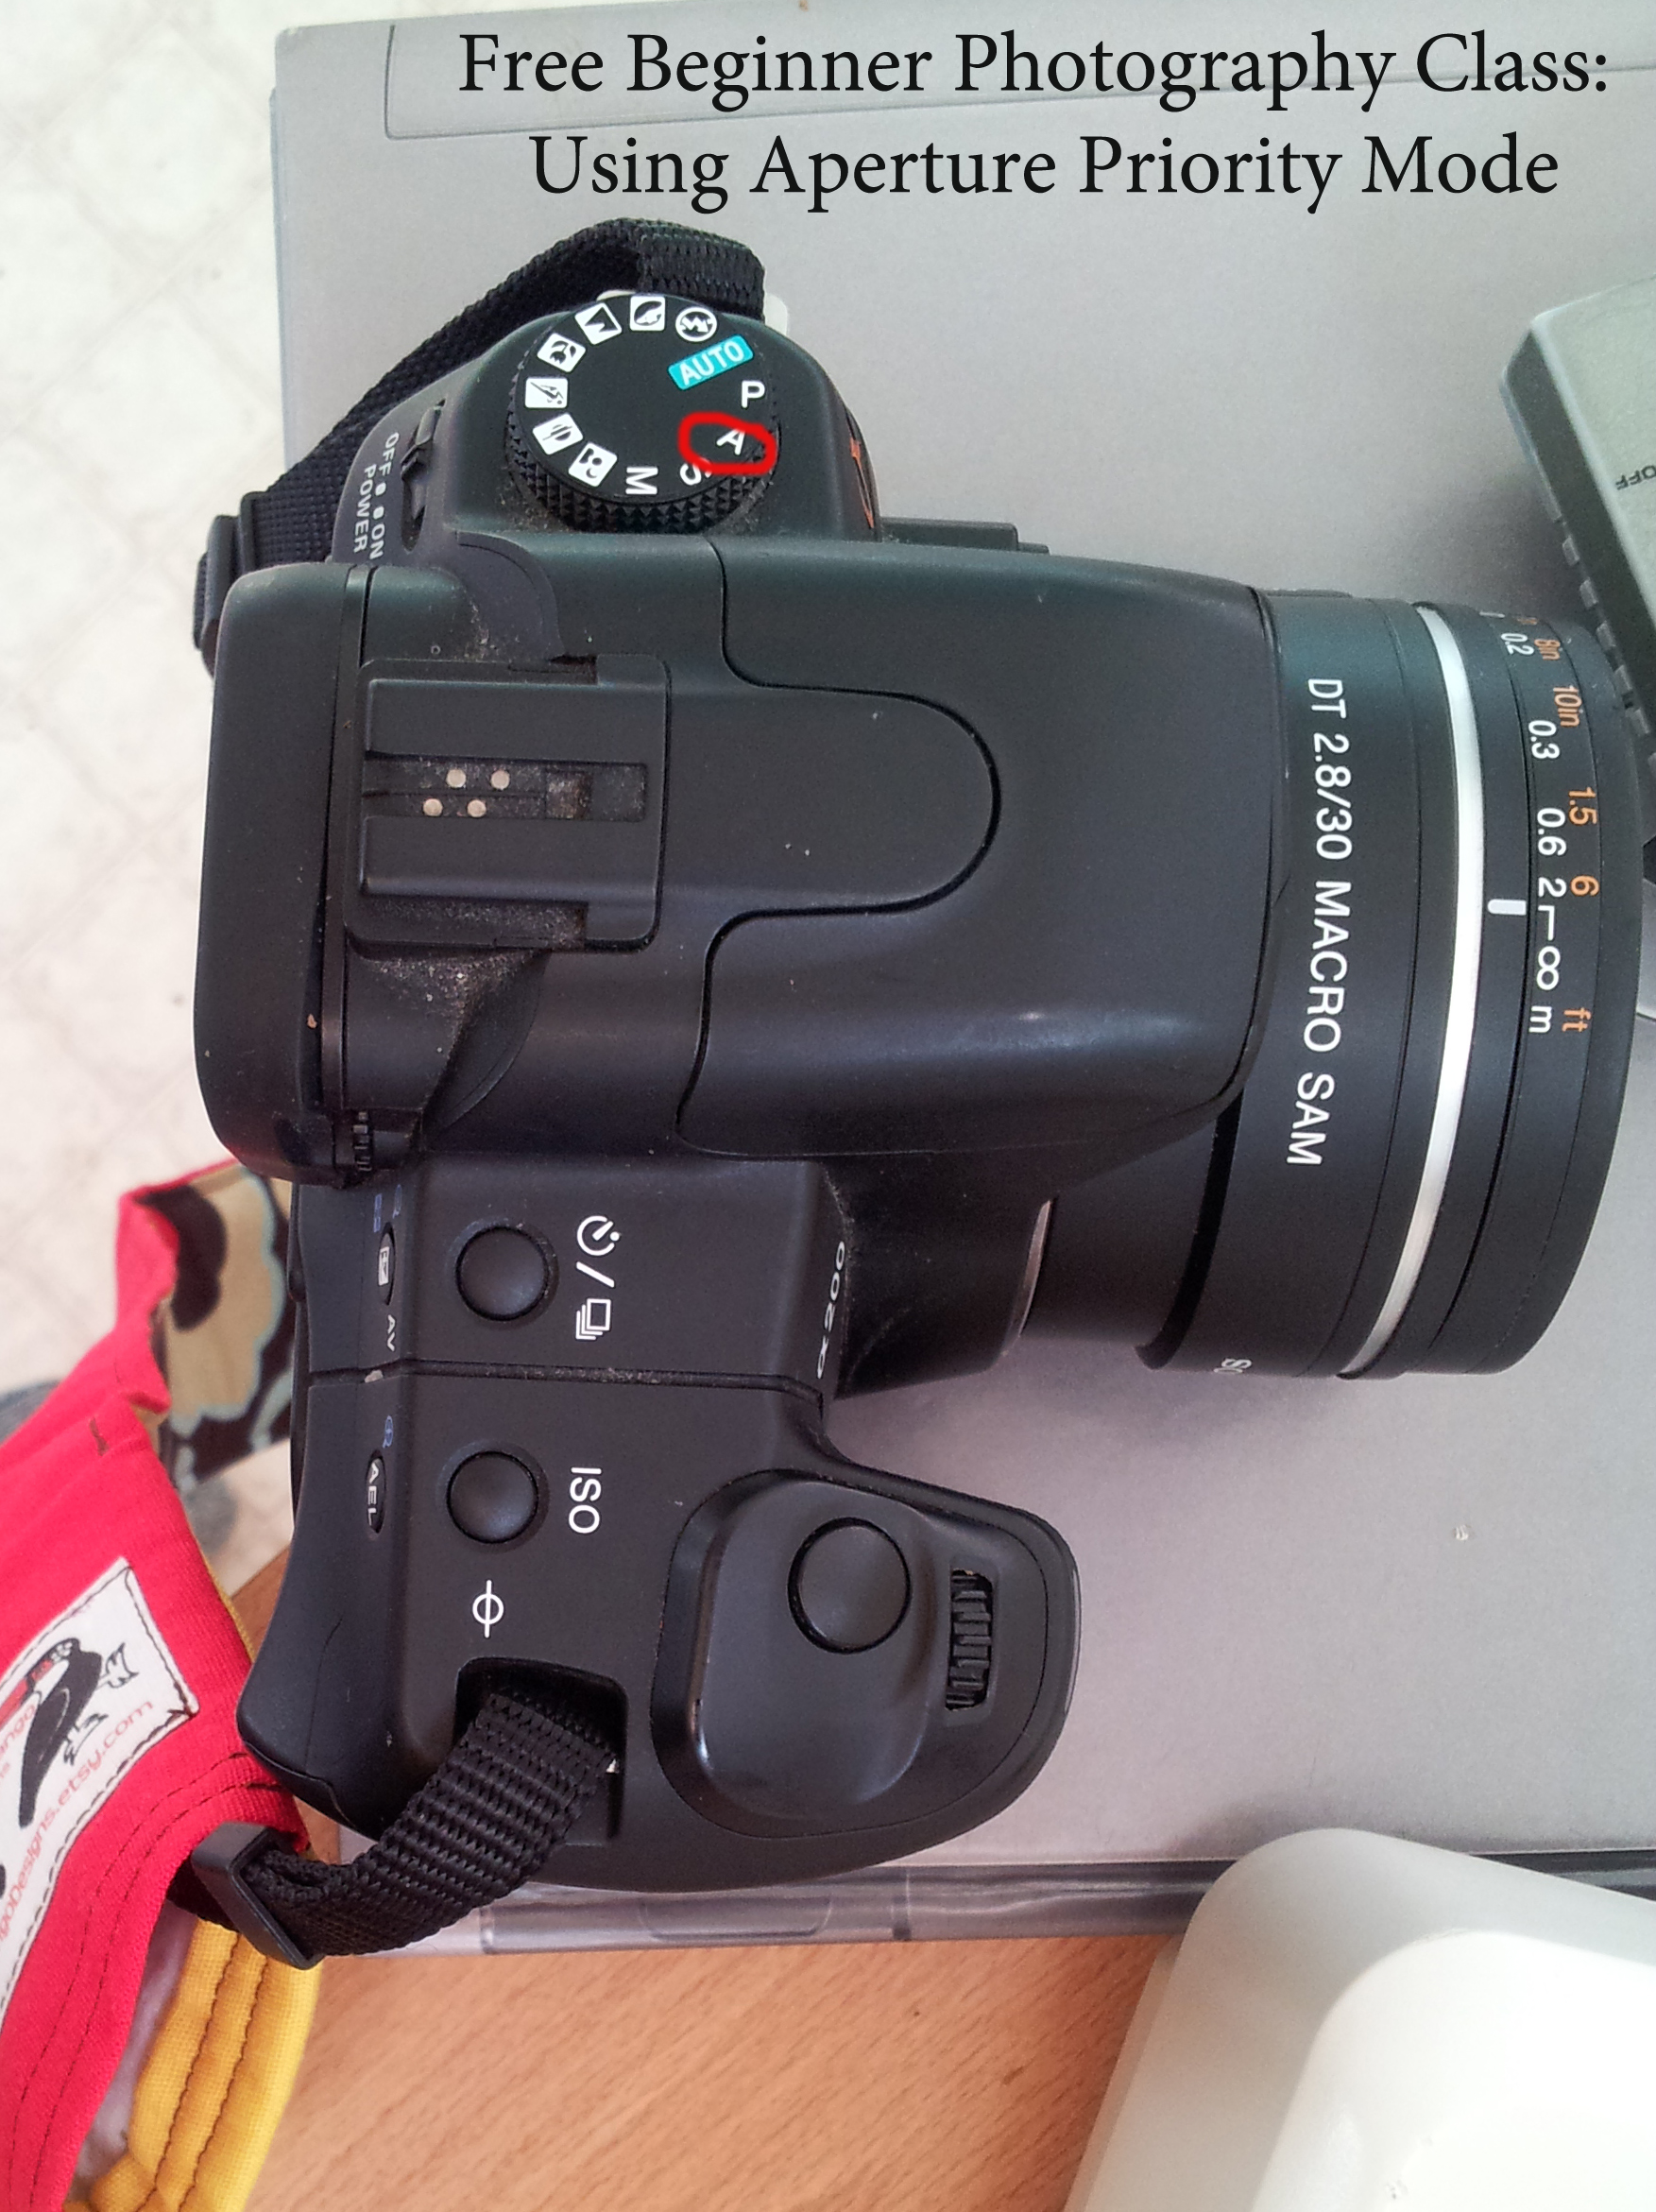
Digital SLR
You’re going to flick your camera mode to A-mode or Aperture-Priority. This will allow you to change aperture but let the camera choose all other variables. Honestly, I spent years shooting in Aperture-Priority mode. So if you’re overwhelmed by Manual mode next week just stick with Aperture-Priority mode most of the time (unless you want to freeze fast moving motion then switch to Shutter-Priority).
Now that you’re in A-mode you’ll have to look up where your adjustment dial is. Likely it’s the same as last week when you had the camera in S-mode 🙂 So you’re pretty much set to go!
Aperture Experiment Assignment
Make sure your flash is turned off before beginning this assignment!
4 Images with your Aperture Wide Open
This part of the assignment will be affected greatly by your lens’s highest f-stop. The kit lens for my a200 is wide open at f/4. My favorite prime lens is wide open at f/1.7. I can take the same images with both of these lens wide open and set at the same focal lens and will get wildly different results. That’s okay. I just wanted you to be aware of that!
Depth of field isn’t only affected by aperture so these three images will give you a feeling of what also affects depth of field as well as let you play with that narrow slice of focus.
If you’re shooting on a point and shoot use Portrait mode.
- Any Wide Open image that captures your imagination. Remember that shooting wide open will give you a very narrow slice in perfect focus. Try to pay attention to your focus as you take the image.
- Image with your subject very close to you and your aperture wide open. Perhaps even as close as your lens will focus. Switching the lens into manual focus may be helpful if you’re really close!
- Image with your subject farther away from you and the background pretty far from your subject. Let them have some open space behind them. If you have a zoom lens, then zoom it all the way in (to 55mm or 100mm or whatever is the biggest number… I know we haven’t covered lenses yet… do the best you can)
- Image with your subject close to a background but at the same zoom focal length as image 3 if you’re using a zoom lens. Put them up next to a wall or some other background that ends abruptly.
2 Images with your Aperture Completely Stopped/Closed Down
Make sure you have ample light for these images because with your aperture closed down this far, you’re going to need it!
Use landscape mode on your point and shoot. On your DSLR, close your camera way down to f/22 (or greater if you have it on your lens).
- Take any image with your aperture closed down that you want!
- Take a close up image of a subject. That Dandelion in your yard for example? It’d be really fun if you did this image the same as #2 from above so you can compare, but it’s totally not necessary at all!
Once you finish all (or just an image or two…) your assignment, click on over to our Flickr group and upload them. Please try to leave 1 critique for every member who has posted that week’s assignment already (or go back critique last week’s assignment if you’re early in the game). Critique helps us all grow!
Also, watch the Discussions at the bottom of the Flickr Group. From time to time, I’ll post some questions for feedback and help identifying the class direction and, in fact, I’ve got one of those posts up right now. 🙂

Camera Light Meters and Metering Modes @ Beautiful Newborn and Lifestyle Portraits by Quiet Graces PhotographyBeautiful Newborn and Lifestyle Portraits by Quiet Graces Photography
[…] gave 6 images for the Aperture Assignment. I’m not going to number your images here because the assignment I gave was for you to get […]