03
2013Modifying Light Part 2: On Camera Flash {Free Beginner Photography Class}
So far in this class I have dissuaded you from using your flash at all. You’ve learned to take even low light images without the aid of on camera flash. One of the reasons I discourage the use of flash while you’re learning your camera is because your camera will automatically trigger the flash in the wrong lighting situations.
When to use On Camera Flash
Here are a few rules of when it’s okay to use flash.
- When your subject is at least 3 feet away from the camera and no more than 15 feet away.
- When you need to freeze motion in a dark scene and can’t get your shutter speed fast enough any other way and you’re still following rule 1.
- When you need fill flash for a dark subject.
- When you can use a diffuser for your on camera flash.
In this post, I’m going to cover reasons 3 and 4 since the first two are just sort of common sense guidelines.
Fill Flash
Remember our back lit scene? Remember how tough it is to get a good exposure for your subject without blowing out all the details in the background? A brightly back lit scene is the ideal place to use your on camera flash. This is also true for those harsh mid-day photos with the sun high overhead casting terrible shadows.
“What, Melissa?” You cry. “I thought flash was best used in low light situations?!” Well, unless your low light situations meet requirements 1 and 2, then this actually is the best place to use on camera flash. In this scenario it’s called fill-flash. You’ll have to manually activate your flash in these situations (mine has a simple button next to the pop up flash, but read your manual to be sure!)
You may need to adjust the strength of your flash to do this (read your manual to learn how), but you may not. You’ll know right away if your flash is too bright when your subject looks white and washed out. Power it down a little and try again.
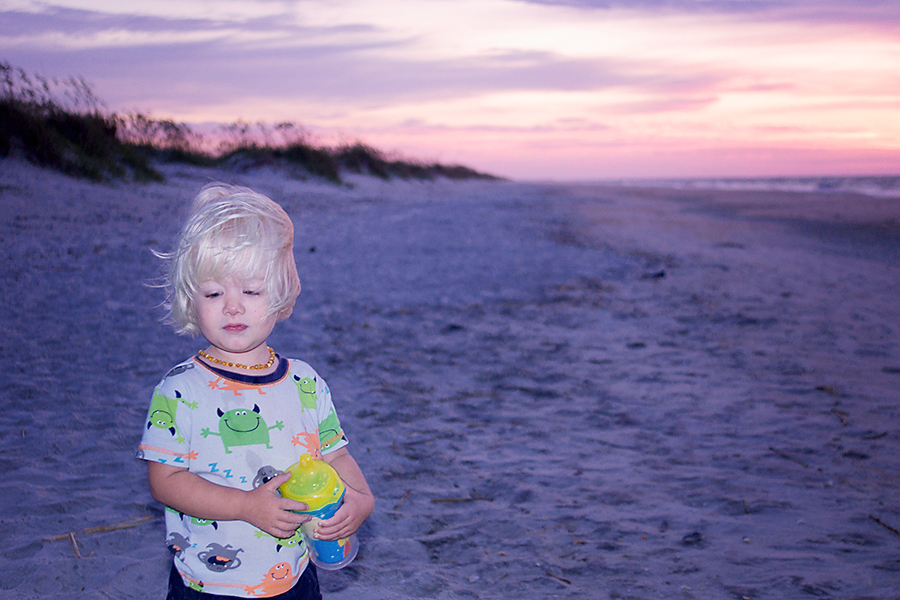
For this example I powered my flash down two stops. The extra light did make the sunrise a little brighter than it appeared in real life, but not so much that I’m unhappy with the outcome. Just in case you were wondering, if you’re tent camping with this little boy, he will wake you just prior to the sun. So what else should you do but take sunrise pictures?
Diffusing On Camera Flash
So what about those low light situations where don’t want a lot of grain and your subjects are closer than 3 feet or you’re hating the washed out look of your on camera flash?
This is a situation where your flash will need diffusing. You can start by taking your flash power down a few notches (read your manual), but if that doesn’t work you can buy a flash diffuser. Like most gear, this isn’t something you will need unless you face the situation over and over. But it’s a cheap little piece of gear if you like to play around. You can also improvise something like this with lightweight white fabric and a wire coat hanger for you DIY types 😉

A Little Housekeeping and your Assignment
Whew! I can’t believe we’ve powered through all of our lighting posts. The class is beginning to wind down. Over the next three weeks, I’ll be featuring a few sort of miscellaneous posts on things that haven’t really fit well elsewhere. Then, I’ll guide you in picking a final project to showcase your new skills. Finally, I’ll be featuring your images from these summer assignments on October 8th (so now is the time to catch up!). After those feature images, I’ll spend our remaining time on various editing topics (with just a few mini-assignments) while you work through your final projects.
To make it easy for you to finish all your unfinished assignments from summer here they are all in one place:
Using your Camera in Manual Mode Assignment
Manual Mode Workflow Assignment
Exposure Bracketing Assignment
Full Sun/Open Shade/Golden Hour Assignment
Portrait Lighting (the post is for next week so the link will work then)
Lighting Assignment
I’ve been preparing you for this throughout our lighting series. If you’ve been taking images concurrently throughout the series, you’ve likely covered all these assignments. If not, it’ll probably be pretty easy to combine them with the assignments above. Just make sure you label them for both assignments in the Flickr Pool.
- Front light an image or two.
- Side light an image or two.
- Back light an image so as to silhouette your subject.
- Back light an image exposing for your subject.
- Back light and use an improvised reflector (poster board, white towel, concrete, a lake, sand) OR use fill flash to get decent exposure for both the background and the subject.

Yahya
– Can I just say what a relief to find soeomne who actually knows what they are speaking about on the internet. Lots of people need to read this write-up and understand this. I’m shocked that this site is not more popualar.September 4, 2011 3:57 pm