23
2013Natural Light {Free Beginner Photography Class}
Class Notes
If you’ve been with me since the beginning, I miss you in the Flickr Pool. However, it’s summer. Life is busy and vacations are happening. I get that. Don’t forget to jump in again when life slows down. I really can’t wait to see the summer fun you’ve captured with your lens when things start cooling off again!
If you’re new to my class, welcome! Jump in where ever you want and start posting in the Flickr Pool. Just label your assignment so we know how to give you critique 🙂
Here’s where I’m headed. The rest of the summer will likely be spent on studying using light. In September, we’ll be taking a break from assignments and studying a few informative areas of photography. This will be your chance to catch up and just keep practicing. In October, class members will choose a final project (woo hoo!!) and I’ll talk about photo perspectives with a few little assignments. In November and December, I’ll touch on beginning editing. And during January, I’ll be showcasing each of my students’ final projects (which hopefully ya’ll can get posted in between drinking eggnog and enjoying Christmas cookies).
Now this is a week of really quick definitions and then sweet but short little assignments. We’re studying the types of natural light and how they’re used primarily in portraiture
Full Sun
I typically think of the full sun hours as being between 9 am and 3 pm. The sun is high overhead, bright and harsh, and casts unflattering shadows across noses and eye sockets. Honestly, I try to avoid full sun at all costs: instead I seek out open shade. Truth be told: adventurous preschoolers sometimes make the search for open shade impossible.

Here’s our little case study image. Do you see the deep shadows made by her hat, nose, and up under her hands? All those shadows are a result of the direct intense mid-day sun.
The best thing to do in Full Sun when you can’t find open shade is to look for natural light reflectors that will reflect light back into the subject’s face. Had I turned Aeralind to image left the lake behind her would have been reflecting light into her face to dissipate the shadows some. Natural light reflectors include water, concrete, and sand. If you wanted to modify the light with a purchased reflector that would work as well. Here’s a nice cheap reflector, but I’ve also used white poster board in a pinch! Again, we’ll go over the use of reflectors at a later point.
Full Sun Assignment
Take 1 photo in full sun. Do one of the following (or both for you overachievers):
- Use the shadows created in full sun to emphasize an aspect of your subject.
- Place your subject in such a way that a natural reflector is pushing light back into your subject. It might help to have an obedient subject who will patiently wait while you direct them in circles to find the best angle of reflection. Actually, images of annoyed husbands or wives would pretty much crack me up!
Shade
Open Shade
If I have to shoot during the day, I methodically hunt down open shade. Open shade is full shade, very near where the sun shines. Found under awnings or trees or the shadows of buildings, open shade is best used with a subject positioned so that they are side lit or front lit by the sun. Ready for my incredible graphic skills again? Here goes!
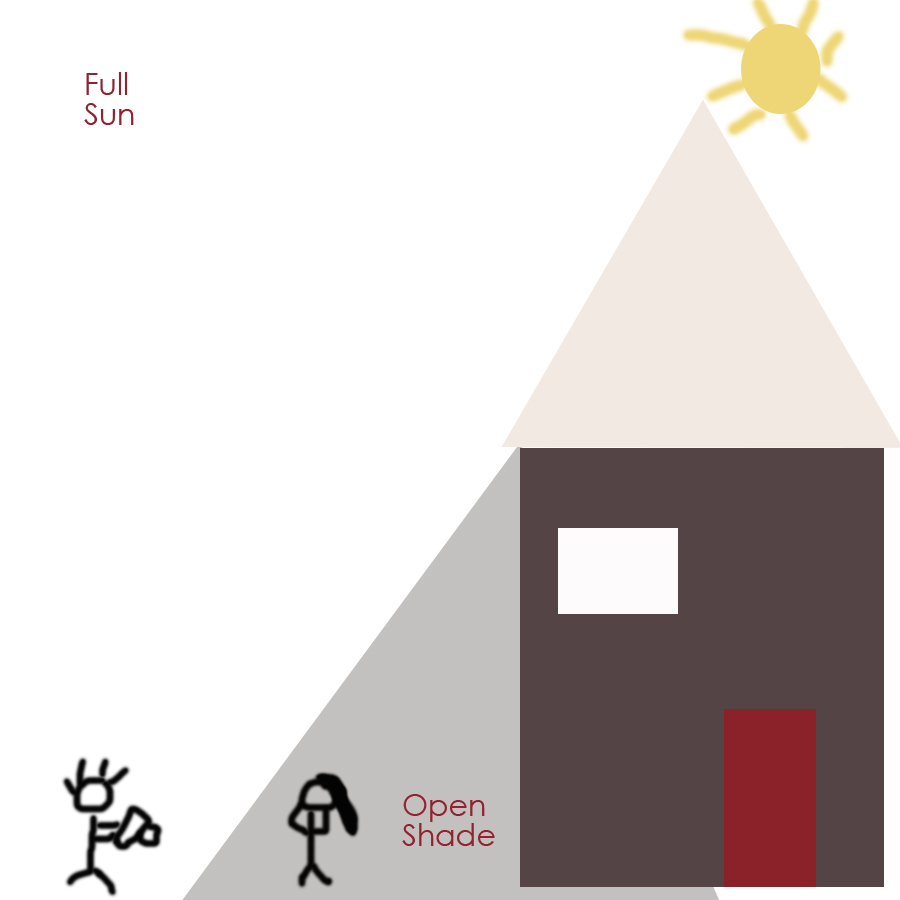
This would be where the photographer and subject would be positioned with either the subject facing fully into the light or turned at an angle to it. Got it?

This is my niece Brooklyn (isn’t she a doll?) playing under the open shade of a twisty slide and facing out toward the sunny parts. She how she’s evenly lit without any harsh shadows. I love open shade during mid-day (or early evening as was the case here).
Beware of Dappled Shade
Open shade is fully covered. It’s ideal and often easy to find. Dappled shade is not ideal. Dappled shade is when light is filtering through shade-creating object. The best example of this is when sun filters through tree leaves. This type of shade produces some parts of the image having shaded light and some portions brightly lit by sunlight. Avoid this for portraits. Use it if you like for dramatic landscapes 🙂
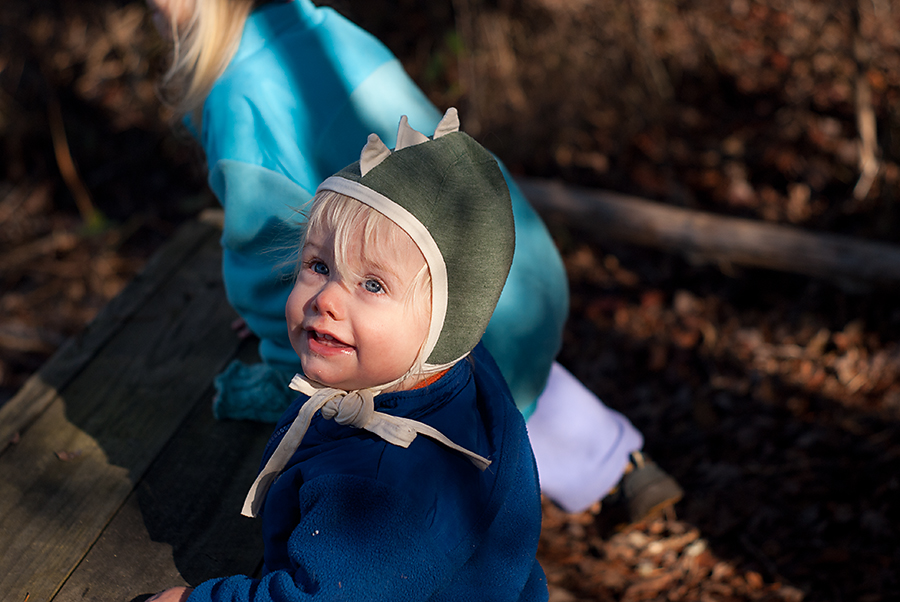
Dappled shade at it’s not so finest. Tree leaves filtering and it looks like a tree trunk across his sister’s back. 🙂
Open Shade Assignment
Find some open shade. Play around. Take some images. Enjoy! 🙂
Golden Hour
Golden Hour occurs twice a day: once about 30 minutes to an hour after sunrise and the second time about an hour an a half to an hour before sunset.
This light is magical. The sun is too low to produce dramatic shadows. The reds and pinks and oranges in the sky produce a lovely golden glow. It’s wonderful for back lit portraits and front lit portraits won’t find your subject squinting. I love everything about the Golden Hour.
Three images taken at Golden Hour on the same day (two by my husband who’s almost mastered the mechanics of manual mode and has no idea how to light images properly…. well, until after he reads this series :-p).


Enough said about golden hour. 🙂
Golden Hour Assignment
Go take images during one of the golden hour periods. Please try to post less than 10 images taken during golden hour, ok? I know it’s a hard task… enjoy that light though. It’s yummy.
Post all your images to the Quiet Graces Free Beginner Photography Class Flickr Pool and leave some critique for the others in the group! Can’t wait to see you begin to paint with light.
