29
2013Photography Critique Assignment Wrap Up {Free Beginner Photography Class}
Photography Critique: The Vocabulary
I hope you’re wearing your heavy duty antiperspirant today. I know I am (mainly because I’m afraid no one is going to link-up!). Before we dive into photography critique, I thought I’d throw out a helpful list of vocabulary so you know what on earth I’m talking about when I critique my own images! Most of these things we’ll get into more in depth as the year goes on, but for now I’ll give short no-nonsense definitions so you can start familiarizing yourself with the terms and use them yourself. I’m also not going to give you too many words for right now. We’ll stick to the basics.
Underexposure: An image that is mostly dark. Even what was white looks grey.
Overexposure: An image that is mostly light. Even what should have been black will look gray.
Depth of Field: How much of an image is in focus (a function of aperture). A shallow depth of field has very little in focus while a wide depth of field will have more in focus.
Warm: A white balance that tends toward yellow or orange. You whites will be yellowed.
Cool: A white balance that tends toward blue or green (maybe even purple.) Your whites will be bluish.
Noise/Grain: White or colored speckles particularly in the darker colors of the image. Seen when an image is shot at high ISO.
Sharp: When an image is focused well on what the photographer wants your eyes to land on. In a portrait, this is usually the subject’s eyes.
Leading Lines: When something in the photo moves your eyes toward your subject or around the image. Think family sitting in the middle of a railroad track, the track leads your eyes to the family.
Sun/Lens Flare: When the sun reflects off your lens and into your image. This can be purposefully used or it can be an unfortunate accident.
Personal Photography Critique
You’re going to get both my SOOC and my edited images. Mainly because I want you to see that if you don’t have editing software you can still take great photos. But I also want you to see that even a “professional” photographer messes things up and may have to save them in post processing. Most of these are my own daily photographs, but there’s a couple client photos in here too so you can see my process from initial image to final product.
Alright, here I go!
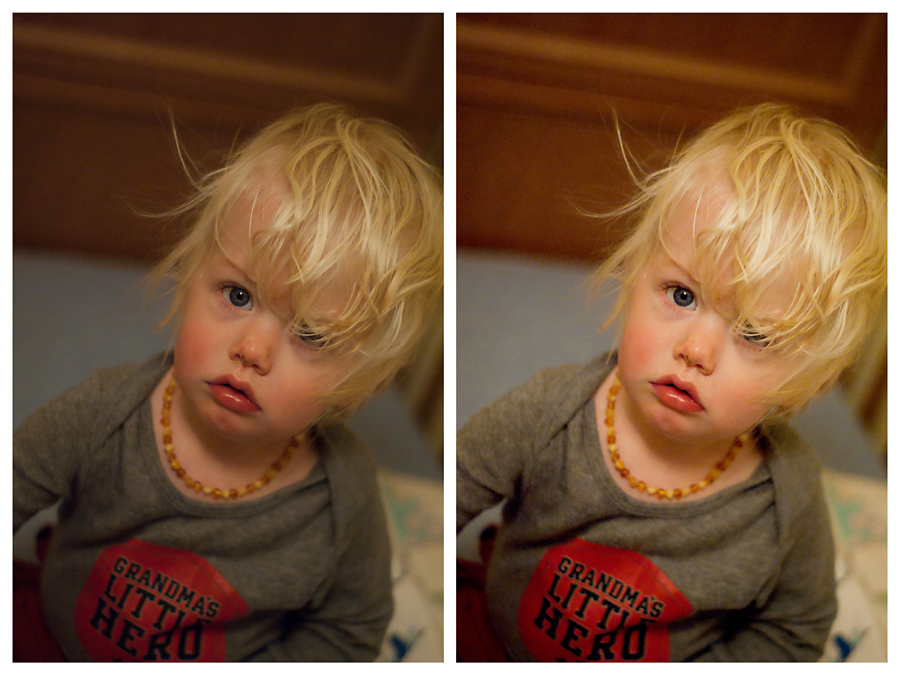
Left is SOOC image. Right is the final edited copy.
Why I like this photo: This is an emotional image for me. Sedryn had bronchialitis and was such a sad whiny boy! Those flushed red cheeks, crusty nose, and that pouty mouth… sigh… adorable.
The Bad: My exposure is a little darker than I prefer.
White balance is also a tad off. Sedryn’s room has Tungsten lighting (your old filament type bulb) and knowing how grumpy he was going to be waking from nap I did not tweek white balance as much as I could. I need to get better at doing that quickly! The blanket below his elbow with the blue bit, that white should be true white. Even my final edit is a touch on the warm/orange side. I like things warm, but this might be a bit too much.
The high ISO I used to capture this shot sans flash caused a ton of grain in the back ground. You can see it the worst in the dark parts of the crib back. A newer camera or larger sensor might not have this problem… but my current camera is always grainy above 400 ISO and this was shot at 1600.
The Good: In that tiny split second that he actually looked at me, I did nail focus on the visible eye! Woot! Not easy when I was shooting wide open at f/1.7 to make up for the lack of light in the room. It’s also a skill (picking focus points) that is less than a year old for me.
The wide open aperture of f/1.7 blurs out the background leaving you focused on the baby and not the potentially distracting background.

Top is SOOC. Bottom is Full Edit.
Why I like this Photo: I actually made my husband pull over the car and used the roof of the car as a tripod. We were on our way home from Owl-ing at a friend’s house. Those clouds lit up by that full moon… absolutely breathtaking!
The Bad: Because I was using the roof of the car as a makeshift tripod I had very little control over the composition of this image. That means I had pretty much no choice but to capture that super distracting lens flare and the “for sale” sign in the bottom right corner.
I nowhere near captured the actual scene before my eyes. It’s too bright and the contrast is not deep enough. Some of this is the limitation of a camera and I couldn’t change it. If I had more knowledge of High Dynamic Range Photography (HDR), I might have been able to do a better job bringing this out in the edit. However, HDR isn’t something I’m super interested in learning.
The Good: Obviously I was able to get rid of the lens flare and the for sale sign in the final edit. Hooray! I was also able to increase the darkness of the sky and while keeping the beautifully reflective light on the clouds.
Using a car for a tripod with a shutter speed of 1/30 of a second, I’d say I rocked getting a sharp image. Normally there’d be camera shake with an exposure time that long!
I like the way the power lines move your eye around this image from the moon down to the clouds and back again. It’s a good use of leading lines in the composition, though I’ll admit I didn’t have much choice in the matter due to the position of the parked car!
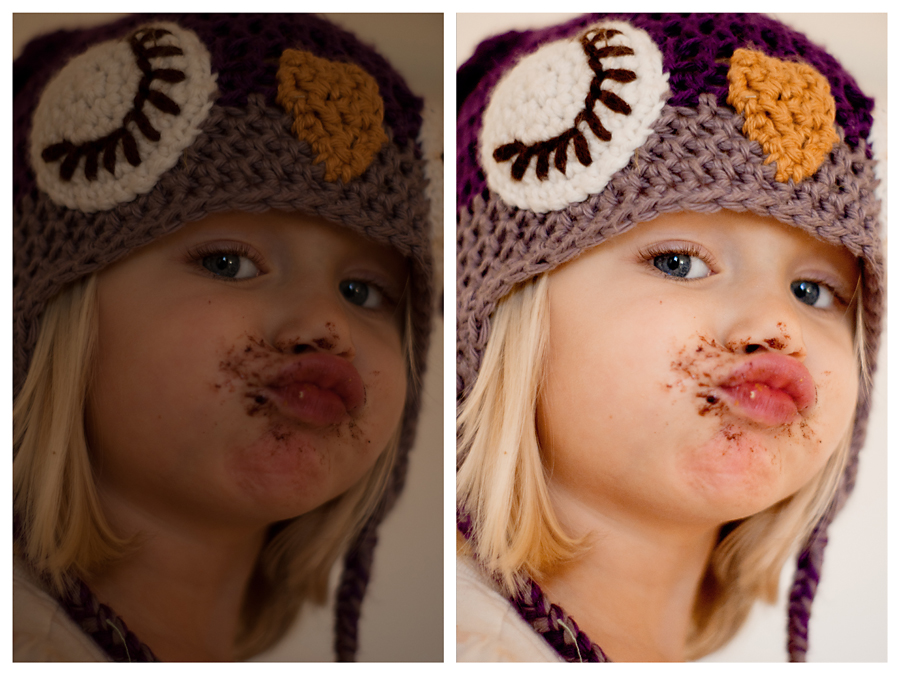
Right is SOOC. Left is fully edited.
What I like about this photo: There is nothing distracting you from the full glory of her pursed lip birthday cake face! (her dad’s birthday)
The Bad: As you can see, I seriously underexposed the original image. Moments before I had been shooting her backlit brother. I turned around and saw this and captured it with the settings I had. After all, toddlers move so quickly. Had I not been shooting in RAW, I would not have been able to save this image at all! I’ll tell you about RAW later, but if you know what RAW is know that I normally shoot my kids in JPEG. RAW files are just too big! I must have not switched back after a client session.
The back eye is out of focus due to her face angle/my wide open aperture. Not the worst offense in the world… but it drives me crazy!
If I was being a perfectionist, I should have edited out that little string on the hat in the bottom left corner. And maybe also the bit of orange dirt on her left shoulder…
The Good: I filled my frame with my subject leaving nothing distracting to your eye! (which is impressive if you had seen what was on that table in front of her!)
I have learned to save potentially unusable images in Photoshop Elements. It’s always better to get it right in camera, but it’s nice to know how to fix it if I mess up!
The front eye’s eyelashes are perfectly sharp! I forgot how much I love this lens.
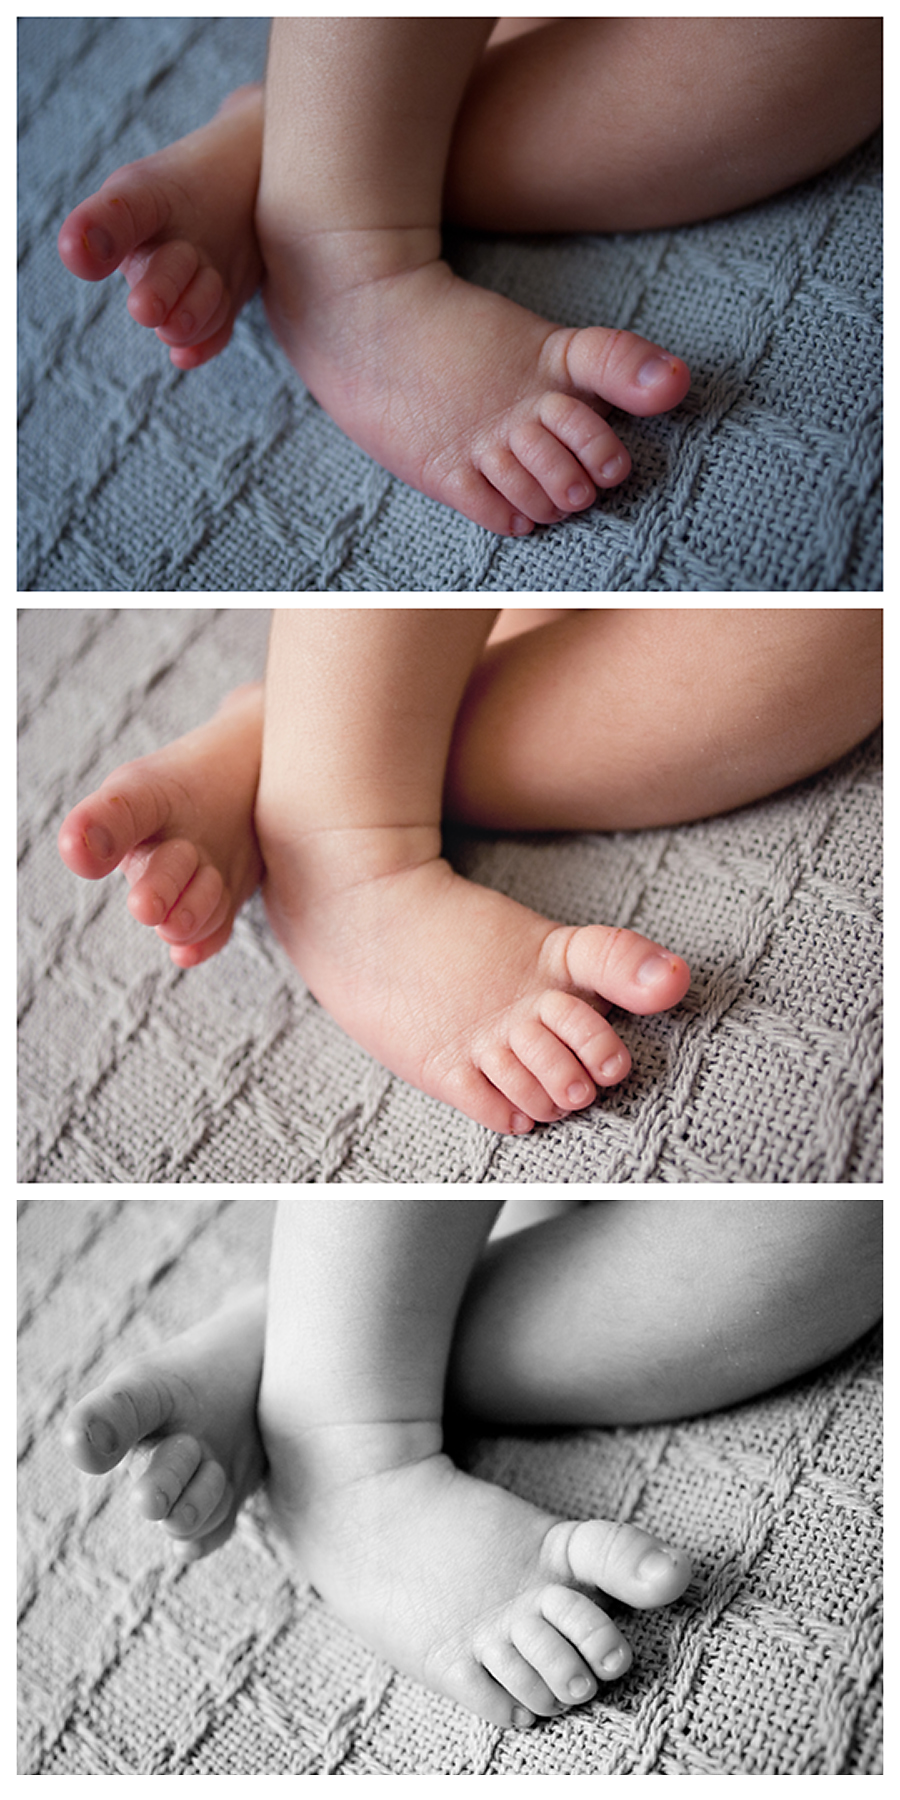
What I like about this photo: As a mom (sleep-deprived in these stages of my children’s lives), I so appreciate the capture of the tiniest details. These are the things that I loved the most but can remember the least. Sedryn’s extra long blond hair. Aeralind’s legs always pulled up nearly to her chest. Bronwyn’s feet always popping out of her blankets. Sigh. I guess I’m more emotional about my imagery than I thought!
The Bad: I think I either missed focus or should have used a wider depth of field. This is my 35mm Macro so I’m less than 2 inches from sweet Ethan’s feet here. I typically choose to manually focus these shots b/c the autofocus is slow this close to the subject. So it could be that I’m off. Yet, I also forgot that the closer you get to your subject the shallower your depth of field gets. If I had shot at a wider f/stop, maybe f/4, then maybe his big toe would be in focus.
The Good: I actually think my white balance and exposure on the original shot wasn’t so bad. His skin really is that red/magenta. The blanket is a little bluer than in real life, but not too bad overall. It’s not very bright, but this is also a RAW image so that’s a given. I always have to brighten my RAW images in post processing.
I like the color edit, but not nearly as much as the black and white. The black and white is so timeless. Hopefully, a beautiful memory for this client!
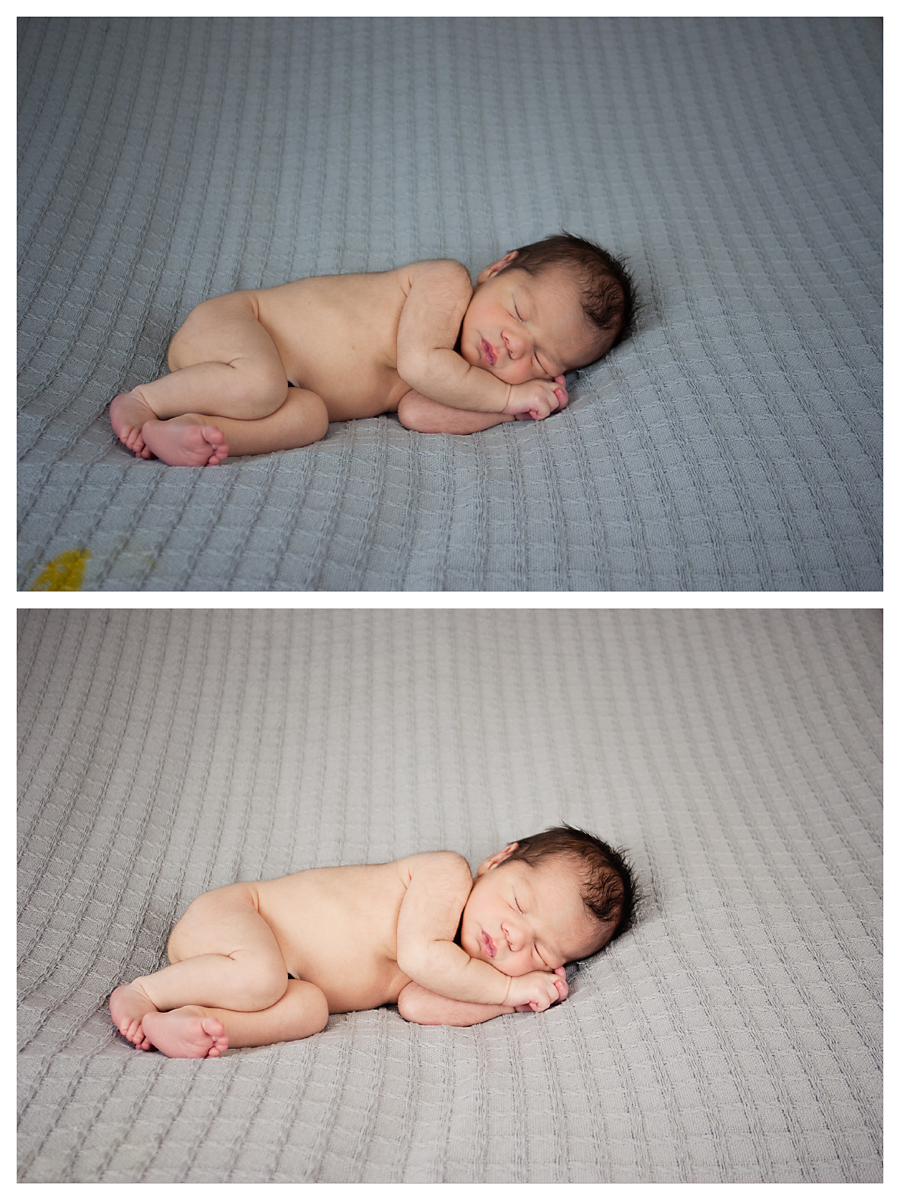
What I like about this photo: Ethan is modest (which was hard and often is hard for newborn boys!). And he just looks so peaceful. I also managed not to catch any of my backdrop stand in the image (sometimes I mess that up a ton).
The Bad: As you can see, the real life of a newborn photographer is exposed in the bottom left. That was only about a third of that accident, the rest caused me to have to change shirts. Ahem. So I had to edit that spot out.
My white balance is a wee bit too blue, but also not too bad. I did brighten and warm it up significantly while editing.
I think the contrast on the final edit might be a bit too much. I think I prefer a softer look in my newborns than what I achieved here.
I wish I could have straightened or intertwined his fingers under his cheek. This is my ‘safe’ shot. I tried to get his fingers straighter for a subsequent image, but Ethan just would not have it! Every baby has something he doesn’t like me to do; for Ethan, messing with his fingers would startle reflex him and curling him up in a ball was clearly uncomfortable for him.
My depth of field is also a little shallow. His foot is out of focus. But Ethan was super tall (nearly 22 inches!) so I think I would have been alright with a more average baby 😉
The Good: This is a really solid client shot. I love how smooth the blanket is in this shot, which is something I also struggle with because most of my blankets are very wrinkly (but soft!) cotton. His face is sharp. He looks sweet. And he’s posed pretty well with his face not buried in the blankets. It’s just a really solid shot.
A Quick Look Ahead
February is likely to be the most intense month of this class. Each week you’ll have a medium sized assignment, followed by a link up the following week. We’re going to learn about the exposure triangle. By the last week, you should be able to begin to shoot in manual mode if your camera has manual mode. If your camera doesn’t have manual mode, you’ll be fully equipped to use A-priority or S-priority(sports mode) and know when to use which. It’s going to be intense, but worth it. The assignments should only take 15-30 minutes a week, but keep trying to practice using your camera 5-10 minutes a day as well.
Your Photography Critique Assignment
Now it’s your turn to shine 🙂
- I want you to put up 3-10 of your best images on a blog post and write your personal critique below each image; Link your blog in the comments! If you don’t have a blog, I’ve created a Flikr group for our class. You’ll simply create an account, upload your photos, and put your critique into the description of each image, and then add those images to the group pool. Flikr is pretty intuitive, but if you need help feel free to use my contact me page and I’ll help as much as I can. Alternatively, you could use free blogging sites like Blogger or WordPress.com and create a blog just for this class. It’s really up to you!
- Once you’ve completed your personal critique, come back here and link up your work if it’s a blog. Link your specific post rather than your blog as a whole. For example, http://www.quietgraces.com/free-beginner-photography-class is a good link to a specific post while http://www.quietgraces.com would only link to my home page and make it hard for a user to find my work. You will also be able to link to a specific photo on Flikr or a Flikr set.
- Go check out the work of the person who commented right before you (or any image that catches your eye in the photo pool!). Pick one of their images and give them specific “Oreo” photography critique in the comments section. Don’t skip this step! It will only take a few minutes to critique one person. Additionally, this is what will build our class community and will also give you opportunity to both practice giving critique and receiving it. Each time I host a homework link-up, you will be instructed to do this step.
I can’t wait to see your work! Tell me in the comments, what did you think of this assignment? Was it helpful? What did you learn about yourself as a photographer?

quietgraces
If you entered a link and can’t see it, please let me know… this whole link process is new to me and I’ll try to figure out what I did wrong.
However, there seems to be a relatively lively conversation going on in the Flikr group, so hop on over there and give some critique! http://www.flickr.com/groups/2164527@N23/
Andrew Bouchard
Thanks for this series – my girlfriend and I are having a blast going through it together.
Here’s my set of images
http://www.flickr.com/photos/37767576@N02/sets/72157632651450663/
I’ll look at the Flickr group and try to add some comments, and I would appreciate any feedback on mine!
quietgraces
These are some great images and I can totally see an emerging style in the set. I’ll give you a touch of critique at naptime. 🙂 In the meantime, drop them in the group pool and you’ll probably get some critique before nap time in this house 🙂
Camera ISO: Free Beginner Photography ClassBeautiful Newborn and Lifestyle Portraits by Quiet Graces Photography
[…] tight, friends. Compared to January, February is going to be one intense month! We’re going to attempt to hammer down the […]
Aperture: Free Beginner Photography ClassBeautiful Newborn and Lifestyle Portraits by Quiet Graces Photography
[…] And by critique I don’t mean “Great job!” Really work a bit to use the Oreo Method we talked about in our first assignment. Tell them why it caught your eye, one area you would do […]
A Free Beginner Photography Class @ Beautiful Newborn and Lifestyle Portraits by Quiet Graces PhotographyBeautiful Newborn and Lifestyle Portraits by Quiet Graces Photography
[…] Photography Critique Assignment Link-Up […]