12
2013Program Mode: Beginner Photography Class
Last week we learned how our camera light meters are used to determine exposure in Auto, Aperture priority, and Shutter priority modes. We also learned that our camera’s light meters will fail miserably in the following situations:
- mostly light
- mostly dark
- scenes with a huge contrast ( very dark areas and very bright areas with very little mid tone areas).
Today we’re going to learn how Program mode can alleviate some of those difficulties without the stress of adjusting everything at once as if we were in Manual mode.
Program Mode
Program mode is pretty nifty. I personally think it would be extremely useful not only in the 3 situations above, but also if you’re photographing fast moving toddlers/kids who won’t stand still while you fiddle with settings (but are staying in the same basic lighting). Oh, and I wish the wedding I had shot (my first… and likely my last), I would have set program mode at each distinct lighting situation so I wouldn’t have been so stressed out trying to change my settings quickly in manual. Program mode is a great place to warm up to learning full manual mode.
What does Program Mode let you Control?
Program mode turns off the flash (unless you manually turn it on) lets you change Aperture or Shutter Speed, ISO, Metering Mode (which we talked about last week), White Balance, and Exposure Value. However, in program mode your camera’s light meter is still doing the main job of setting exposure. The difference in program mode is that you’re telling the light meter the exposure you want to be set.
Aperture and Shutter Speed in Program Mode
You can change aperture and shutter speed through the use of your adjustment dial in this mode. However, you can’t change them independently. So if you want an aperture of f/22 and a shutter speed of over 1/300th, you’ll need to shoot in manual. However, if you just want to specifically change one variable or the other, almost as if you were in aperture or shutter priority mode, you can do that. The important thing to remember in Program Mode is to focus on which value (aperture or shutter speed) will help you create the image you want.
ISO in Program Mode
If you can’t change your ISO in Auto, but still want the freedom of turning off your flash and changing ISO then Program mode may become your favorite ‘lazy’ mode. Just like aperture and shutter priority you can change your ISO.
Metering Mode in Program Mode
Just like we learned last week, you can change your metering mode while in Program Mode. However, you’ll find that your multi-segmented mode (or normal metering mode) will typically be fine in Program mode because you’ll be changing the exposure value to fit the situation.
The one exception is in the situation where your image has both very bright and very dark spots with little to no mid tones; in that situation you’ll want to use your center-weighted or spot metering mode to help the camera pick whether you’d like it to meter for the light or dark section of an image. You’ll never be able to light meter/expose for both the light and dark sections in a super contrasted scene so you will always have to choose one. Your camera can’t capture the world the way they eye sees it and this is one of those areas of limitation.
The only way to capture a very high contrast scene is using a a multiple exposure technique that is then combined either in camera (some pro level cameras have this feature) or in photo editing software. This technique is called High Dynamic Range (HDR) photography. We’ll touch on this again later in our class so for now HDR is trivia knowledge.
White Balance in Program Mode
White Balance lets you change the way your camera meters color in a scene. It tailors your exposure for your specific lighting situation. This is going to be the topic for next week’s class because it’s not quite as revolutionary as exposure value 😉
Program Mode’s Main Perk: Changing Exposure Value
Up until this point, your camera has chosen your exposure value. You have no say in exposure value unless you’re in Program or Manual Mode. Since we’re going to do one more technical lesson in white balance and then move on to creative storytelling with your images for a few weeks before learning to shoot in full manual mode, I really want you to focus on this idea.
What is Exposure Value?
Exposure is measured in stops. All three areas of the exposure triangle let in or close down a ‘stop’ of light as you change a variable. We’ll go into more detail about these stops when we tackle full manual. For now I’ll keep in very basic, but I wanted you to know the word stop because I’m about to use it in describing exposure value.
Your camera light meter in Auto/A/S always exposes images with a exposure value of zero. If you’ve ever shot in manual, this is what my Father in Law (and many others) refer to as “getting rid of the blinkie lights”. But if we’re spending our time getting our exposure value to zero when shooting in Program or Manual, we may as well be shooting in Auto/A/S because we’re doing exactly what the camera would have done!
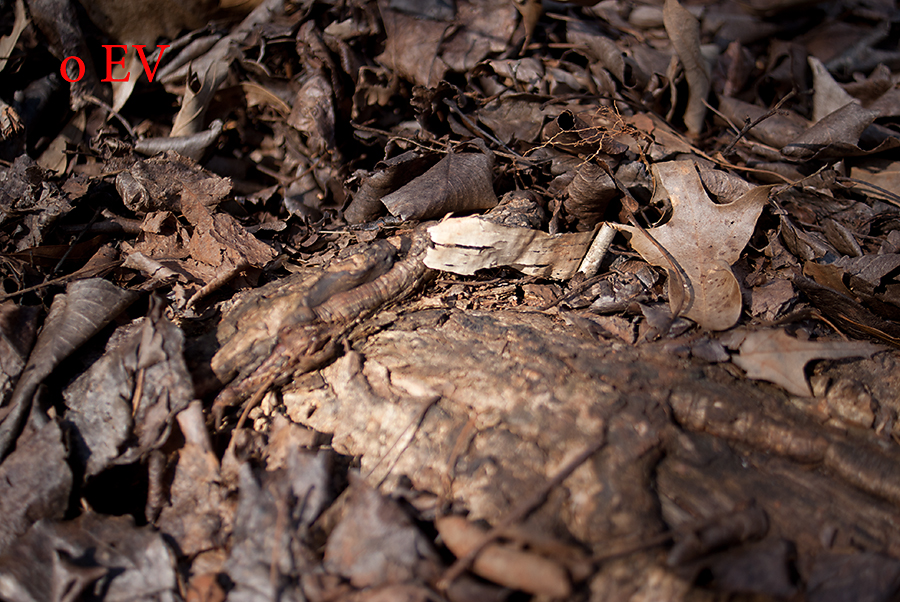
So lets make this visual. Here’s my camera exposure value menu at “0” or what the camera shoots in Auto/A/S.
Here is the resulting image at the exposure value of 0
Here’s my camera exposure value menu at +1 (or one stop over exposed).
Here is the resulting image at the exposure value of +1 Stop
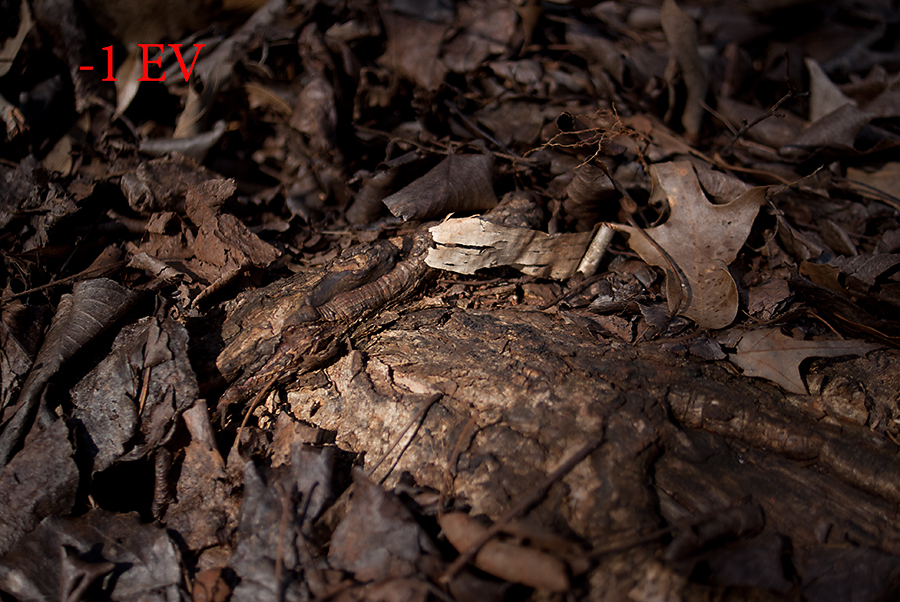
Here’s my camera exposure value menu at -1 (or one stop under exposed).
Here is the resulting image at the exposure value of -1 Stop
In this particular scene an exposure value of 0 (or what your light meter says is perfect), is closest to what my eye saw before taking the photograph.
Why would I want to Change the Exposure Value?
Remember that bright high key beach scene that came out too dark at the auto setting of 0? Set your exposure to +1 and it might look right. If that looks too bright you can always close down to +.03 or +.07.
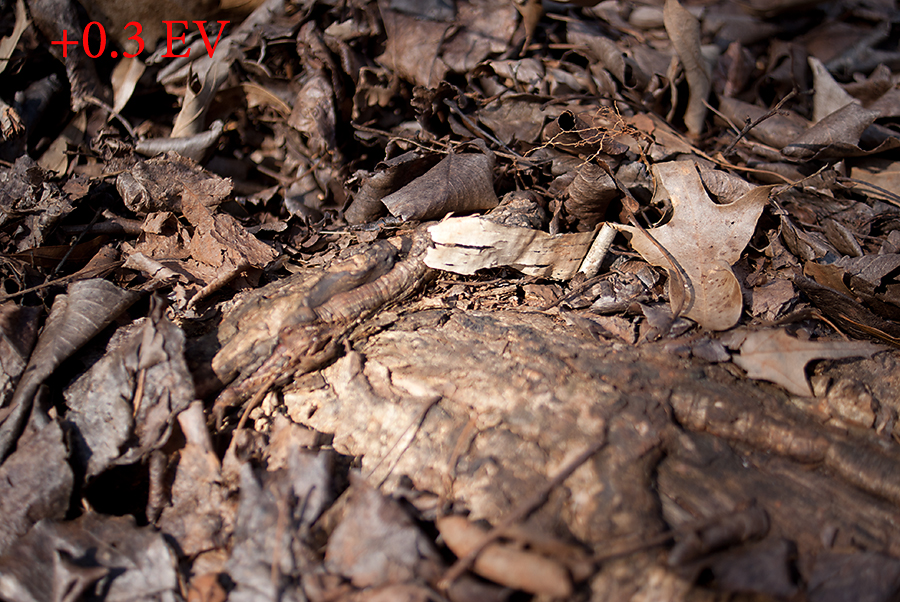
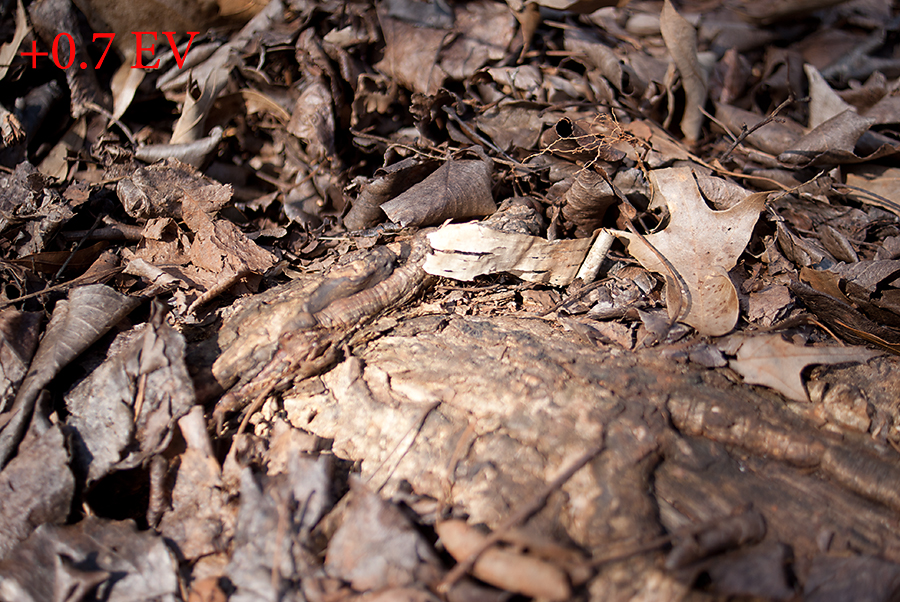
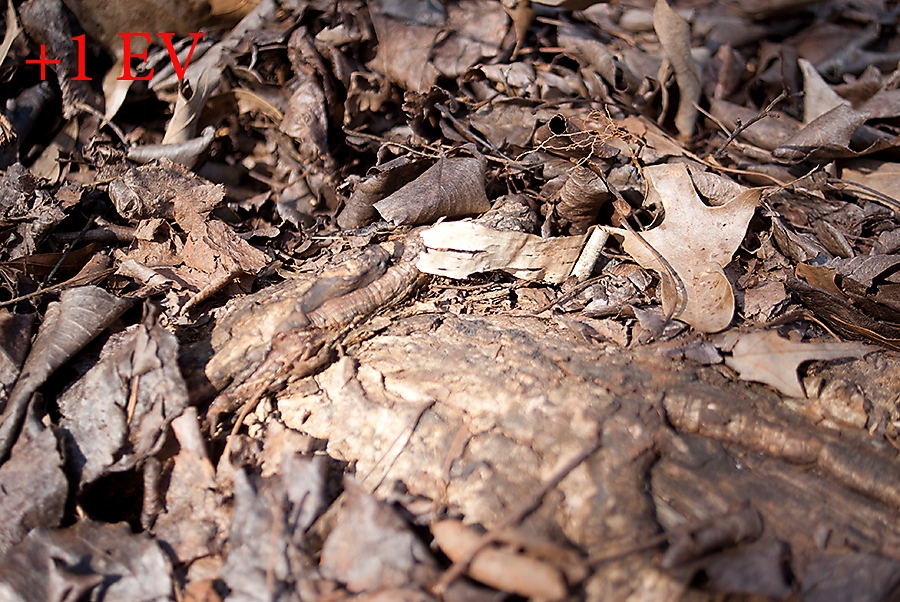
Here’s a series of images with a really large portion of the photo that should be white at a different exposure values.
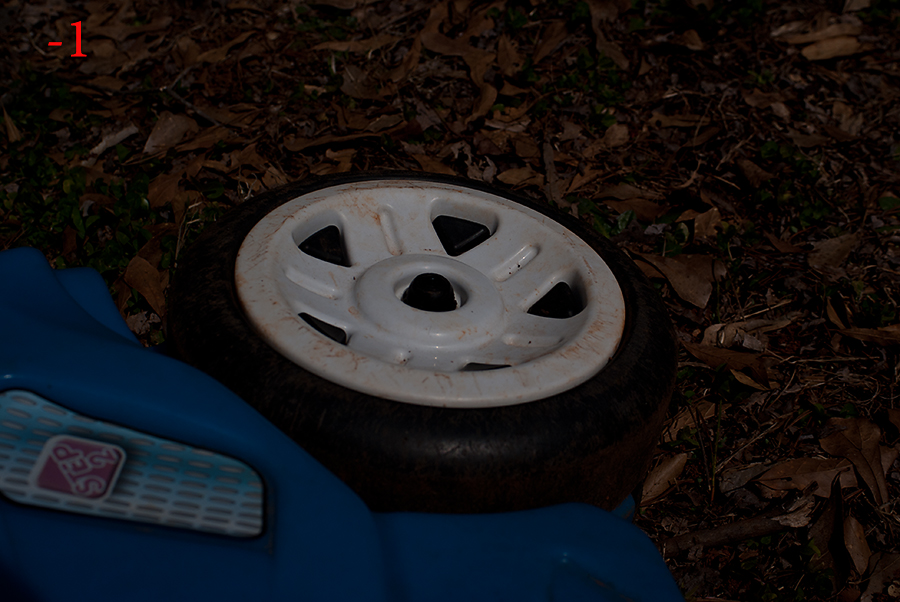
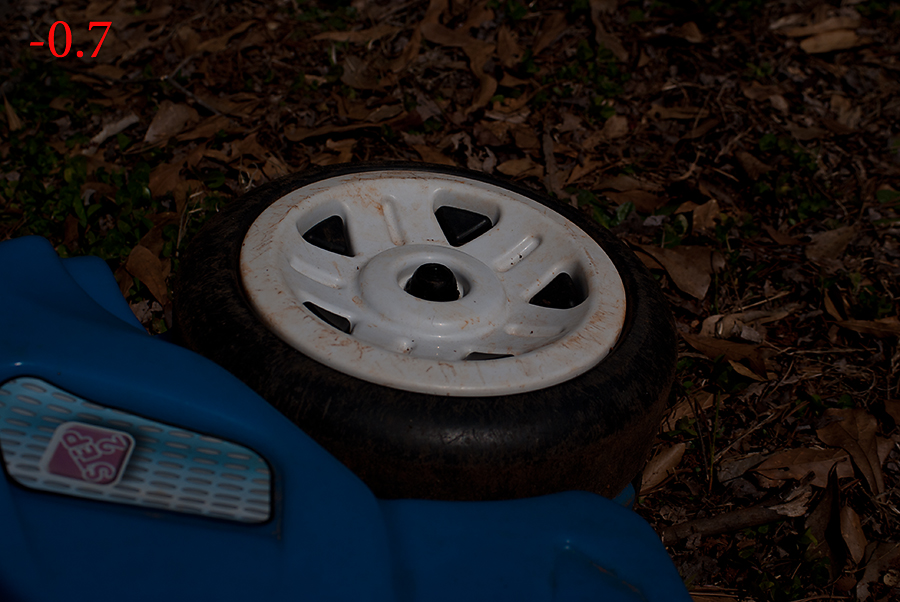
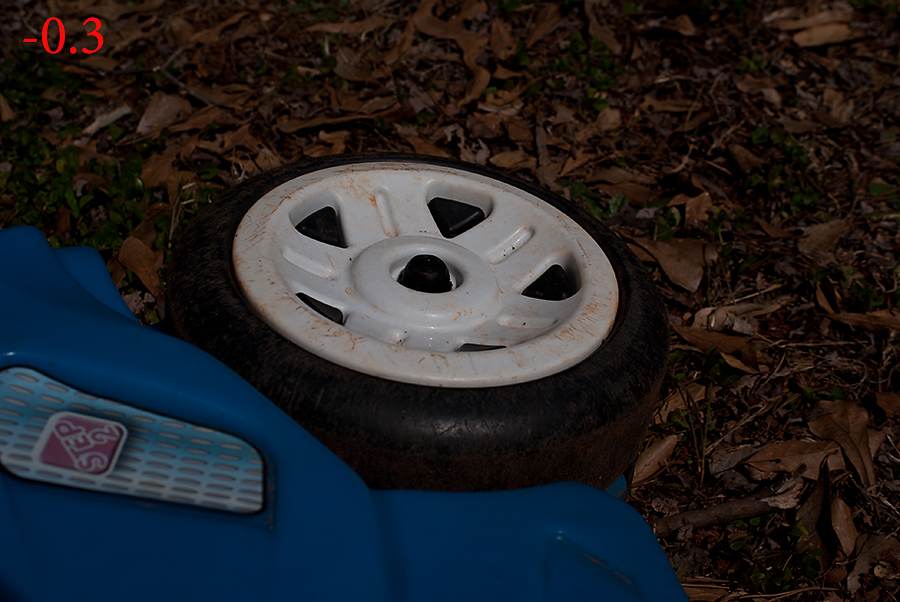

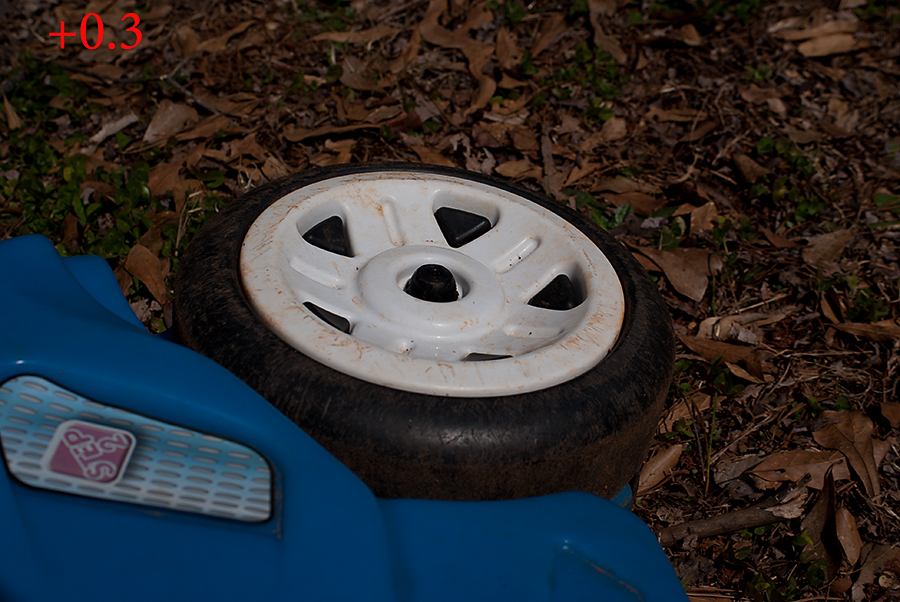

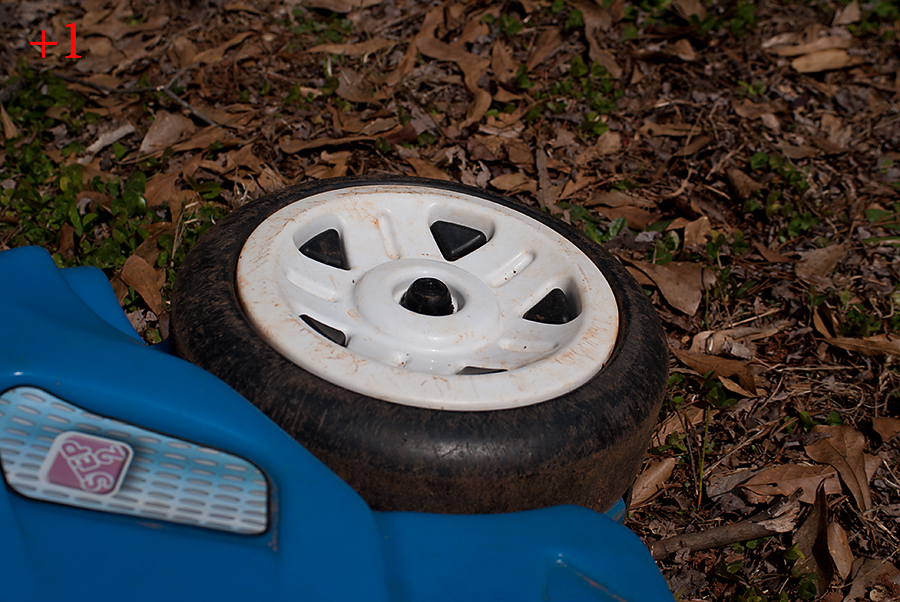
+1 is the best exposure for the white hub cap. If I had left my camera to set the exposure, this white hub cap would have been a dingy grey.
Remember the dark low key deep shade scene that came out too bright at the auto setting of 0? Set your exposure to -1 and it might look right. If that looks too bright you can always open up to -.03 or -.07.
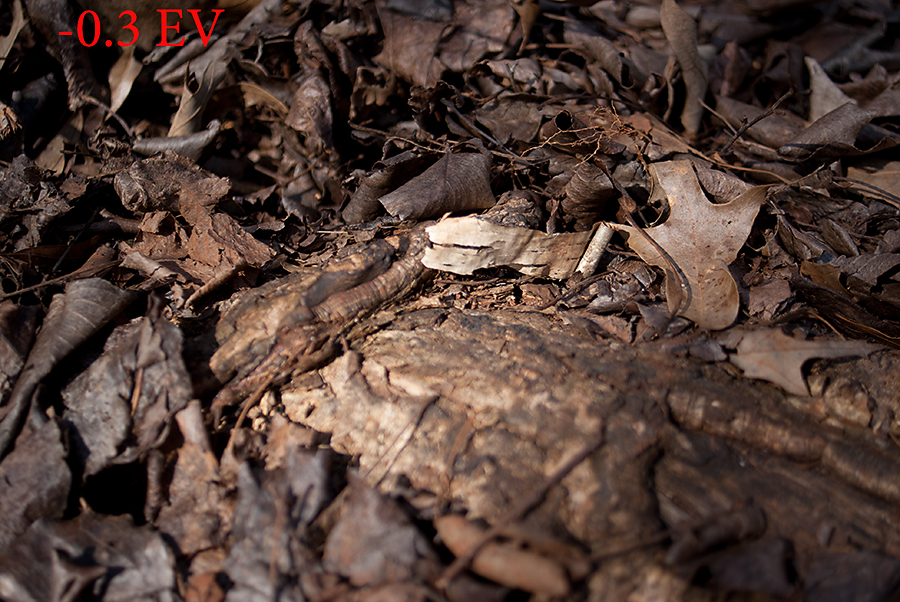
Here’s a series of low key images at a different exposure values.
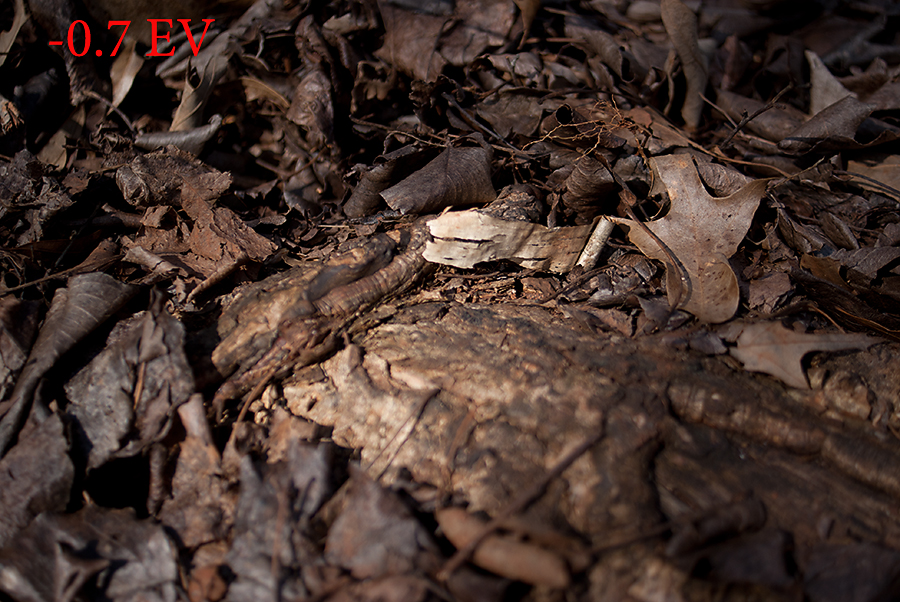
-0.7 is closest to what my eye saw. However, that may not be the one I like best. Sometimes the photographers vision isn’t to present reality 😉
With our awkward scene with lots of light in some places and none in others we can use a spot meter mode to pick what portion of the scene we want to be closest to the camera’s goal of a midtone at 18% grey. Or we can simply take the series of images at different exposure values and see which turns out best.
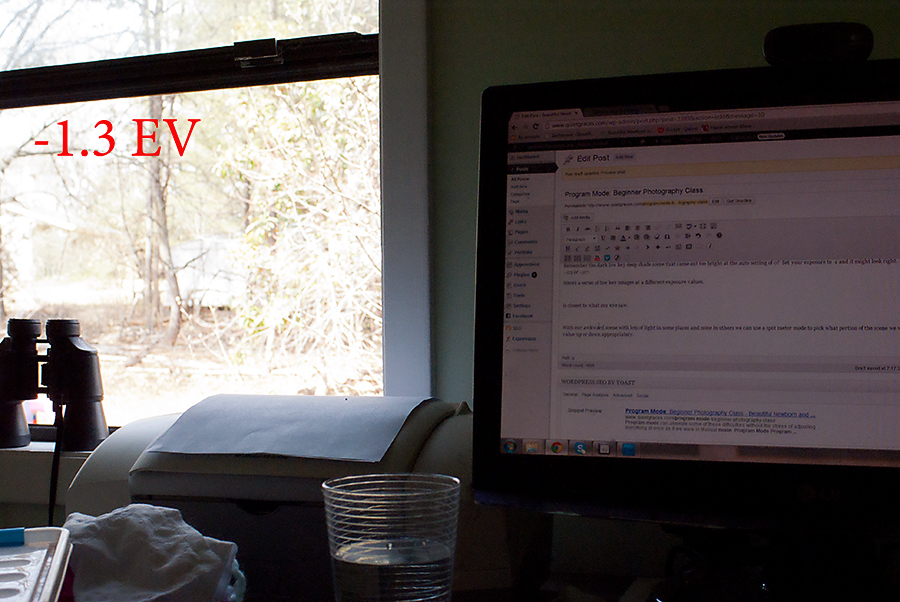
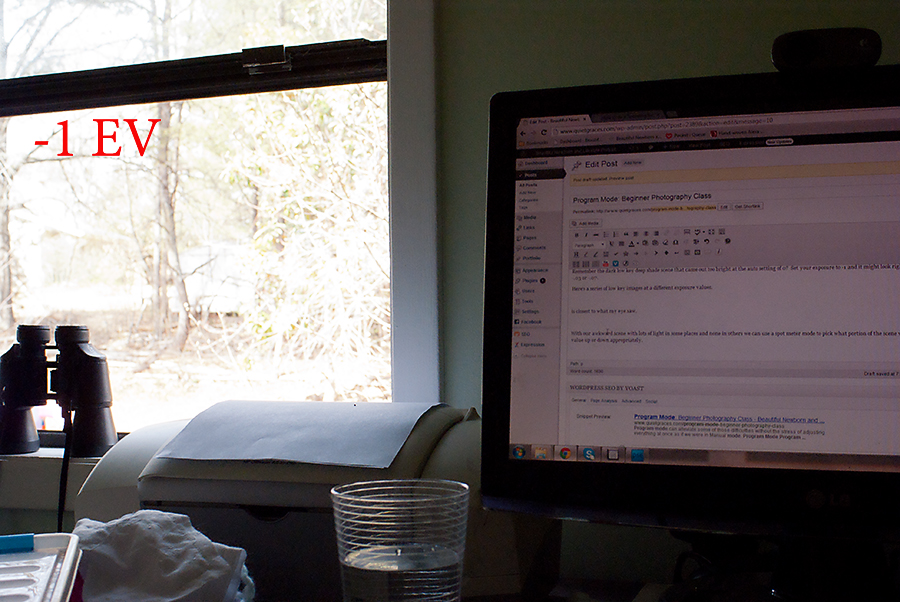
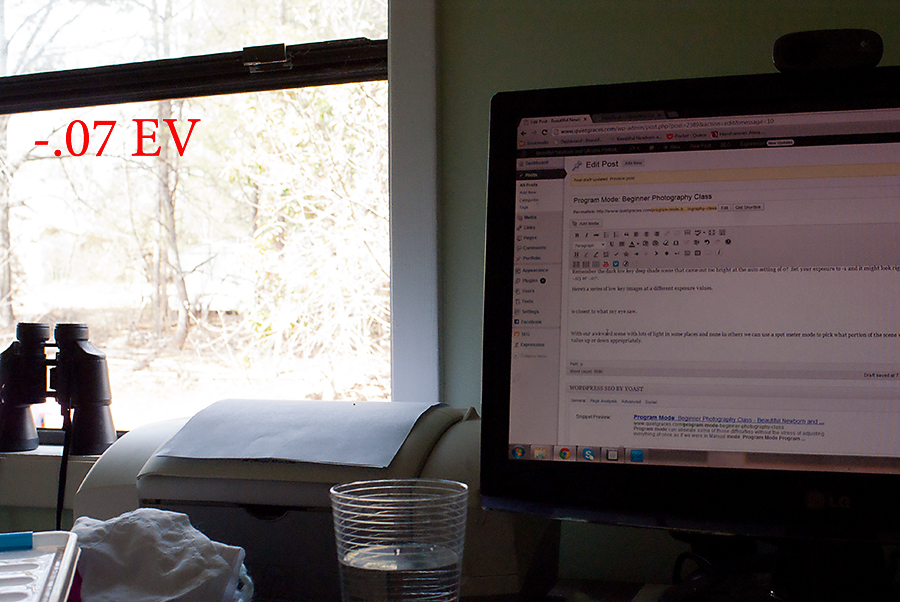
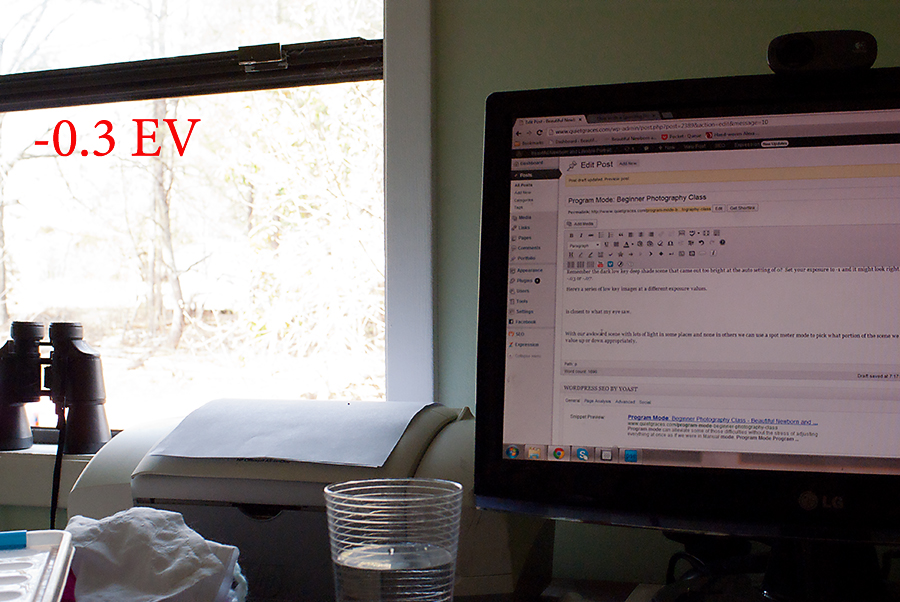
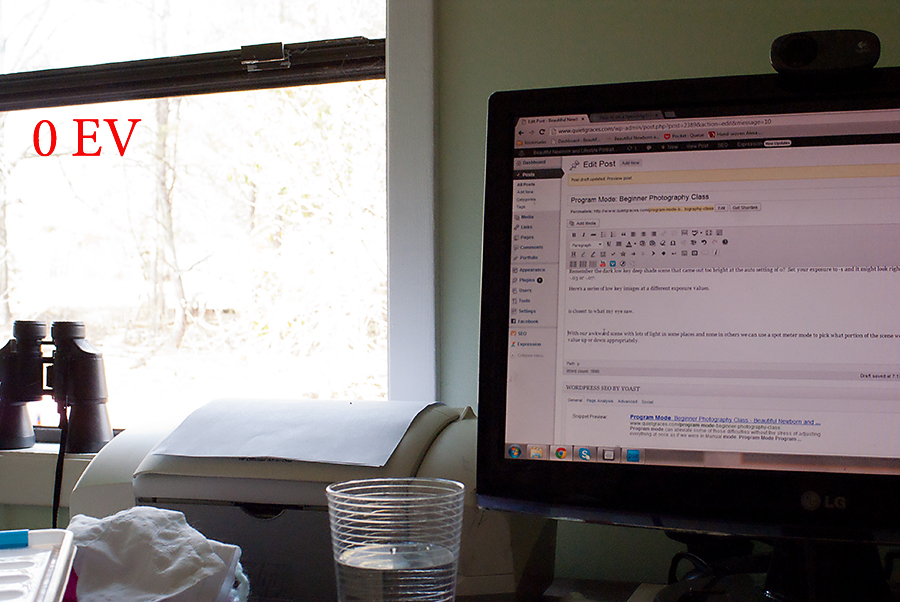
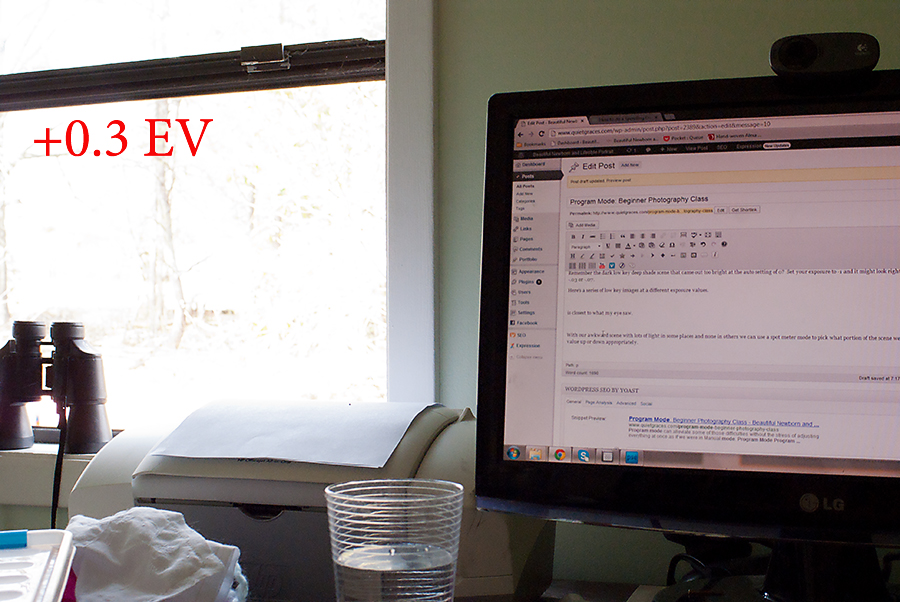
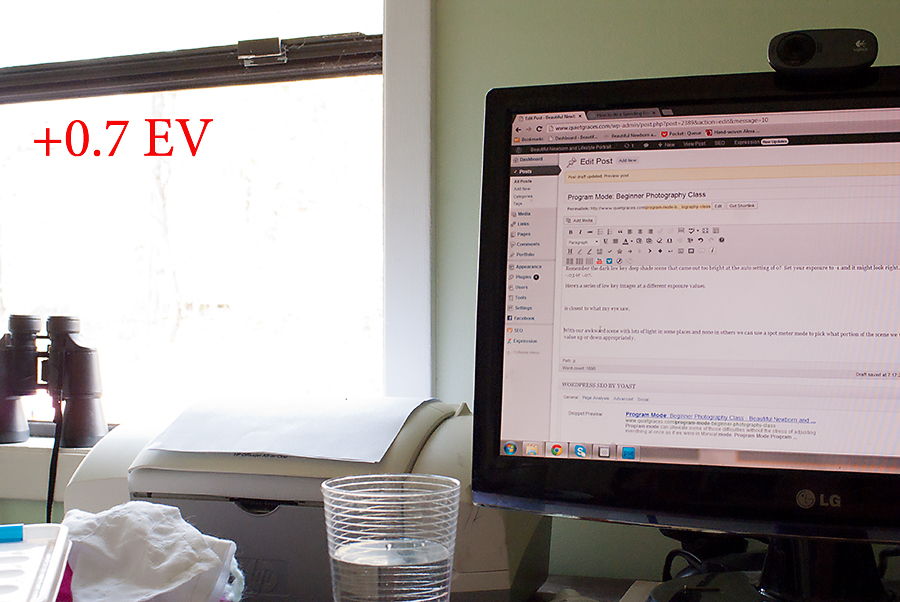
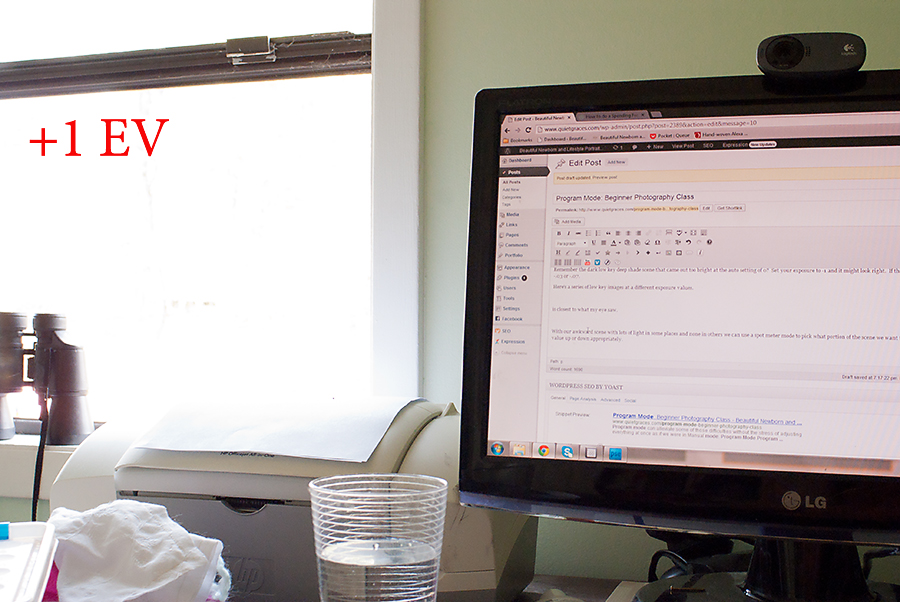
As you can see the light between my cluttered indoor room and the window next to my desk is very different. The exposure for the computer screen is best at +1 (where you can read that I’m working on this very post), but the exposure for the world outside my window doesn’t begin to look right until at least -1.3 and would likely need at least -2 before you could see real detail out of the window.
Changing Exposure Value in Program Mode on your Camera
We’re back to diving in our manuals… but the good news is both Point and Shoot users and DSLR users will probably be able to change their exposure value (even if your camera doesn’t have program mode).
Program Mode on a Point and Shoot
I don’t have Program Mode on my phone camera. But I am able to change both white balance and exposure value on their own. Here’s my drop down menu screen shot to change exposure value.
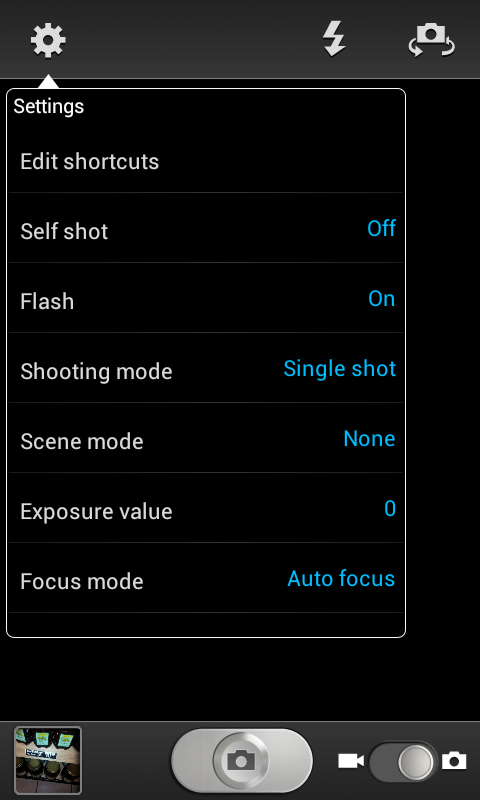
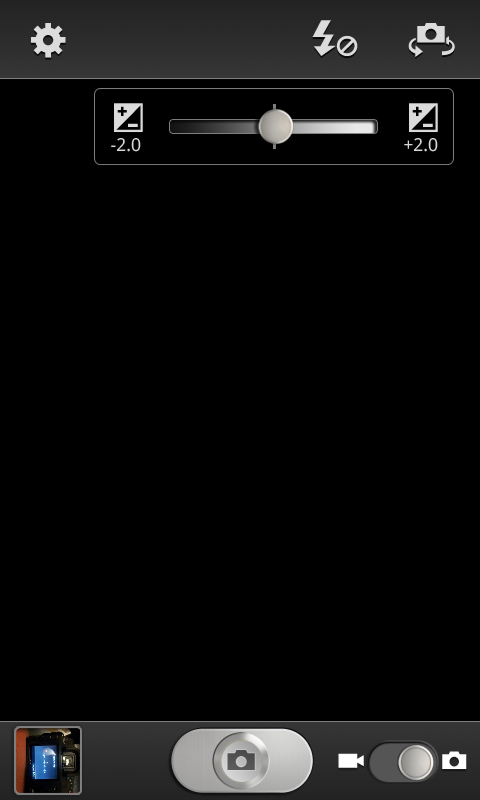
Your Point and Shoot may or may not have an option for that. Dig out that by now dog eared manual and find out how.
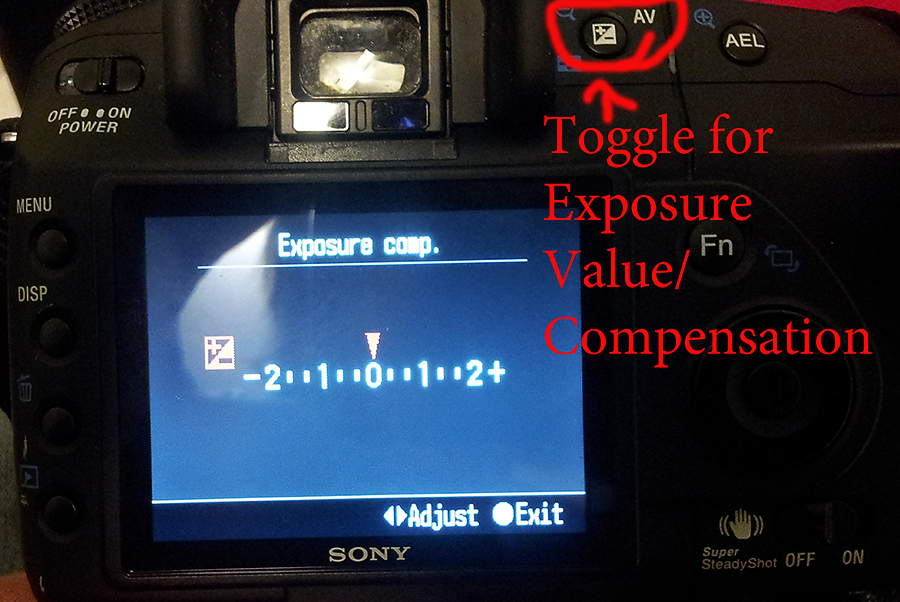
Program Mode on a DSLR/DSLT
So you’ll start by switching the dial to Program Mode. Your adjustment dial will change your aperture and shutter speed together when toggled. Remember choose which one is more important to your image! You can change metering mode (if needed for a very high contrast scene) the same way you changed it last week. And next week we’ll learn how to change the white balance.
Changing exposure value (or my camera calls it exposure compensation… which might be a more universal term for this scale) is where you’ll have to reference the good old manual. My camera has a button circled below with a +/- sign on it. Yours is likely to look the same.
Program Mode Assignment
For all of the following images, post the one that you think looks the best in the Flickr group. This choice is a lot of subjective personal taste, but this is where you truly begin to harness the technical side of the camera to your creative vision.
You’re going to shoot the following scenes at -1,-0.7,-0.3,0,+0.3,+0.7, and +1 on the exposure value scale. If you still don’t like your image your can go farther on either end of the scale. I don’t recommend human or moving subjects for these series 🙂
You’re going to find that you prefer one stop over the rest for most situations. You may find that one exposure value stop works best for bright scenes and one works best for darker ones. I shoot almost all things at +0.7, because I lightly colored images. My one excpetion is shooting in the studio on a black background where I hover between -0.3 and -0.7. However this will vary from camera to camera as well as personal preference. Your camera may look terrible at +0.7 and you may hate brighter images. So be it 🙂 Like me, once you switch to program/manual mode, you’ll discover that you have a distinct preference on the exposure value scale for your images. Find what you like most (and feel free to change it up sometimes!).
- The same stop series in an average light scent.
- The same stop series of a very bright scene.
- The same stop series of a very dark scene.
- The same stop series of a scene that is very contrasted with mostly light and dark tones with very little mid-tones. On this one share both the image with the best exposure for the light part of the image and the best exposure for the dark part of them image. And let us know which of these two images you like the best!

Photography Exposure Stops {Free Beginnger Photography Class}Beautiful Newborn and Lifestyle Portraits by Quiet Graces Photography
[…] talked about stops just a little bit when we explored exposure value/compensation in this post on Program Mode. Remember how the assignment was to shoot a few things at -1, -2/3, -1/3, 0, +1/3, +2/3, +1 to […]