11
2013Using your Camera in Manual Mode: Exposure Triangle {Free Beginner Photography Class}
If you’ve been shooting in Program Mode for the last month+, the good news is that the jump to Manual Mode isn’t going to be so scary.
You’ve already been thinking the following things that you’ll also be asking in Manual Mode:
- Do I need to focus more on my Aperture or my Shutter Speed for this image?
- Do I need my ISO to be very high to compensate for lack of light or can I leave it low because it’s bright and sunny?
- Is this a very bright scene where I need to lower my exposure compensation to capture the brightness that I want?
- Is this a very dark scene where I will need to increase my exposure compensation to capture the brightness I want?
- What is the most important thing in this image that I should meter from?
So how does Program Mode Differ from Manual Mode?
Program Mode is still an automatic mode. The camera is still metering for the image and setting the exposures for you even if you have engaged exposure compensation. That’s not necessarily a bad thing. Program Mode is beautiful for weddings and parties where you can’t miss the shot and can set it each time your light changes. It’s also wonderful for a studio situation where you know your light and backdrop well and want to spend more time posing. And it’s also a wonderful bridge between the Auto Modes and Manual mode precisely because it makes you think like you’re in Manual Mode. And, honestly, if you shoot in program mode for the rest of your camera using life, you’re still way ahead of the average camera user.
So you might be asking, why switch to Manual Mode at all?
That’s a good question. And it’s not one that I can really answer. If you end up choosing program mode as your primary mode, then I won’t judge you (sometimes I choose Program, too). Because honestly, you’ll still be making all the creative decisions just as if you were shooting manual mode, your camera is simply filling in all the blanks.
However, I think the real benefit of shooting manual mode (even if only for a season) is that the photographer is forced to think about every relationship in the Exposure Triangle and decide whether changing one part will create the image they want. So I’m going to encourage all of you to give this a try for a few weeks.
Now let me warn you, switching from Program to Manual is going to be frustrating mainly because it takes so much more thinking and adjusting time before you press the shutter release. Where in Program mode you could adjust one thing (ISO, Aperture, Shutter Speed, or your Exposure Compensation) and let the camera do the rest, in Manual mode you’ll be doing all of that adjusting with your own fingers before each shot or series of shots. So I suggest that we practice the first week of manual mode with still life or landscapes so we’re not kicking ourselves for missing “the shot” with moving subjects.
What is the Exposure Triangle?
The Exposure Triangle is the key concept for shooting in Manual Mode.
If you’ve stuck with this class for the first half so far than you already know all of the parts of the Exposure Triangle: ISO, Shutter Speed, and Aperture. However, because we’ve let the camera pick at least one of the triangle points even shooting in Program Mode, we haven’t had really had to think about all of the ramifications of changing one point.
So first let’s review the three points on the Exposure Triangle and the key questions we need to ask ourselves before changing one. And (surprise!) my graphic skills are slightly better this time around. Look at how much you guys are growing me!

Relationship of the Three Points on the Exposure Triangle
Once we have the perfect exposure set, if we change one of the points of the Exposure Triangle we will have to change at least one other point to compensate. For example, if my current perfect exposure for the scene is 1/60 second, f/5.6, ISO 100 and I want to photograph a running toddler, I should quickly realize that 1/60 is not fast enough to freeze the toddler’s motion. So I’ll change shutter speed to at least 1/100 of a second to freeze the motion. But once I’ve changed that, I’m either going to need to adjust the aperture or the ISO an equal number of stops or I’ll have to adjust both aperture and ISO to a number of stops that together equal the number of stops that I changed the shutter speed.
Confusing, huh? We’ll talk about specific stops and the more mathematical side of the Exposure Triangle next week, but this week I want to give you an idea of how changing one point on the exposure triangle is going to affect the other points on the triangle. The following is a series of graphics to help us understand these changes.
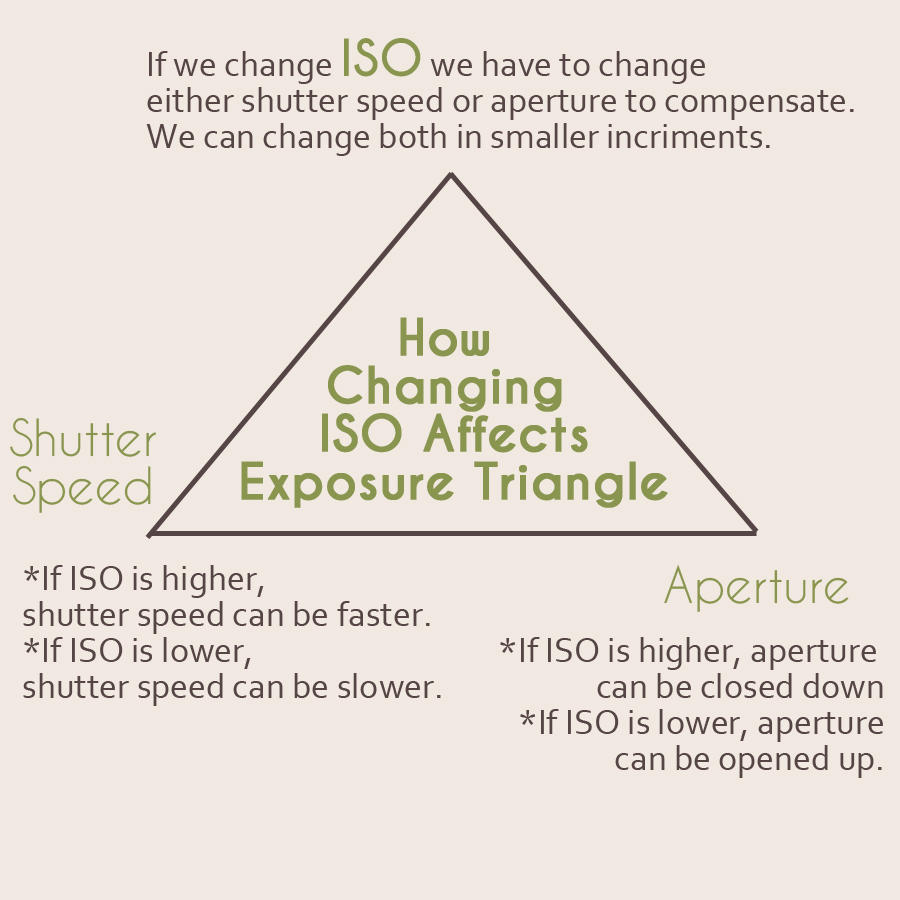
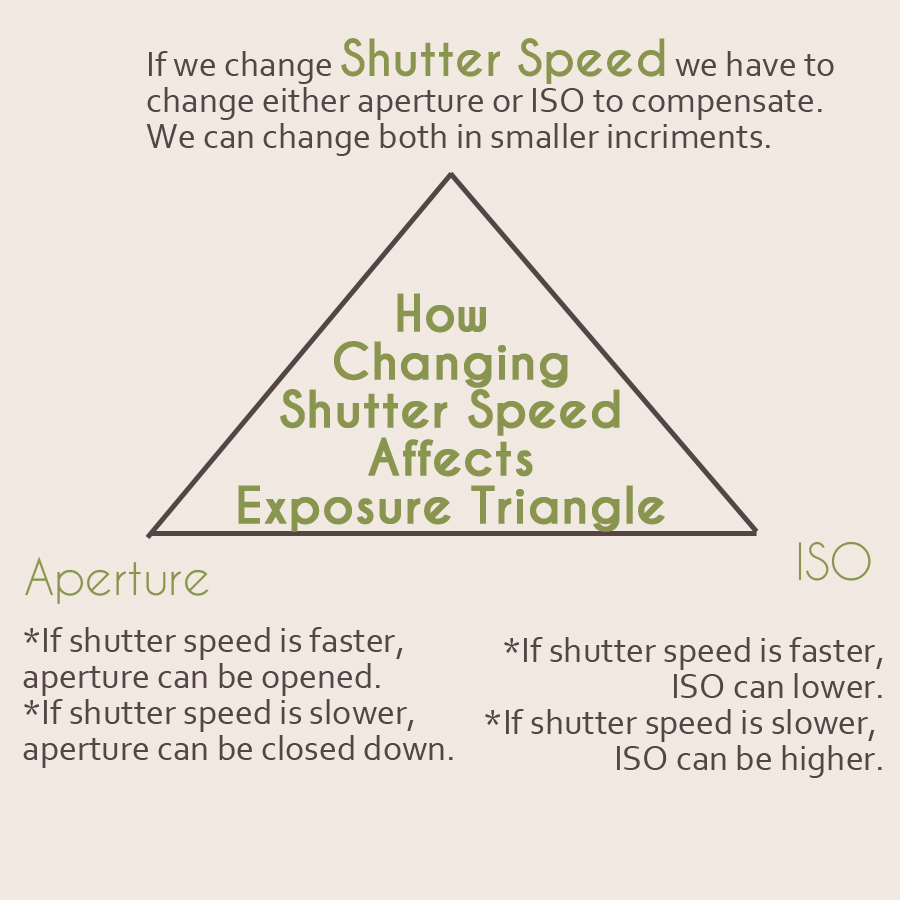
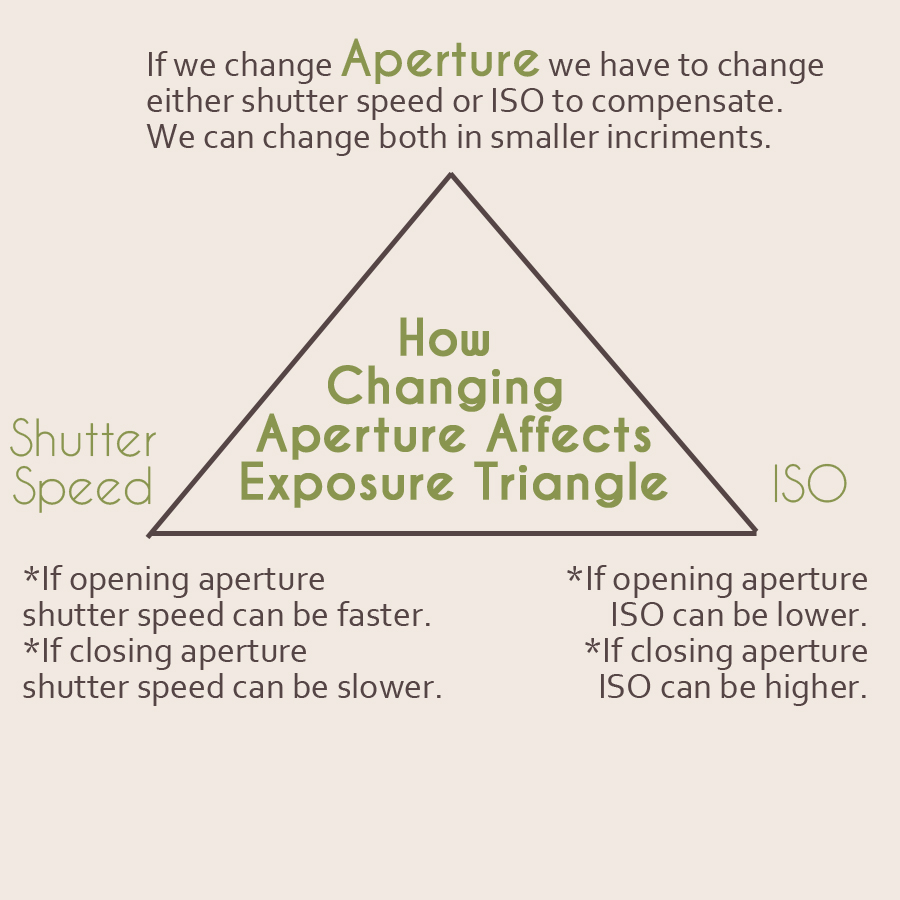
Hopefully those graphics are helpful as we learn Manual Mode. If you’d like to print a copy of these graphics, here is an Exposure Triangle Printable.
So How Do I use Manual Mode?
Whew! So that was a lot of theoretical head knowledge up there. And we’re really just starting to think about it rather than truly diving into what it means. So really this section is your challenge to read your camera manual! You’re going to have to pick up your camera manual and figure out what your adjustment dial (or dials) will do once you switch it over to manual mode. For instance, the dial on the front of my camera changes shutter speed and the one on the back of my camera changes aperture in manual mode. If I hold down the AEL button, then I can change both aperture and shutter speed together with one dial and the camera will calculate the stops for me!
Now for your pretty easy assignment.
Manual Mode Assignment #1
- Read that Camera Manual and figure out the mechanics of Manual Mode (how to use adjustment dials, where your exposure scale will appear, which button to hold down to adjust aperture and shutter speed at the same time.
- Go out and practice manipulating all points of the exposure triangle on 1-3 images.
- Here’s a rough process for these images: Set the ISO for your scene then fiddle with shutter speed/aperture according to your composition needs until your exposure scale shows that you’ve set the correct exposure for your metering mode. Take the shot. Decide whether you like the exposure on 0 and if not fiddle with moving the exposure up or down to +1 or -1.
- Don’t expect miracles this week. Your goal should simply be to understand the mechanics of shooting in Manual Mode.
- If you want to just shift your camera back to Program or one of the other Auto Modes, resist (unless you’re shooting something important like a birthday or other irreplaceable memories). Keep practicing.
That’s it for this week. If you have any specific questions about Manual Mode, get those written down in the comment section so I can address them in upcoming posts. This week is meant to be sort of a rough introduction and the assignment goes along with that. Next week we’ll cover the mathematics to get a better feel for the relationships within the exposure triangle. Don’t worry… I’m not very mathematical so it’ll be pretty easy to understand. 🙂
