12
2013Shutter Speed: Beginner Photography Class
Okay so we’ve tackled one of two harder points of the exposure triangle, now let’s hit the easiest: shutter speed. I promise this concept is so much easier to understand than ISO. Plus you won’t have to deal with any crazy family skin tone metaphors. Ahem. But first lets have a look at some of the results from our Camera ISO assignment!
Camera ISO Assignment Recap
Not many of the participants were able to get their images in the Flickr pool in this one week assignment period. If you didn’t get your assignment in “on time” (or are joining the class late), feel free to add it to the pool for constructive criticism when you finish.
Image 1: A subject in bright sun around noon.

Amber tried to capture the glory inherent in ice crystals on a branch in full sun. ISO 400. She used a higher ISO here even in the shade because of the reflection of all the white snow.
Image 2: A subject in bright sun, but located in the shade (under a tree, in a shadow, etc)

Chickadee by Andrew. ISO 1250 taken in the shade. He’s a cute little birdie.
Image 3: A subject inside the house in the evening or in an area of the house where light is limited.
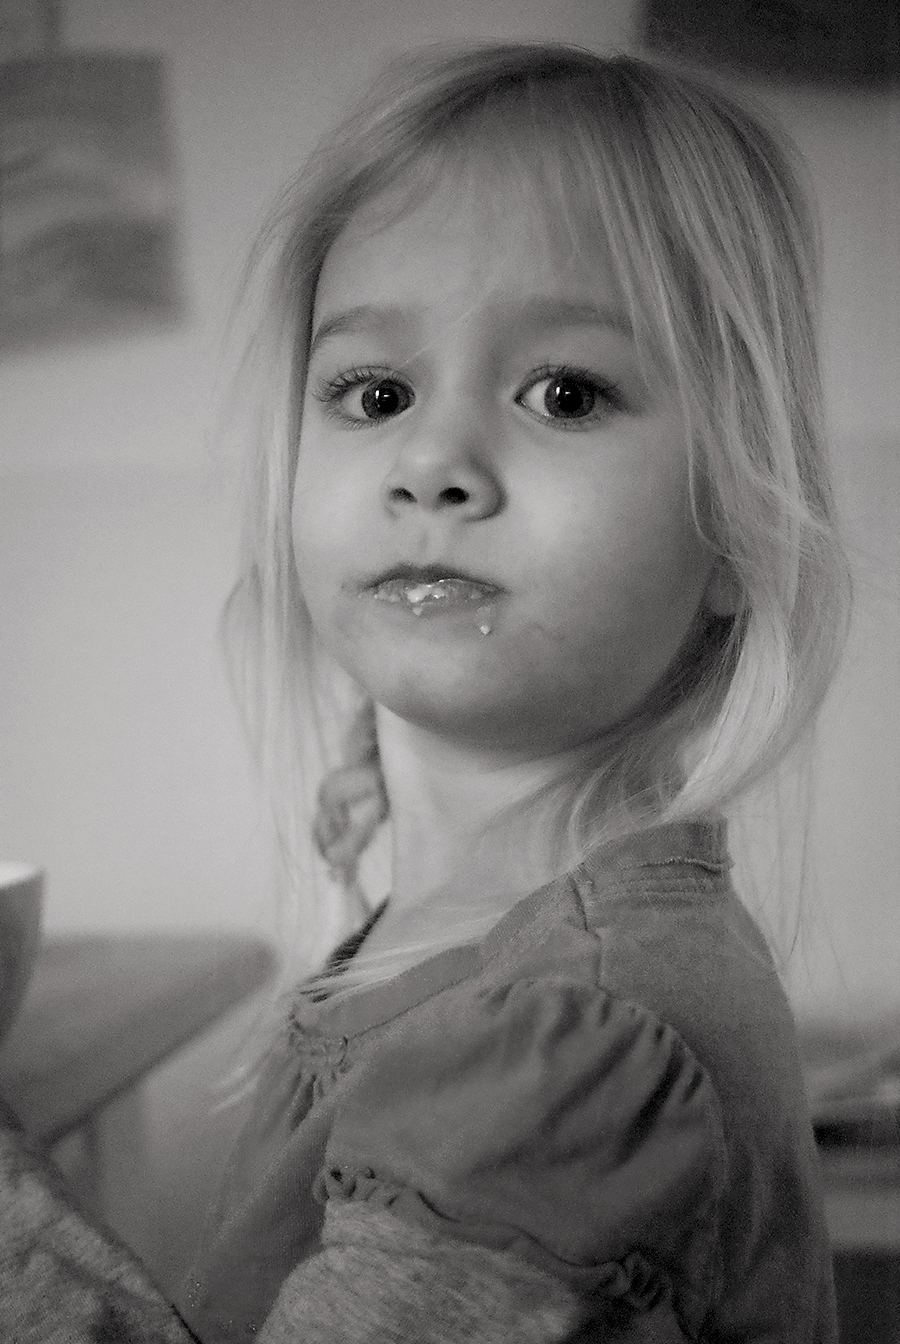
My daughter Aeralind in low natural light coming from a window early in the morning on a rainy day. She hasn’t been receptive to having her photo taken recently so this is a rare treat! ISO 3200
Image 4: A subject outside shortly after the sun has set or if you’re feeling brave loooong after the sun set.

My favorite from this assignment is from Amber who says “I do not know how to use any settings on my camera other than auto and the setting that is currently being covered in the class.” Well, just telling her to change her ISO and point it at the sky and she created this great image! Do you see the airplane! So cool! ISO 3200
Shutter Speed: Definition
Time to jump into this week’s lesson.
Shutter speed: The amount of time your camera’s sensor (or film) is exposed to light. It’s called shutter speed because time it is the rate at which the shutter is moved from covering our sensor. Also known as exposure time.
Yep, that’s it… pretty simple, eh?
What does Shutter Speed Do?
Simply said: it lets the light in for a set amount of time. However, which shutter speed you will use for a situation depends on a few variables outside of the exposure triangle: creative vision, the amount of light in the scene, and whether you want to freeze or capture motion.
What Shutter Speed Should I Use?
Shutter speed can be fast. Anything from 1/250 to 1/4000 of a second (and maybe higher) is a fast shutter speed. Generally, you want to use a faster shutter speed when capturing something that is moving pretty quickly. A car, a ferris wheel, an athlete, a wild animal. or a toddler/preschooler all require a pretty fast shutter speed. Use a faster shutter speed if you want to freeze your subject’s action (or in a bright light situation where it’s required).
Shutter speed can just be sort of right down the middle between 1/60-1/250 of a second. This is a pretty all purpose type range. Most images you take are probably in this range. This shutter speed is fast enough to freeze most movement. It’s perfect for still life, portraits of most ages (except for toddlers or other fast movers), nature photography and most hand held uses. However, your middle shutter speed should always be slightly faster than your lens length to avoid camera shake. For example, if I’m using a 50mm lens (or have my zoom lens set around that range), I need to keep my shutter speed above 1/50. If I switch to a longer lens of 100mm, then I need to keep my shutter speed above 1/100 to avoid camera shake. Use a mid range shutter speed in most normal situations.
Shutter speed can be slow. Generally anything from 1/60 of a second to hours and hours and hours is a slow shutter speed. Slow shutter speeds are great for capturing low light situations like sunrise, sunset, slow moving people around a bonfire, and stars. But they’re also good for capturing motion as it occurs rather than freezing a moment in time. I’ll give you a visual for this in the following section. Slow shutter speeds require either a tripod or a good flat surface to brace your camera on. Use a slow shutter speed (and a tripod) to capture low light situations or motion as it’s occurring.
How to Change Shutter Speed on Your Camera
Once again DSLR users are going to have an slightly easier time with this than those using a Point and Shoot. However, just like last week there are ways to trick your camera into using a faster or slower shutter speed. Both Camera Type users are going to have to consult their manuals. By the time we’ve finished this class, you might think of your camera manual as a dear friend. You can thank me for that… or you can hate me for it. I’m okay with either :-p
Digital Point and Shoot
I don’t want those of you using a point and shoot to be discouraged by this month. You can take great pictures. This month is focused on getting the DSLR users to be able to shoot in manual. Some of your point and shoot cameras will allow that while others will not. Yes, you’ll be doing a fair bit of manual reading (but not as much as the DSLR users). By the end of this month you’ll understand all the variables in the exposure triangle and hopefully be able to manipulate the one you’d most like to change for your image. But hang with me and don’t get frustrated. I’m telling you this now because the next two assignments are likely to be the most frustrating for you. 🙂 The months following this one will be more composition/capturing the moment/post processing type things that every camera type can manage.
That said, let’s look at how you can manipulate the shutter speed using scene modes (or similar on your camera). I kept my promise and this week you get screen shots rather than pictures of my dusty and grimy phone point and shoot. Woohoo! Oh, and don’t forget to turn off your flash! (Mine is still on in this picture from capturing a shot of Sedryn sleeping in my bed in a near dark room on night mode… yep… that image required flash to be even close to exposed!)
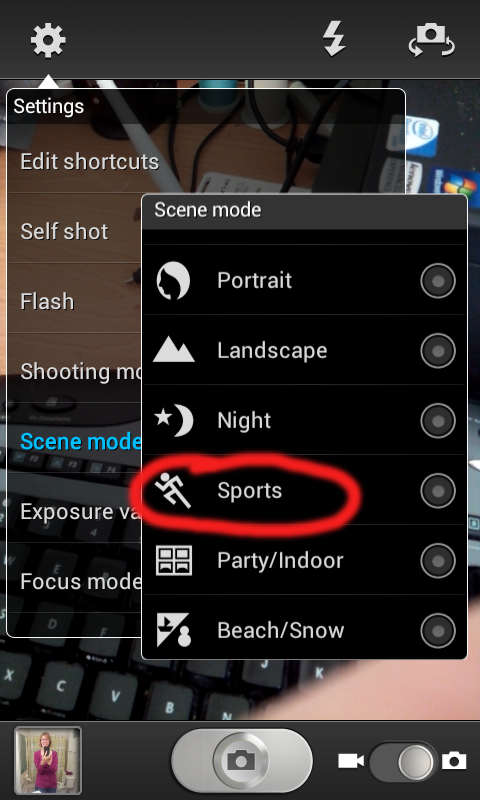
Pick Sport for a Faster Shutter Speed
The scene mode to pick for a fast shutter speed is Sport. Regardless of your camera type this almost always has this running man icon. It’s pretty much your only option for a fast shutter speed. Toddlers require Sport mode. 😉
For slow shutter speeds on my phone there are a variety of modes to choose. The universal mode that all point and shoots will have is the Night mode with the moon and star icons. My phone also has Candlelight, Dusk, Dawn, and Party/Indoor. You’ll need to experiment a bit to see which mode works best for what you’re capturing.
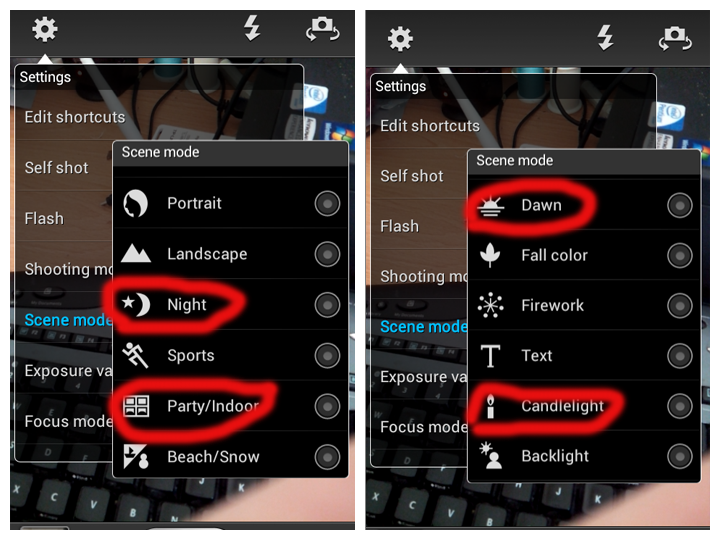
Night, Party/Indoor (with flash turned off), Dusk (not pictured), Dawn, and Candlelight will all produce slower shutter speeds on my point and shoot.
Digital SLR
You’re going to start by switching your dial into S (Shutter Speed Priority) mode. Then you’re going to have to crack open your manual and figure out which other dial changes your shutter speed. It’s an adjustment dial like mine circled below.
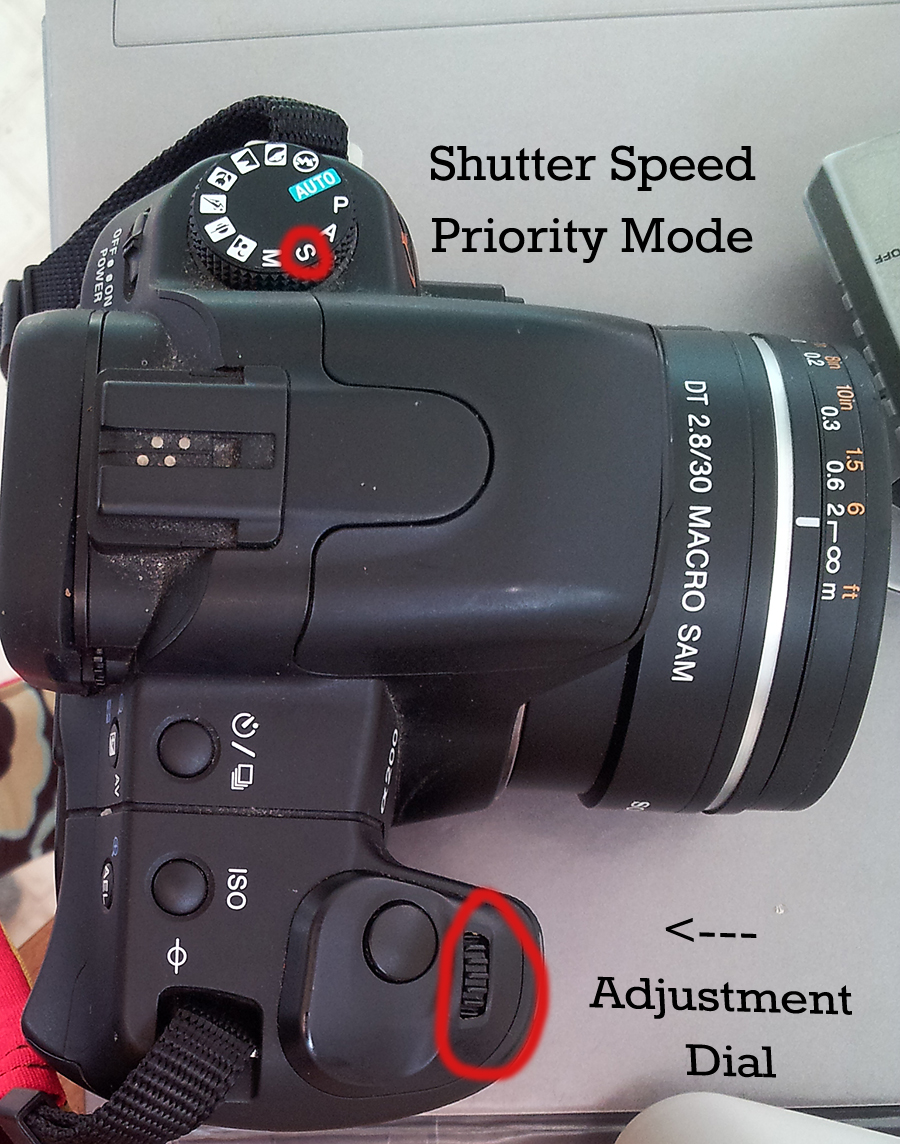
Once you’ve put it in S mode and found you’re adjustment dial, it’s as simple as picking the shutter speed! However, not all shutter speeds will go with all light conditions. So if your camera’s LCD display is blinking and your photos are turning out really dark or really light, then you’re going to have to learn to adjust. If the image is too light, make the shutter speed faster. If the image is too dark, make the shutter speed slower. Remember a slow shutter speed is generally below 1/100 of a second (Bulb-1/80th) while a fast shutter speed is above (1/125-1/4000 or higher)
Your Assignment: Getting Creative with Shutter Speed
Shutter speed is simpler than ISO, but it’s much more creative. For this month’s class you’re going to experiment in two ways with shutter speed. Once again: turn off your flash!
1. Freeze the Action (Fast Shutter Speed)
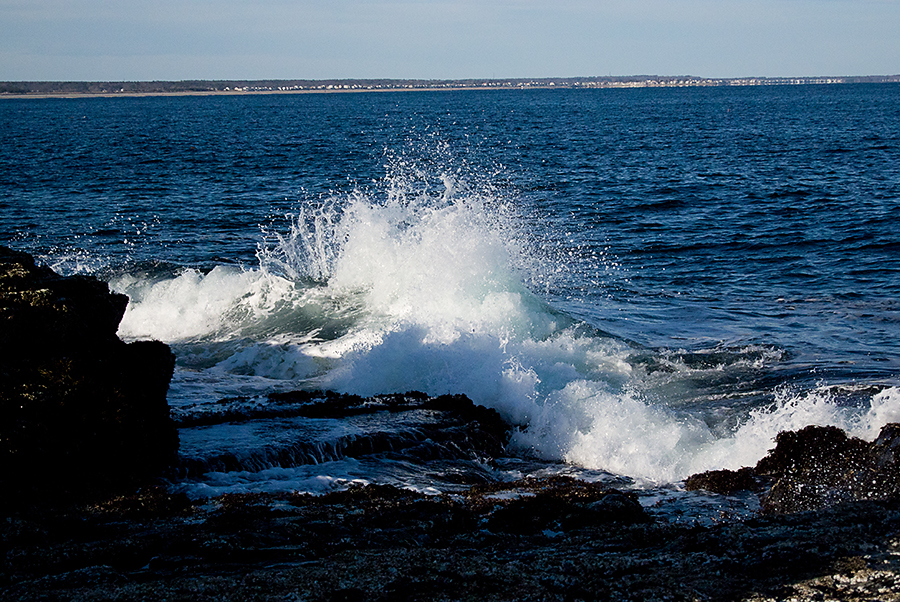
Image by Andrew Aldrich and edited by me (b/c he’s my father-in-law and lets me get away with editing his stuff…sometimes)
Andrew’s image was shot with the incredibly quick shutter speed of 1/8000 of a second. Unreal! But do you see those droplets suspended in the air? I’m not sure the human eye can process that sort of thing… it all just blurs together as it moves. I think that’s what makes this a really incredible capture. 🙂
For your assignment, capture something frozen in motion. Someone frozen on a jump in the air, sea spray, or those ever moving toddlers all count. It’s going to be easier to capture a fast moving subject in brighter light so head outside for this one.
2. Don’t Freeze the Action (Slow Shutter Speed)

By TeddyBouche in our Flickr Group.
Teddy Bouche in our Flickr group totally nailed capturing motion on our Learn to Critique assignment (He did one with water too. He also explained his process. Check it out!) This image was shot with a shutter speed of 1/8th of a second. I think his camera was handheld as well. So there’s blur from the dancers moving as well as from the camera moving in his hands. Yet there’s still a sense of capturing the feeling of this dance as it’s occurring.
For this second image, I want you to use a slow shutter speed to capture a sense of motion. You could try this handheld, or you could put your camera on a tripod (or a stack of books or a car roof or a railing or whatever you have to stabilize the camera). Play around and see what you like. I think kids jumping on a trampoline, bicycles moving, someone turning a kartwheel, someone shaking a sparkler at dusk, or waterfalls/fountains would be the perfect subject for this assignment. But really, go all out creative on this one. I’m sure you’re going to give me some unexpected images!
3. Give Panning a Try (Slow Shutter Speed)
This technique will frustrate most of you (it still frustrates me)…. so if you don’t succeed perfectly try again. If you keep trying and never succeed perfectly, post your best image. Odds are mine will look similar to yours 🙂 Just wanted to warn you before you got frustrated!

Panning is using a slow shutter speed while moving your camera parallel to your subject’s movement as they move. Yeah, I know… that’s a really technical definition. Here are two articles that will give you better idea of how to do this. The Art of Panning and Mastering Panning.
Basically, a panning image will keep the moving subject in basically good focus while blurring the back ground with motion. A shutter speed between 1/30-1/50 of a second should work very well. However, this may be a more difficult (or impossible) assignment for those of you using lower end Point and Shoots without much control. So if you’re finding this too frustrating or impossible, feel free to skip it!
The Panning effect is most often seen with cars or motorcycles like the image above. However, it also works with bicycle riding, or running children, or merry-go-rounds, or moving birds. For this first attempt at panning, I recommend a slower object: toddlers are actually perfect subjects for this technique. A slow rolling ball might work as well. Or a slow moving boat. Slow object equals less frustration!
Once you’ve completed your assignment, drop on over to our Flickr pool and share your images for some critique. I’m looking forward to seeing your creativity begin to expand this week!
