Sep
10
2009Twice we have met
and twice you have calmed me,
even though you were supposed to make me jittery.
My irritable uterus loathes you,
stopping short it’s naughtiness when you are near.
One day soon we might dilate and not need your services.
Then I shall sleep far less,
thank you for the rest.
How corny is that… I think I need a nap already…
Happy 36 weeks, little girls!
Sep
03
2009***Warning I am very tired (sleeping with a watermelon belly is difficult) and very hormonal at this moment. Read this post at your own risk.
I have a Breech Baby A. This little girl has her head stuck up near my ribs and her body slouched down in my left hip. Her little feet are constantly bombarding either my cervix or her sisters head. She has always been in this footling breech position except on one evening at 29 weeks when she stuck her feet up by her head and then removed them the next morning during an ultrasound.
Her positioning gives me about a 99.9% chance of a c-section.
Just writing that makes me well up with tears.
I do not want to have massive surgery to bring these little ones into the world. I want to be at home in my own bed with my sweet husband; I want a normal natural medicine free birth, but unless she flips I’m pretty much automatically going to be put under the knife. At this point, I’d even agree to get the epidural “just in case” if a doctor would let me try the breech delivery (and the thought of that needle makes me want to pass out just thinking about it).
I think this is ludicrous! Last week(34 weeks) precious Baby A didn’t even weigh 5lbs yet due to IUGR. She’s TINY! Surely a 5lb baby can’t be too terribly hard to push out feet first! But as I live in America where the newer OB’s are taught to cut but not to deliver breech, I have no real choice.
Don’t misunderstand me, if my little ones NEED a C-section due to fetal distress or danger to my life, I would be glad to undergo the procedure. I would be thankful that C-section is a life saving option.
But at this point the NEED is not present.
I have a tiny bit of hope: my .1% chance of delivering a breech relies solely on the testimony of a friend (also expecting twins) who talked to Dr. S of my practice about the possibility of delivering breech. Dr. S told her that he likes to deliver according to the mother’s preference if there is no danger to mother or child. He will attempt to deliver a breech.
Here’s hoping that Dr. S is the office doctor tomorrow. But even if he is what are the odds that he’ll be the doctor on call that night? I haven’t even met all the doctors in this mega practice yet.
Sigh.
Okay… c-section rant is now out of my system. I’m sure, however, that the tears will keep coming until the uncertainty is over and the little girls are here.

Aug
26
2009I was so excited when I found the matching Basic Grey scrap-booking papers and Moda fabrics in the Sultry line. It meant all my decorating efforts in the girls room could coordinate! My mom, sister, husband, and I made their Bird Art Canvases from the scrap-booking papers and I made each girl a quilt using the Moda Fabrics.
I’ve had Baby A’s quilt finished for over a month now, but every time I went to photograph it, Olive Cat paw prints were all over it. Olive cat is meticulously clean and bathes 1000 times a day, but she doesn’t clean her feet! I washed the quilt 3 times to get her paw prints out! Arg…
A’s quilt was made using the Pinwheel Baby Quilt tutorial at Moda Bake Shop. I machine quilted in the ditch along the pinwheels and hand quilted one of the Canvas Bird Art designs in the large white border.


B’s quilt is loosely based off the Baby Blanket tutorial also at Moda Bake Shop. I made this quilt much smaller by only using 12 blocks so that the two quilts were practically the same size. B’s quilt was also hand quilted in the white border with a different Canvas Bird Art template.


I hope they love their quilts as much as I do!


Aug
24
2009I had some scraps leftover from making Baby B’s quilt with that adorable Honey Bun. I was puzzled about what to do with them. I’ve always wanted to do hexagons because I love hand sewing and because they look so interesting. So I looked up some hexagon tutorials (there aren’t many) and kind of developed my own method borrowing what I liked from each of what I’ve read. I thought I’d share with you!
Supplies
- Starch (I’m addicted to starch. It makes so many quilting projects easier!)
- Iron
- Rotary Cutter and Mat
- Scraps (Mine were from 1.5″ Honey Bun Scraps)
- Printer and Paper
- Hand Quilting Thread
- Scissors (for paper and for cutting thread)
- Hand Needle
- Thimble
- Pins
Directions
- Starch and press your scraps. Un-startched scraps are harder to fold accuratly over the paper templates… ask me how I know…
- Cut into squares. Since I used a Honeybun, my squares were 1.5″. I would recommend doing a bigger size for your first hexagons. These were a wee bit tedious…
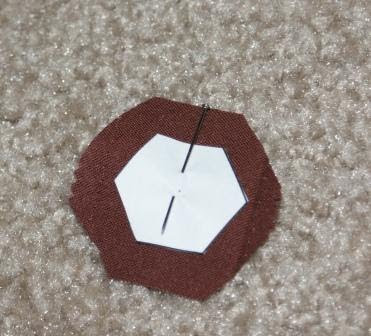
- Go to this site and print hexagonal graph paper in your desired size. Your finished hexagon width should be .5 inches smaller than the squares you cut. So for my 1.5″ squares I wanted hexagons that were 1″ at their widest. Divide your desired width in half and you have the width of the hexagon sides. My sides were .5″
- Cut out your paper hexagons and pin in the center of your fabric square. I trimmed around the corners of my squares to make the shape slightly more hexagonal.
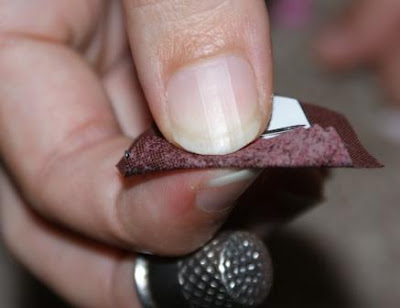
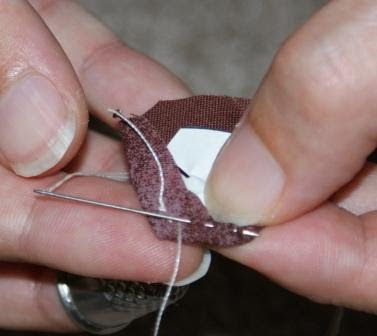
- Fold over one of the edges of fabric along the line of your paper template. Be very careful not to bend your template.
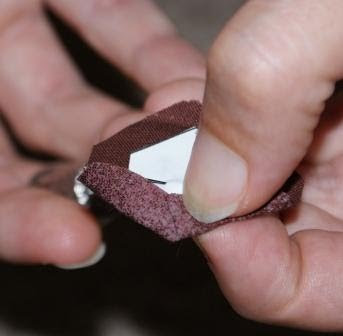
- Fold over an adjacent edge to make a sharp corner. Again be careful about not folding your template hexagon.
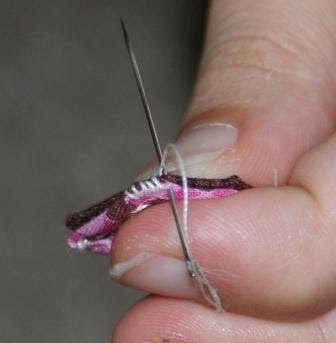
- Put your needle through one of the folded sides and bring it out close to the corner. Use 1 or 2 whipstiches to tightly tack down the corner. DO NOT sew through the paper template.
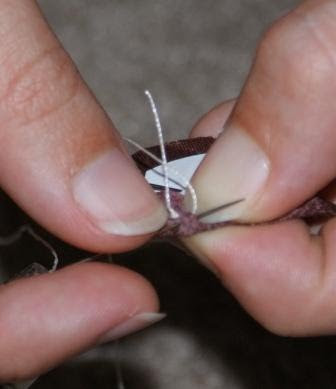
- Fold down the next corner. Use a running stitch (don’t go through the paper) to get to the next corner. Whipstitch that corner down.
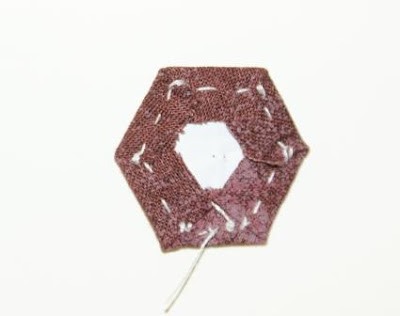
- Continue this process for the other corners. Tie off your thread. The back of your hexagon will look like the picture. Since you did not through the front of the hexagon or the paper template, you will be able to remove the paper (and reuse it if you like!) and not have to remove these basting stitches when you begin sewing the hexagons together.
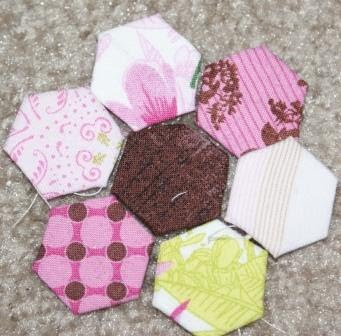
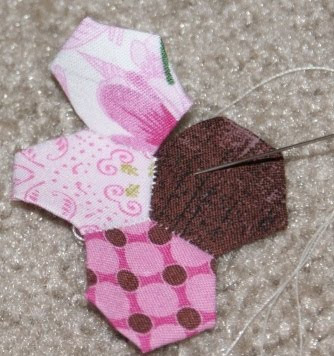
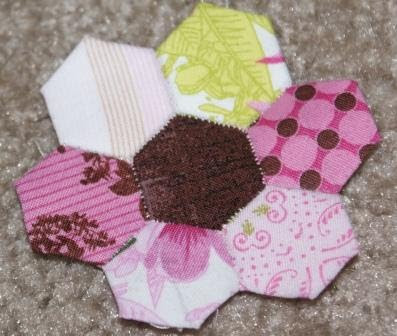
- Once you have made 7 hexagons you can sew them together to make a “flower”. Here are the seven pieces I picked out for mine.
- Take the center and one petal and hold them together along one side. Knot a thread and run it through the back of one hexagon. Whipstitch your hexagons together at the corner.
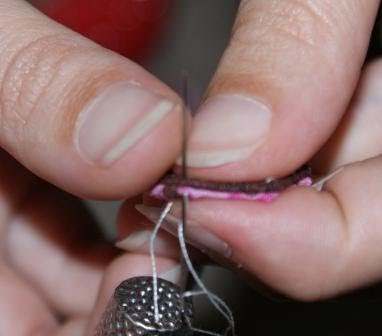
- Continue whip stitching along that side to the next corner. Be careful not to sew through your paper templates!
- Add additional petals sewing them both to each other and the flower center as you go.
- When you’ve finished whip stitching your flower together, insert a needle gently into the paper at the flower center.
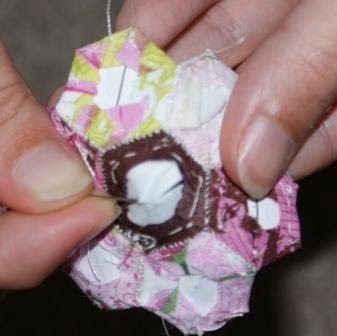
- Carefully pop out the hexagonal piece of paper. If you’ve not sewn through it, you can use your template again!
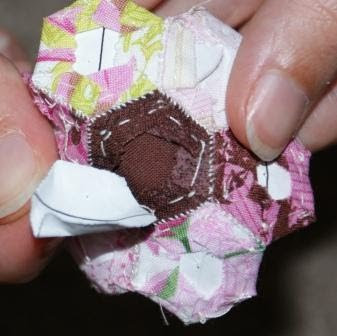
- Here’s my finished hexagon flower! You can arrange these in a million ways to make your quilt top or decorate a project by appliqueing the flowers.


I made 110 of these little guys. Wouldn’t you like to know what they’re going to become? :-p
 P.S. Didn’t my husband do an awesome job on the photography for this tutorial?! I’m so proud of him!
