Aug
21
2009Our decision not to share the names of our babies until they arrive has been generally very unpopular. Folks have complained about not being able to monogram items (even though we freely share the girls initials). I have found the negative response quite random, but we have persisted with our sweet secret 😀
The Carolina English Country Dancers threw us a really sweet shower last night. Among their gifts were these two burp cloth sets.
Perfect! Derek and I chuckled and rejoiced at such thoughtful (and fun!) presents.
Aug
12
2009How am I supposed to unwrap and cut into this adorable package of fabric!
It’s just too cute!
Aug
10
2009Saturday at the Miracle Hill Thrift Store I found approximately 6 yards of very lightweight (almost sheer) pale pink cotton for $1.50. I couldn’t pass up that opportunity! I’ve been wanting to make car seat canopies so that overzealous curious strangers would have to pass a barrier before laying their germ-y hands on my girls. Really, I’m not normally germophobic, but unless I know you and your reasons for touching the girls… well, I’m not all that comfortable with you putting your hands on them! Besides the canopy also shuts out sunlight for the sleeping little ones while not adding too much warmth. And for $3.81 (with the added cost of some fun grosgrain ribbon) I couldn’t pass up this opportunity!
I used the tutorial for a Car Seat Canopy from While They Sleep, but since the canopy is basically two yard long rectangles sewn together with ribbon or self-fabric ties affixing it to the handle I thought that would be pretty boring in a plain pink. I decided I would venture into the world of Machine Applique just to spice things up a wee bit. I’m definitely no expert at machine applique since this is my first time, but I did quite a bit of research and came up with my own method using things I had on hand. I thought I’d share my new knowledge with you since I’m so happy with the results!
Simple Machine Applique Tutorial
Items Needed
- A Sewing Machine
- Background project that needs a little spicing up
- Fabric scraps
- Fusible Interfacing
- Fusible Stabilizer
- Iron and Ironing Board
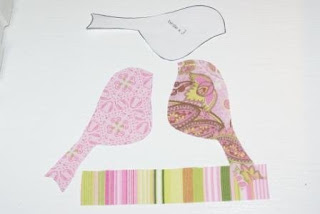
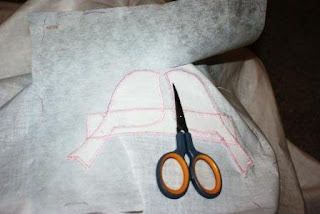
- Template for the applique (I used a birdie from the Canvas Bird Art Tutorial)
- Fabric Pencil
- Scissors
- Seam Ripper
Instructions for Applique
- Take a few fabric scraps and play with your machine’s settings until you have a fairly tight zigzag stitch. I was going to be using a tightly woven quilting weight woven cotton for my applique so I knew I wanted the stitches close together to prevent fraying and just long enough to cover the edges about 1/8″. On my Viking Emerald 116, my settings were as follows:
Stitch Selected: 2-a plain zigzag
Presser Foot Tension: 3
Thread Tension: 4
Width: 2.5
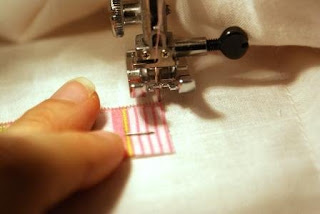
Length: at about .3 if I were to guess since it’s over in the buttonhole stitch area - Practice. You don’t want to mess up your actual applique so take a few minutes to practice turning convex and concave curves as well as some inside and outside corners. You’ll find you need to lift the presser foot and pivot slightly as your turn the curves.
 (Here’s my practice)
To make the stitching smooth I found that on convex curves and outside corners, you want to pivot with the needle down on the outside of the zigzag.
 (Needle down and one the outside swing of the zig zag. Here I’ve pivoted and am about to lower the presser foot)
For concave curves and inside corners, you’ll want to pivot the project with the needle down on the inside of the zigzag.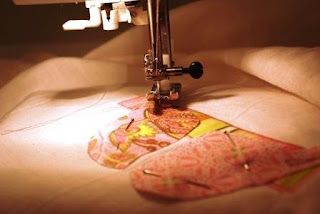 (The needle is on the inside of the zigzag as you lift the presser foot and turn though this example is harder to see than the outside corner)
 - Fuse the interfacing to your fabric scraps and then trace your template onto the scrap. Cut out your shapes.
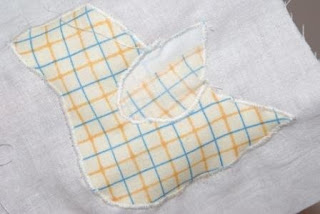
 (Fabric scraps reinforced with interfacing and cut after tracing my template)
 - Cut out a piece of fusible stabilizer that is larger than your finished applique. Using a long straight stitch baste the stabilizer to the back of your background project. The fusible side of the stabilizer should be facing the back side of your background fabric.
- Pin your first applique piece ontop of the right side of your background fabric. The stablizer will be on the back side underneath where you pinned.
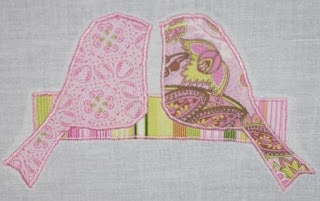
- Applique your first piece and then continue with the remainder of the applique.
- Rip the basting stitches from the fusible stabilizer. Trim the stabilizer along the edges of your stitching being careful not to cut the background fabric.
- Fuse the stablizer to the fabric using your iron. Assemble and complete your project and enjoy your foray into machine applique!


Aug
05
2009Derek and I hung the completed Bird Art Canvases over the cribs last night. It is so fulfilling to see that room in it’s mostly finished state! The art is on the wall, the little beds made, the dresser filling with clothing, and the closet overflowing with newborn disposables. These little things make the impending arrival just a little more real.
A’s Bird Art
My sister did most of these except for the name which Derek and I did after my family left (we’re keeping the names secret until they arrive)
B’s Bird Art
My mom and I did most of these, but again Derek helped with the name. The wall color is very washed out in these images; the nursery is a minty green not the sickly cream the camera flash created.
I’m really in love with them: the birdies, the quirky Basic Grey Sultry papers, the way they’ll match (but not too matchy) the girls completed quilts. Sigh… it makes me want to decorate my entire house in this much exquisite detail. Maybe I’ll do our bedroom next…
Aug
04
2009I keep insisting that I need a cherry pitter, but it’s one of those seasonal items that costs irrationally close to $20. Perhaps it might be a wise investment over the course a few years, but for the past three years I’ve just pitted them by hand. Afterward, my hands always look as if I’d murdered someone.
Today I made a banana cherry smoothie. I managed to clean all the evidence of the cherry slaughter off of my left hand except for my cuticles. Switching focus to my right hand, I found that no amount of scrubbing would clean my first two fingers and thumb. Upon inspecting my fingers a little closer, I realized that the cherries had brightly stained my otherwise invisible hand sewing calluses.
I’m especially amused by the calluses on my middle finger. The bulls eye on the finger tip is from pressing inside my thimble and the ring around the finger shows the exact shape of the thimble 😀 These calluses just saw me through hand quilting the border and sewing down the binding on Baby A’s quilt. Now to start piecing B’s quilt…
P.S. Photographing your own right had is pretty difficult…just in case you were wondering…
