Jul
03
2013It’s your baby’s first birthday. You really want to shoot in manual mode, but what if you don’t get things right? What if the test image you saw on your LCD is just a tad too dark or too light? What if you mess up?
Next week we’ll jump into another math/stop based concept that helps us get exposure right the first time, but this week I’m going to teach you a little automatic cheat for those situations where you know you’re close but really don’t want to mess it up and miss the moment.
Exposure Bracketing
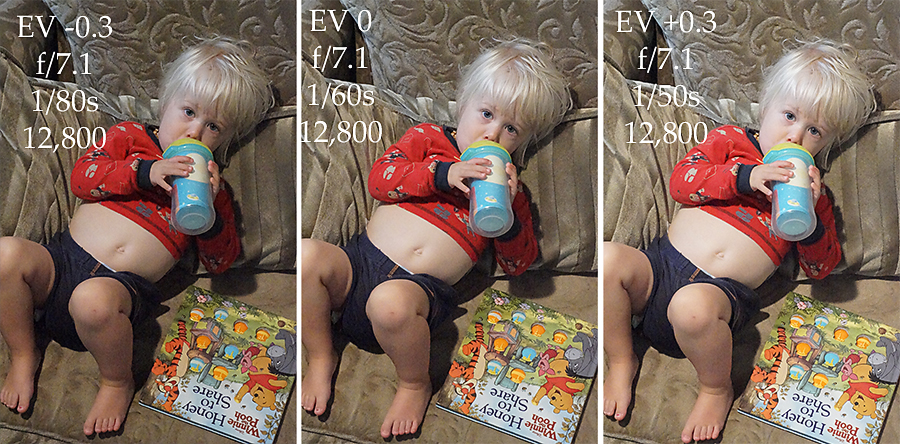
Back in the old days of film, if we were unsure about an image, we exposure bracketed. That meant we took an image at a zero exposure value according to our meter, then we moved both one stop up and one stop down and took two more images. If we were OCD (and had film to waste) we might do five images. Usually this would be done for a heavily contrasted image like a sunset or sunrise over a gorgeous landscape.
Most cameras come equipped with an automatic exposure bracketing mode. When toggled on, exposure bracketing takes a rapid burst of 3 or 5 images where the camera will calculate the stops for you both up and down each type you press the shutter release. In your baby’s first birthday scenario or any scenario where you are not completely sure about getting exposure right in camera: use exposure bracketing.
Exposure Bracketing Assignment
Consult your manual now and figure out how to turn on exposure bracketing. I actually had to consult my manual for my new camera on this one (Did I tell you I had a new camera? Sony a77. I’m reading a manual right along with you!) and I found that I actually have a dedicated button for braketing/self-timer. Maybe you do too, but otherwise it’ll likely be an option on your camera menu 🙂 Like me, you may find that you have a few options for how your camera brackets. Read the manual to find out the benefits of each option.
Use it this week while you keep on practicing in manual mode.
Upload some photos in our Flickr Group (it’s kind lonely over there… ya’ll are sorely missed, but I hope you’re enjoying your summer vacations!!!).
Jul
01
2013I’m so excited to announce that I will be offering a bimonthly newsletter. This newsletter has exclusive content including notes of encouragement to moms, favorite recipes, local events, nuggets of wisdom I’ve learned, and exclusive offers for you. If you’re expecting, there’s a special 7 week series just for you with practical things like what to cook when food makes you nauseous, where to shop for your nursery, and where to sign up for you birth classes.
I hope it will be a useful resource for you. For those who sign up, I’m offering a free copy of my brand new e-book to help you prepare your family and home for baby.
Sign up to recieve my newsletter (and your free ebook!) below.
Jun
26
2013Danielle is here this week helping us learn to build up our homes instead of tear them down. I’m so excited about how she paints a picture of who we should trust in most.
______________________________________________________________________
Hi, my name is Danielle. I am 34 years old, been married for 12 years, and have 4 children, 6, 4, 3, and 1.
I’ve been pondering the task that Melissa has set before me – to pick one area of marriage that I need to work on and then report back my findings. Well, the one thing that keeps coming to mind is this over arching theme of trust. I’ve been mulling over in my mind what this means and how I can apply it to my marriage.
So, let’s take some time together. Grab a steaming cup of coffee and join me on the couch. Lord willing, if you stick with me, there will be some growth in this for both of us.
Trust is a funny thing. Over time it can be built up or it can come crashing down in an instant. There are times when I find that I don’t trust that man of mine. That tall, ruggedly handsome, jack-of-all trades. Why do I let the fear taint the everyday? Why is it that when he gives me a fantastic gift the first thing that runs through my mind is ‘Why, what has he done?’ Not, amazing gratitude. Why is it that when he offers to help someone carry signage away from the picnic pavilion, I see him helping a beautiful women, who obviously isn’t carrying around the marks of giving birth to 4 children in 5 years, instead of just helping someone in need. I question his motives.
This lack of trust curls around my heart and wafts through almost every area of my life. Does he know what he is doing with our finances, why hasn’t he fixed the house yet, is it really best to let the kids have those suckers…
This lack of trust in the man that God has given me, is it really a lack of trust in God? For me, in the end, it is.
A verse that keeps running through my mind is Proverbs 3:5, 6. If you’ve grown up in Christian circles, then you will have memorized this when you were 3 and can recite it backwards and forwards while doing a handstand. It is amazingly deep, but sometimes with familiarity, comes forgetfulness.
But, if you aren’t familiar with the verse, here it is:
5 Trust in the Lord with all your heart,
and do not lean on your own understanding.
6 In all your ways acknowledge him,
and he will make straight your paths.(emphasis added) Proverbs 3:5,6
You might be wondering why I’m starting out with a verse about trusting God and not about my husband. But I think that unless I’m truly trusting in the Father, I can’t completely trust my husband.
God is always faithful – ALWAYS. There is never a time when He is not. I thought that it might be a good idea to look up the word ‘faithful’ and see what it really meant. On my search, I found that the word ‘faithfulness‘ is often paired with the phrase ‘steadfast love’. Well, what does that mean? So off again to the dictionary to see what exactly ‘steadfast’ means. Most of us know what the connotation of the these two words are but maybe not the denotation. ‘Steadfast’ means ‘fixed’ or ‘unwavering’. And, ‘faithfulness’ means ‘true to one’s promises’.
So God’s love is unwavering and He always keeps His promises.

When I look at my love for my husband in this light, I realize that I fail on a daily basis. Now I know that this article is supposed to be about me trusting him and his love for me, blah, blah, but I’m finding that God is using this to call me out on the sin in my own heart. How many times have I wavered in my love for my husband and how many times have I not been true to my promise?
Now that this has come to light, I want you, if you’re willing, to walk part of this path with me. Over the next month, instead of doubting our husbands, let’s look into our own hearts and see where we are doubting God, and where we could improve on being steadfast and faithful. Beware, fear is going to take hold, pride too, and will try to get our focus onto what (we think) our husbands are doing wrong. But know this, I’m praying for you, and more importantly, we have an Advocate with the Father who is interceding for us right now.
Jun
25
2013So week one of manual mode, you learned to adjust the dials and play around. Week two week dove right into the technicality of stops. This week I’m going to walk you through a typical manual mode workflow. This whole post will be a do-while-reading assignment. So grab your cameras and find something in your reading space that it is photo worth. Ready, set, go!
Manual Mode Workflow
Alright, you’ve got your camera. You’ve switched it into manual mode and you’ve found something interesting. Let’s start exercising our manual mode workflow muscles.
Set White Balance
Glance around your lighting situation and access whether you want to change white balance. I’m shooting outside in open shade and so I set white balance for shade.
Set your white balance and move on to ISO.
Set your ISO
The spot I’m in has a good bit of dappled shade, but is overall pretty bright. I set ISO at 160.
You’re taking a guess here but you should be close to spot on. Back in the old days when film had the ISO rating rather than a sensor, a photographer would pick out their film based on where they were shooting. Outside in bright daylight: grab a roll of ISO 50 or 100 or 200. Varied conditions, some outside some inside: ISO 400. Inside a building: ISO 800. Pretty dark: We’d push process our ISO 400 or 800 to 1600 or 3200 or fork over the big bucks for a roll of film with that ISO rating.
So what are your lighting conditions? Pick your ISO and lets move on.
Choosing what to Change Next
Now comes a decision: is aperture more important to your composition or shutter speed?
My goal is to capture my daughter playing while blurring out the background. To blur the background I know I need a wide aperture. She’s also moving pretty fast so I know a wider aperture will allow for a faster shutter speed. I’ve decided aperture is my most important setting.
If you have a fast subject and want to blur motion or freeze motion, pick shutter speed first.
Set Your Most Important Setting
I’m going to set my aperture at f/2.5 which is pretty wide open but not so wide that my fast moving subject will move too much after I lock focus. You might want your aperture at f/22 to capture the glory a full landscape scene. Or you might be setting it around f/5.6 to capture a family of 4 in good focus but still apply background blur.
You might be setting your shutter speed at 1/125 of a second or above to freeze motion or slower than 1/60 to capture motion occurring.
Now that you’ve picked what’s most important to your composition, set it.
Set your Least Important Setting
Now change your least important setting for your desired composition. My shutter speed landed at 1/160 of a second zeroed out on the exposure value/bias scale.
Take your First Shot

In film days, we didn’t take more than two shots and we couldn’t look to check and see if we got it right on an LCD screen. I’ll talk a little about one of the processes that helped us get it right the first time in the next lesson.
However, in these digital days we have the freedom to check and make sure we got it right. Use that freedom! Look down at your LCD and check out that image. Would you like it to be brighter? Darker? Aperture wider or more closed down? Does your shutter speed need to be faster? Do you need to change the ISO so that you can have a faster shutter speed or more closed down aperture?
Adjust your settings if you didn’t love your first image and try again. I was pretty happy with this shot. I had spot metered (focused on the upper left eye) and I loved the interplay of contrast in both the mud and light skin and her shadowed eye. So I didn’t try again 🙂
The Benefit of Manual Mode
By now you’re thinking, “Gee, this is a lot of work just to take two pictures. Why shouldn’t I just stick it in one of the Auto Modes and let the camera do the work?”
The benefit of shooting in manual mode is that you become the one to evaluate what you need to do to create your image. You’re also able to change settings to get a brighter or darker exposure for your desired outcome as well as adapt to new lighting situations relatively quickly compared to setting exposure compensation in Program mode.
If we stick the camera on Auto then we don’t get to change according to our scene. The camera meters everything for zero and assumes everything is okay, picks a mid aperture, picks a mid shutter speed, or pops up the flash and just takes a picture.
When you begin to shoot in manual, you’re moving from a documentarian to an artist who is evaluating a scene and actively choosing what portion will draw the viewers eye.
Can some of that be done in Aperture, Shutter, or Program Mode? Sure! And there are definitely seasons where I switch over to aperture or Program. But the challenge of manual mode is that I’m responsible for creating the outcome that I desire. It makes me think and respond to changing conditions.
Your Assignment
Go out there and begin mastering your Manual Mode Workflow.
- Pick three or four scenes and start creating art. You should be ready to approach a calm mid-speed preschooler (but maybe not a lighting fast crawler/toddler) after two weeks of practice with changing your settings in manual.
- Pick at least one or two challenging scenes that are either brighter than most (snow, portraits on a beach, white on white) or darker than most (photographing a stage lit recital, capturing something at night). These will challenge you to not always set your exposure value as zero. You’ll learn which lighting situation you’ll want to move toward +1 or -1 in exposure value.
- Upload your final images with a description of what you did AFTER you checked your LCD readout of your first image. (you may need to take notes in the field) What did you change? Why? This is the most important part of the whole assignment. It’s designed to get you thinking about the whys of what you did to make this an image that you liked.
Jun
21
2013Those of you who know me well, know that I don’t cry often. My entire MOPS table with tears streaming down their faces broke into laughter over me… the lone wolf of 10 with no tears after a particularly moving session. I was moved and convicted just as they were, but those emotions don’t always connect with my tear ducts. Usually only anger or that ever present beast of perfectionism cause me tears. Occasionally tears of repentance fall. But stories (mostly) don’t make me cry.
Not yesterday.
Shaun Groves had my children asking me “What’s wrong, mama? Why you cry?” I hug them a little tighter. I can’t imagine choosing between giving them up and watching them not be fed because I couldn’t provide.
And it was this post that had me doubled over in tears. These words about orphan prevention from a father who has adopted and loved an orphan for 2 years. And today they break me again.
As much as I love my son I wish Compassion had been in his neighborhood when he was eighteen months old, when his seizures started. Malnutrition so ravaged his little mind that his mother kissed him goodbye one morning, wrapped him in a blanket and – because of love – gave him the life she couldn’t afford to provide.
If Compassion had been there, sure, I would have missed out on being his dad, but he would be tucked into bed tonight by a mother who has his face. And she would smile his smile when he laughs.
Sponsoring a child saves families. It’s orphan prevention. It’s giving boys and girls best.
I have a heart for orphans and, if the Lord wills, one day there will be one living in our house and laughing and crying and creating a whole new sort of Aldrich chaos. And we will be grateful to the Lord who placed that child in our care and I will be heartbroken for that desperate mama who chose to give her baby up for the sort of life that she was not able to provide.
But I have never thought of the work that we do with Delsys as orphan prevention. These letters we write, that $38 saved each month from saying no to two little girls begging to go out to eat every night, it keeps Delsys in a family. In a home, with people who love her, look like her, and would give her up to give a chance to live her dreams. That is holy work.
Do you have a heart for orphans? Please sponsor a child and be a part of the orphan prevention movement at Compassion.

