Aug
20
2013First, we learned about natural light in the forms of full sun, open shade, dappled shade, and the golden hour. Then we looked closely at front, side, and back lighting. This week we’re going to tackle using available light with and emphasis on indoor photography. There’s a lot of principles we’re going to borrow from our previous posts, but available light requires a little more analyzing on the spot. Are you ready for the challenge?
Available Light Photography
Technically, any photography that doesn’t use off-camera flash is available light photography. But when I talk about available light for the purpose of this post, I’m talking about indoor and night photography specifically.
When we’re shooting in these situations we’re likely using both a wide aperture and high ISO just to get the shutter speed fast enough to be handheld. We may be whipping out tripods at night so that we can use slow shutter speeds and keep our aperture (and ISO too) stopped down to capture all the beauty.
Things to Remember When Using Available Light
- Rarely will our camera meter get it right. If you’re truly trying to represent the scene as you see it, you’re going to have to aim for 1 or more stops of underexposure. If you rely on a camera meter, the scene will be much brighter than you see: that may be a desired affect, but remember that in manual mode (or program mode) you get to decide the look you desire.
- Locate your light sources. Note how light is falling. Ask your subject to move toward better light (if appropriate) or move yourself to a capture a better angle. Window light is my favorite light for inside imagery, but sometimes we’re working with our overhead bulbs.
- All of the principles of front, side, and back lighting will apply to available light imagery but may be more dramatic.
- White balance is crucial. If you miss white balance, things are going to be very off. However, inside images also have color casts due to painted walls. So if you’re shooting under florescent, but the wall is yellow, you may want to see if incandescent is the better white balance. The same with blue walls: switch to florescent. Working in Kelvin for white balance helps too. Take some test shots before you shoot your subject and play around with white balance. There’s no excuse for you not learning how to white balance for each paint color in your own home. Practice.
- Due to high ISO, available light images are often super grainy. Even if you nail white balance and manage to remove color casts the noise/grain in the image can still distort colors and distract. Therefore, embrace the black and white conversion. We’ll touch on doing black and white conversions when we learn about editing, but in whatever software you use to edit, there’s always a simple way to do it.
Case Studies
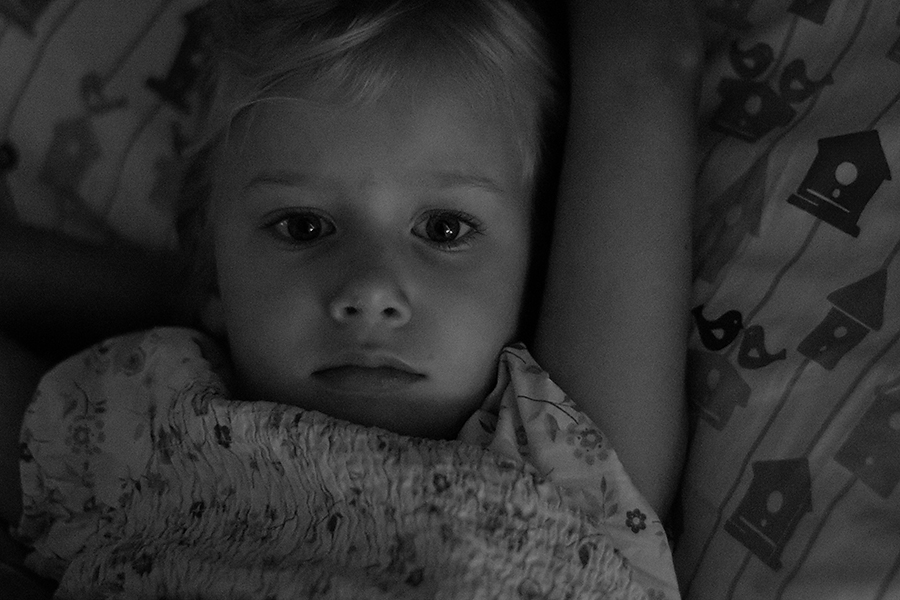
I was thinking about this post when I woke my Aeralind from nap one afternoon. I loved the light! Here head is pointing toward a wall and there is a widow on that wall about 3 feet from where she is lying. It’s casting gorgeous directional side lighting across her face. I kept this image dark and knew when I took this series that they would be black and white; I chose black and white mainly because her dress and pillow clashed in color but also because it would highlight the yummy light better than a color image.
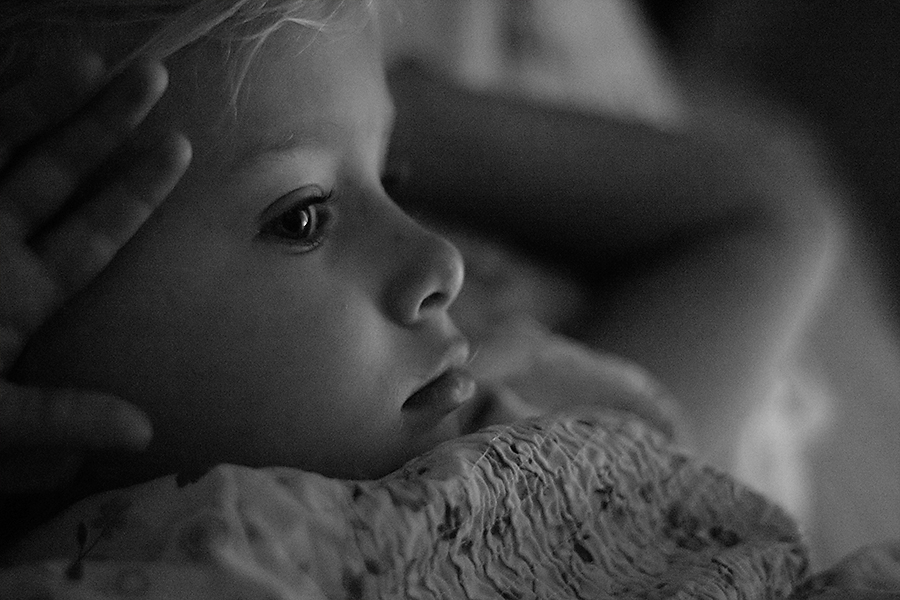
Same light, same day. I moved my position to almost back light her profile. See how much photographer movement can change both light quality/direction?
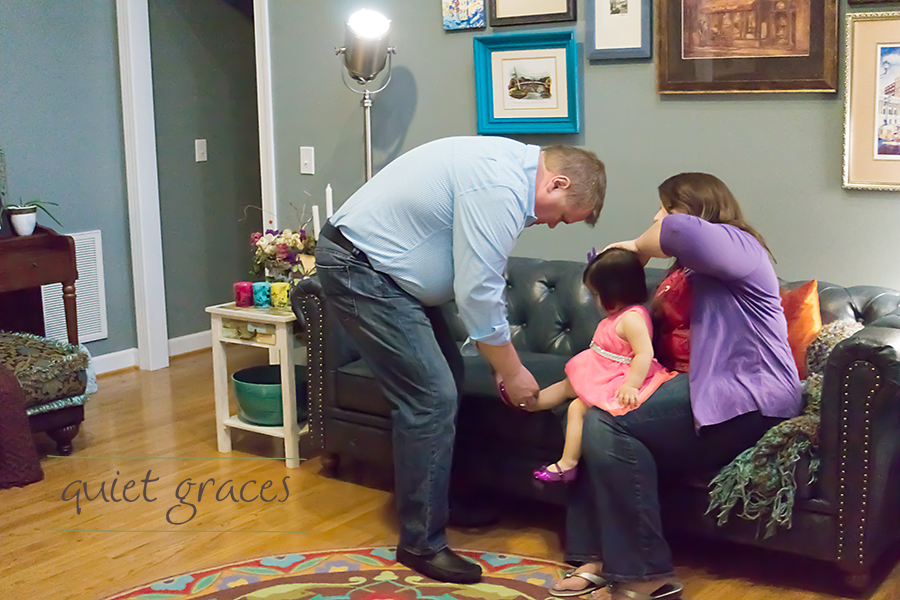
I had a really tough time with this wall color for this family session. Perfecting white balance was hard and even now I’m not wholly satisfied. There were a bunch of lights on in this room but I still had to crank my ISO all the way up to 12,500 to get a shutter speed fast enough to freeze a toddler.
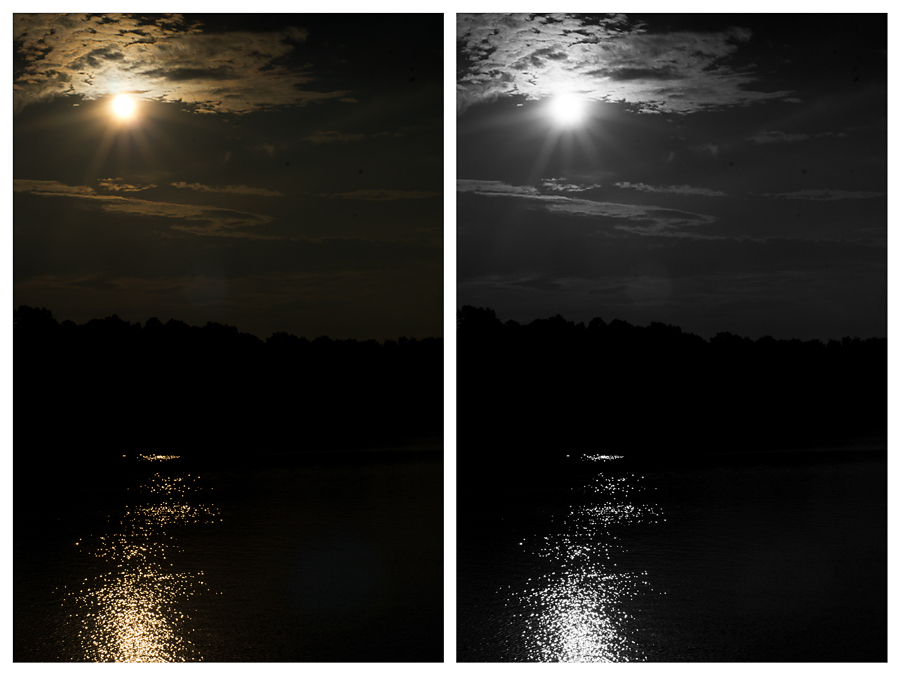
First: I can’t decide if I like this image better in color or B&W so you get to see both. This is not a nighttime image, but it follows the principles that I would use for a night time image. I seriously underexposed this image (at least -2 stops) to keep the sky/water dark. Since this was daylight, I was able to hand hold, but had it been night I would have needed a tripod.
Questions?
For this lesson, I know I dropped a ton a of general principles on you that I’m asking you to apply in available lighting conditions. That means that I may have left something out or been slightly unclear. Please let me know in the comments if you have questions and I’ll try to answer them directly.
Aug
17
2013I don’t know about you, but there are days where I’m so worn out I don’t think I can do one more thing. I need rest.
5 Steps to Finding Quiet in a Noisy World
It’s a balance – living in a digital world and still needing those simple quiet moments. It’s possible. But, it’s also intentional. Purposeful. And well worth it.
A wise friend of mine says that this lie is a dangerous one because every time we tell ourselves we should be doing “more,” it leads to less…
Rest by Downhere
Just this truth.
Aug
15
2013I can’t even begin to tell you what an honor it was to be contacted by this client for Greenville, SC newborn photography for baby number 2! I served Amy way back in my portfolio building days two years ago as my fourth baby ever. The lighting was horrible the first day we shot, so I had to go back and shoot again. I was learning so much in those days and my imagery needed to grow in so many ways. I was both surprised and honored that my images were still featured prominently in Amy’s home.

Here are a few favorites from Charli’s session two years ago. As you can see, I’ve always sort of leaned toward the relationship images 🙂 These family black and whites are precious!
Now look how big and beautiful Charli is two years later! So pretty and such a sweet big sister!

Piper Olivia’s Greenville, SC Newborn Session
For Piper’s session, I finally managed to heat my studio room to the precise temperature to keep a newborn happy and sleepy. We were all sweating profusely, but sweet Piper never woke once and let us pose her however we wanted. I’d also just completed my first newborn workshop, so lots of things were coming together for me! I’m really excited about this imagery.


Mom brought this ruffled diaper set. I loved that it inspired me to finally nail this pose! Love those back wrinkles.
Piper’s also one of only two girls I’ve been privileged to photograph this year: what’s with the boy baby boom? I need another girly fix and soon!

Aug
14
2013 It’s Wednesday here at Quiet Graces and that means today is the day where wives are digging in to the dirt in our own marriage and, with God’s grace, growing to be better wives. Today Julia is going there again. Her desire to live with her husband intentionally has her encouraging us to find ways to “ring his bell.”
______________________________________________________________________________________________
So. After writing my last post, I had Salt n Pepa’s, Let’s Talk About Sex, running through my head for days.
Any day with a little Salt n Pepa is a good day, I always say.
When I set about to writing for this series, my intention was not to talk about sex, necessarily, but rather loving my husband intentionally.
Sometimes when I write things, the idea I have in my head is not at all what I end up with in the end. I was always really terrible at outlining those five paragraph essays in school.
Anyway, before I move on, a disclaimer:
Sex is an uncomfortable topic—for some. And peering into someone’s bedroom, is even more uncomfortable (sorry Mom and Dad). You should know that Brad reads these posts before they’re published, and he has full nix-the-whole-thing-right-
before-it’s-due power. Several people told me they didn’t think their husbands would have been cool them putting it out there like this. Brad, rather than decoy, avoid, or make void the topic, was open to letting me talk about all the good things and the bad things that may be. We pray that this peek into our lives encourages mamas in the same weary season of life, or maybe prepares you if you’re not a mama yet.
So. On intentionality.
I don’t know that I have one love language.
I feel loved when people are intentional. We’re all busy people, right? But, when someone takes a moment to
- bring me a cup of coffee
- give me a hug
- spend time chatting with me
- create the perfect gift that they know I’ll appreciate
I feel loved. Because I know…giving is sacrifice, and people give to what they love.
Giving takes intention. It takes planning and work.
In this season of life I have come to appreciate, even more than before, the people who have poured into my life. Because it’s a choice. And when we give to someone/something it takes away from something else.
When I haven’t slept a stretch of 3+ hours in over two months, and my husband brings up that he wants some lovin’, really, that’s a wake-up call to me—after I calm down, maybe the next day or something—that I haven’t been intentional enough.
Not in the guilt-trip sorta way, but the this-is-the-man-I-love-more-
So, yeah, Brad likes sex sometimes (so do I)—that’s one way he feels loved and connected to me. He also feels loved with words. And when I make him lasagne. And when we watch Walking Dead together, because zombies = love.

He really feels loved when I initiate sex/words/lasagne/zombies—
So, ladies. You’ve studied your man enough to know what rings his bell.
Be intentional.
Show some love to the human you love best in all the world, in a way he best feels love.
He may never have run through an airport for you, but he loves you by watching the kids while you work. Or by working long hours, so you can love your children at home, in yoga pants. Or by putting the daughter back to bed who needs her twisted covers straightened out at 2AM. Or by weeding your pumpkin patch. Or by making you coffee, even though he doesn’t like the way it smells. Or by putting the pacifier back in one.more.time.
I know you’re bone-weary, Mama.
So, make a plan. How will you love him intentionally today?
Aug
13
2013As I mentioned when I was defining all of these terms in my Painting with Light post, back lighting can be just plain tough! Oh, but I love to backlight for families and maternity… so I’m a bit giddy about this post regardless :-p
Lighting a subject from behind requires us to meter for the light in one of three ways in camera: meter for the background, meter for the subject, or meter for the subject and then adjust using the Zone System or by trial and error, so that we keep some detail in the background. I’m going to touch on the advantages and disadvantages of each of these methods briefly in this post.
However, I want you to know that you can modify the light in a back lit photo through the use of light modification: for our class that would mean: on-camera flash or a reflector. Or you can modify the image in post-processing/editing to get a pleasing composition. Both of those options will be covered in upcoming lessons.
Metering Back Lighting for the Background
Using an evaluative or multi-segmented metering mode (most camera’s default) and not adjusting manually using zone system (or trial and error) is going to create a back lit image where your subject is either very dark or silhouetted every single time.
Advantages
Back lit subjects exposed for the background can create dramatic silhouettes. Those whose figures are just shadowed, can give you a sense that you’re peaking in on their world but still retain some detail in the imagery.
It is easy to create back lit images where the background is properly exposed using Auto/A/S/P modes with no to just a bit of an adjustment in Exposure Value.
Disadvantages
You’re going to have a dark subject with very little detail. Depending on what you’re trying to capture: this could be detrimental to your imagery.
Case Studies
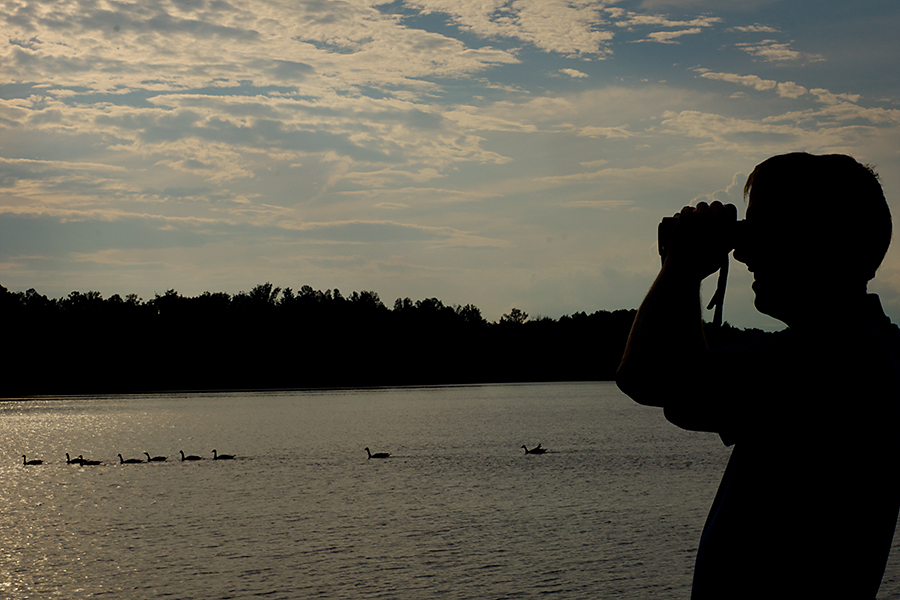
My husband bird watching. I pretty much made him drop everything when I saw this back lighting and the geese in the water. This is so him!
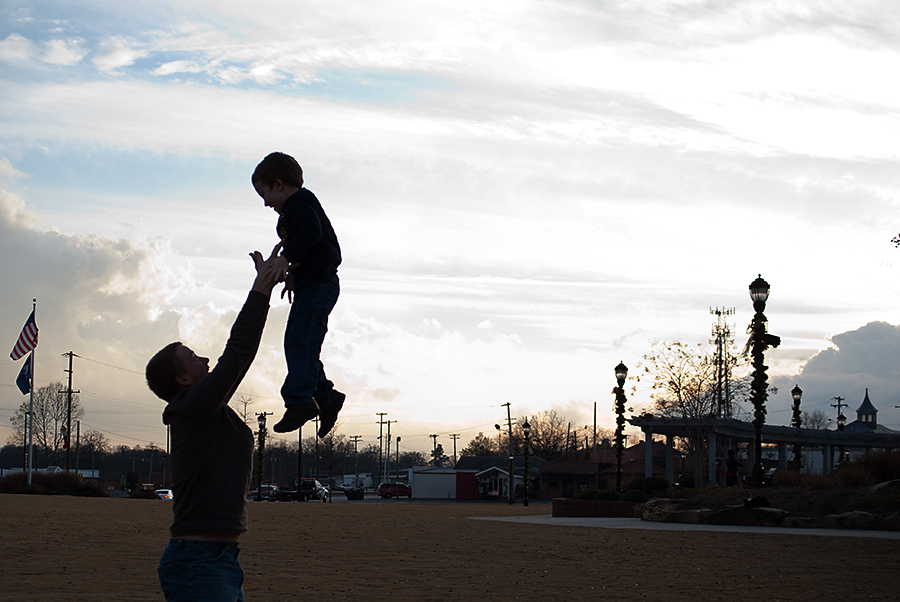
I exposed here for the background (specifically the sky). It’s actually a little distracting with all those cars and buildings… but I love the silhouette high in the sky.
Metering Back Lighting for the Subject
To meter for the subject, we’ll have to switch our metering mode to spot metering. You’re going to have to dive into your manual to figure out how to choose the spot, but you’ll want to spot meter right on your subject whether that is a person (aim for their skin if so) or a palm tree.
Advantages
The advantages of metering your back lit scene for your subject is that your subject will be clearly defined. You’ll be able to see all the detail in that person or tree or scene.
With Spot metering as your metering mode, you may be able to use Auto/A/S/P modes to capture your image.
Disadvantages
The disadvantage of using this method is that if your scene is very bright, you’re likely to blow the highlights of the background. The resulting image will have a well lit subject with a bright almost white background with little detail.
Case Studies
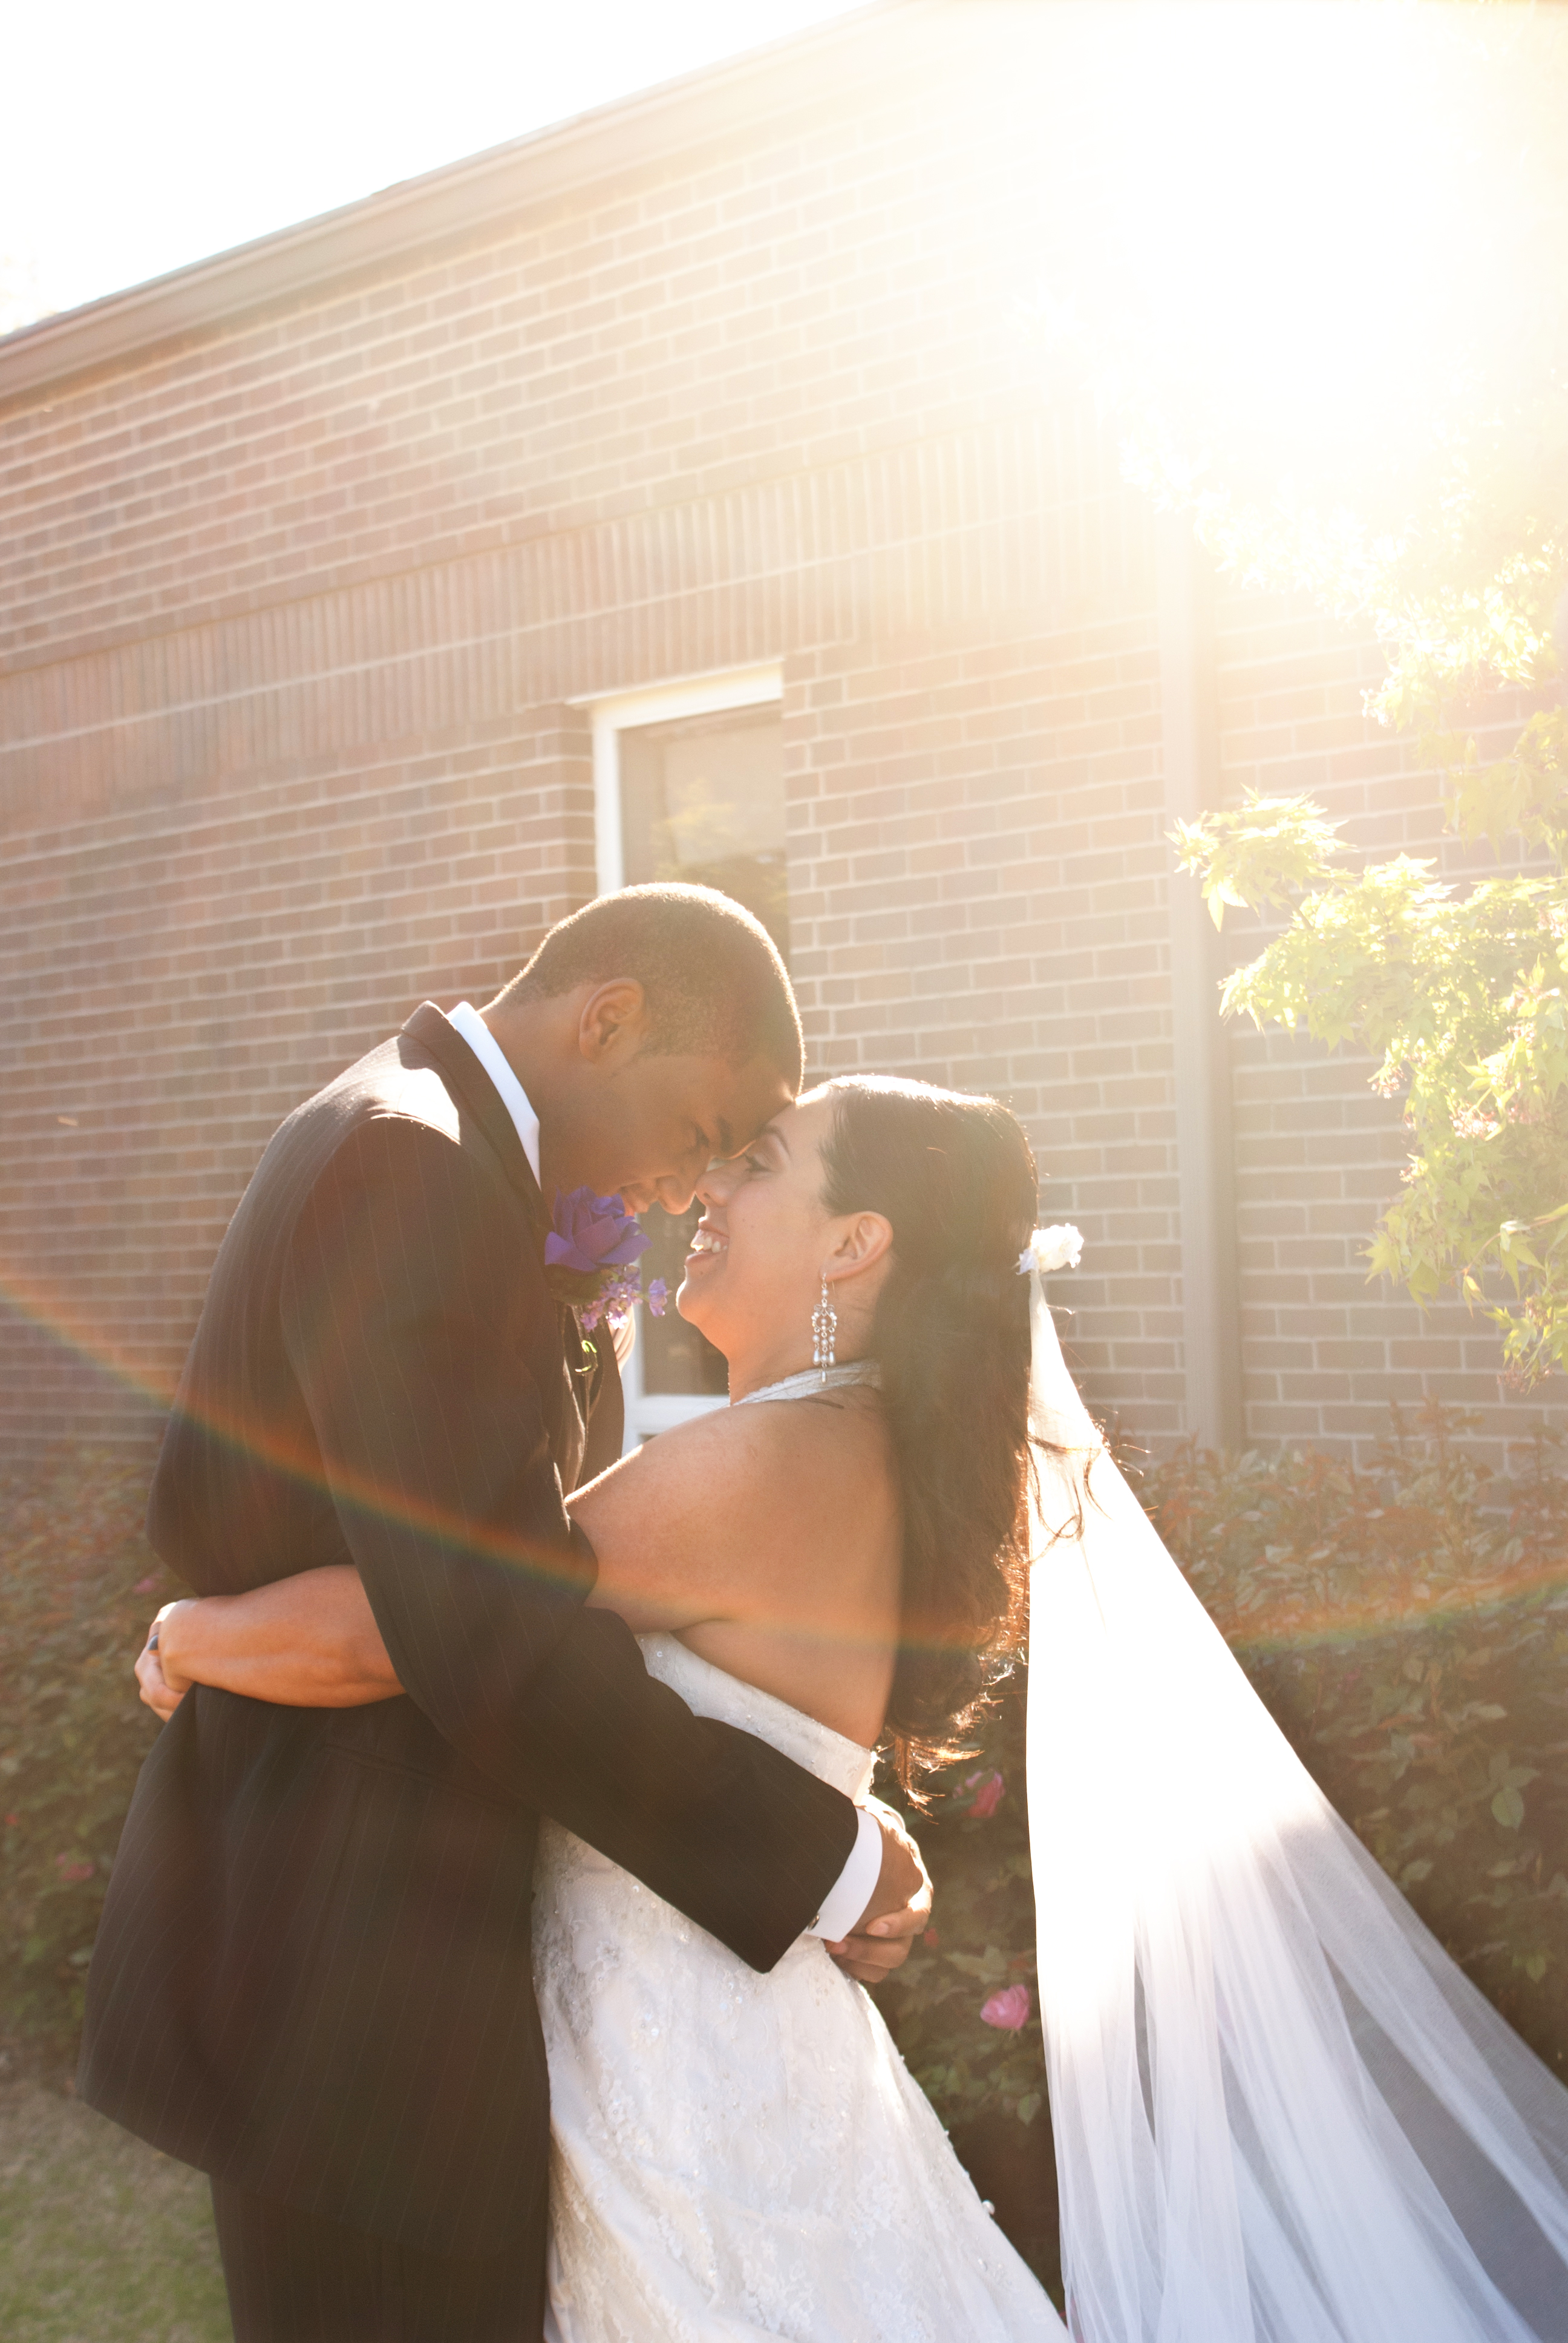
Here I exposed for the subjects. (no… I don’t do weddings. I was a volunteer second shooter here for my sister in law. I never would have posed these guys in front of that brick building… sigh). The sky is blown out, but luckily the sky is not the majority of this image. And that intentional sunflare… ah… to die for. 🙂
Metering for the Subject and Adjusting in Manual Mode
So this is our middle ground for back lit subjects. If you’re trying not to silhouette your subject and yet you’re in a situation where metering for your subject will blow out the background, this is the only way to correct in-camera without light modifiers, editing, or com positing two images together.
To do this: meter for your subject in spot metering. Then use exposure bracketing to bracket up to a full 2 stops below. Have a look-see on the LCD and decide which image has the best exposure for both your subject and your backdrop. (Alternatively, you could use the zone system to calculate how many stops you would need to move below to retain some detail in your highlights.)
Advantages
You’ll have a pretty decent exposure for both the background and your subject.
Disadvantages.
Your subject may still be darker and your background may still be lighter than you would like. You’ll likely want to run this image through editing software in post-processing to fix both of these downfalls.
Case Studies

I aimed for the middle in this image. I wanted some detail in the back and some on the subjects. I think I could have done a better job here, but it was a moment inspired solely by the angle/location of the sun 🙂

Side by Side Comparison
I actually exposed for the background with this image straight out of the camera (I liked the rim lighting around the baby bump.) So this series of images are actually different post processing edits that would show you how each of these scenarios would look as if I had did it in all of the methods described above.

Exposed for the background (or using evaluative/multi-segment metering)

Best of both worlds or spot metering and then adjusting to keep some detail in the background.

Exposing for the subject using spot metering and blowing out the background detail.
Assignment
Remember at the end of August I’ll be giving you an assignment to take imagery in a bunch of lighting types. You can start on this now or wait until I announce the assignment. September will be a no assignment month, giving everyone a bit of time to catch up.
