Mar
27
2013The floor has been vacuumed and the dish and clothes washer loaded. Cloth diapers have been returned to their home. Some clean clothing found its drawers. A bird feeder was painted shades of blue and red by very serious little girls. Sick baby boy tears have been soothed. Two meals were fixed, eaten, and cleaned. Twenty row of a sweater sleeve were knit while three adorable rascals dug, climbed, and soaked in the glorious, but chilly sunshine. I’ve managed to tape together and modify my pattern for my Easter dress. It’s nap and rest time, and I finally get a moment to myself.
Let me confess: my camera battery has been dead for about 9 days.
My everyday is filled with the holy calling of three little lives and my handsome husband. A task both so mundane it brings me to frustrated tears and so big, so beyond me that I can hardly breath under the weight of it all.

I spend 15 minutes here and 20 there tapping keys or clicking the shutter desperately trying to use this one life to fill the calling to show beauty in the midst of everyday mess. And the God who gives that calling, He provides plenty of everyday mess to give me the opportunity to do just that in my very own life.

Like that moment where I pulled that little girl to my side and breathed the grace that she doesn’t have to be perfect because Jesus was perfect for her already. Or the moment where a different little girl was climbing all over me and I snapped at her just wanting a moment of peace after working so hard to tidy our messy space. Or that moment where the little boy, sick again, burst into tears at my feet wanting his nap prematurely and I was able to hold his small body close. Or how I fought back bitterness toward my hard working husband with the gospel as I loaded the dishes and cleaned up the mess from yesterday’s trip.

I have plenty of beautiful-messes and ugly-beautiful in my life. And all of it is grace. All of it is the road Jesus uses to guide me deeper into Him. Uses to make me more like Him. Uses to bring me to the end of my prideful self so that He can file me with His Life and power to live the dream He’s called me to fulfill.
The life of a God-sized dreamer isn’t easy, but every moment writes His story.

Linking up with Holley.
Mar
26
2013“You don’t make a photograph with just a camera. You bring to the act of photography all the pictures you have seen, the books you have read, the music you have heard, the people you have loved.
~Ansel Adams
I am primarily a storyteller.
All my arts fall under this category. Quilts and dresses: stories stitched, lived in, and memories made under them. Writing: the weaving of story with language. Knitting: the story of how yarn and pattern and love intertwine. Photography: capturing a story in images.
I’m best known for newborn imagery, but that’s not the type of imagery that gets me fired up the most. I’m most passionate about telling the story of my clients (or my own family) and capturing those little details we’ll most likely forget. Those relational moments and telling the story of each family’s “us” are what gets me fired up.

This is my Bronwyn Girl. And these two things are simple, real parts of her everyday story.
That thumb tucked in her mouth. Those fingers wrapped securely around that blanket corner.
Not to mention the marker all down her face in her favorite color.
You don’t see many of those images on my page because I have a hard time convincing folks to let me come over and photograph their morning bedhead as they tickle their children in bed. And then following them through the Saturday morning pancake ritual. And the cranky tears with the baby is ready for nap. The way the toddler plays. The way Dad looks at Mom with such respect and desire after so many years. That is what my storytelling photographer heart longs to capture.
Capturing your own Story
It’s pretty safe for me to say that the number one thing you’re wishing to capture as a beginner photographer is your day to day life/interactions and what you see as beautiful. We’ve spent the last 3 months mastering a bunch of technical mumbo jumbo so that we can take better images. We’re going to pause here on the technical stuff and let it all soak in while we work on telling our own personal stories with images.
Until we jump into manual mode, I want you to shoot in Program as much as possible, but supplementing with Aperture and Shutter Priority when needed. But for the next few weeks, the class focus is going to change drastically to storytelling with your work as you master Program Mode/White Balance/ISO/Exposure Value and when to focus on Shutter Speed and Aperture.
Storytelling with Images Mission Statement (Assignment #1)
The way you tell stories with your imagery is going to be different than the way I tell stories. God created us as two different people with two very different viewpoints and purposes on this planet. That’s okay. Sometimes I’m afraid to show you my own “real” imagery because I don’t want you to mimic my storytelling style. I’m also afraid you’ll hate the way I tell stories, but that’s my own baggage (and likely will be a fear you’ll fight too).
I want you to sit down and write a mission statement. I want you to write, as simply or as elaborately as you want, what you want to do with your imagery. Don’t roll your eyes at me. You’re an artist with a camera and in order to get the most beauty in your work you need to have an end goal in mind. What do you want your work as a body to say and do?
Read More»Mar
21
2013Sometimes I feel so small.
Who am I to think that I can change the world through images and words?
I’m just one person. The same person who asked her kids to “Just stop talking to me,” this morning and who right now wants nothing more than a few minutes of peace. The baby is crying in the next room; I shouldn’t have let him have a morning nap despite his stayed-up-too-late crankiness.
I’m weary and I’m squeezing in a few minutes of writing before the afternoon explodes around my ears. I really just want to lie down myself. Lie down and ignore the calling.

Why do I think I can change the world (or even be a catalyst for change in one heart)?
The doubts plague me.
I bet they plague you, too. You know that voice that says you’re a failure as you get angry for having to discipline a young one for the hundredth time. Or reminds you that you can’t even get places on time with all three kids alive when you agree to write for a deadline. Or the voice that tells you there’s no one in the audience clapping… no, not one person, so you might as well pack up the whole mess and go home.
Yeah, that voice speaks to me, too.
Let me tell you a secret: Any voice that devalues your worth is not the voice of God.
The God who stretched out his hands on a tree to show you how much you were worth to him will not tear you down even as you fall again into sin and ‘failure’. No, Jesus will wipe away your tears, ask you why you looked at the wind and the waves, and beckon you quietly to keep walking with Him in obedience.
I am small. My audience of readers/clients here is very small. But my real audience of One, He sits front row and quietly smiling to encourage me to keep doing what he made me to do. Even when the rest of the voices in the audience are boo-hissing about this failure or that inadequacy or this sin problem or that very real limitation.
The God of the Universe, He delights in using the small foolish things in this world to confound the large powerful ones. And I find joy most of all in this little phrase: “But God.”
So I’ll insert this phrase whenever I hear one of those voices devaluing my worth.
“Melissa, you’re a mess. You just yelled at your kids, how could you ever be used to speak to another mom?”
But God. He can use me. He can raise the dead things from my life for His glory.
“Melissa, that image sucks. You should have opened the aperture up to get everyone in focus better.”
But God. He used this image to help me grow. And the family loved it anyhow through His Grace.
“Melissa, you ought to just stop writing. Stop tapping time from your family and home. No one ever comments anyhow.”
But God, has called me to this work. Not just the work of writing and photographing… but the work of obedience. Because without obedience, all “but God’s” are impossible. Besides, the only “well done” I need is His.
Would you try with me, friends? Would you try to seek the joy in your calling by telling those doubting, criticizing voices what the sovereign God of the universe is capable of? Because really what greater joy is there in seeing a dead lifeless heart like mine transformed by the active words “But God.”
For consider your calling, brothers: not many of you were wise according to worldly standards, not many were powerful, not many were of noble birth. But God chose what is foolish in the world to shame the wise; God chose what is weak in the world to shame the strong; God chose what is low and despised in the world, even things that are not, to bring to nothing things that are, so that no human being might boast in the presence of God. 1 Cor. 1:26-29
But God chose and called you and me in our weakness so that we might not boast in our own value. It is because of our weakness that God can use us. Because when we are weak, we know our only hope, our only value is in His abiding love. And that is where real joy in any endeavor lies.
Mar
19
2013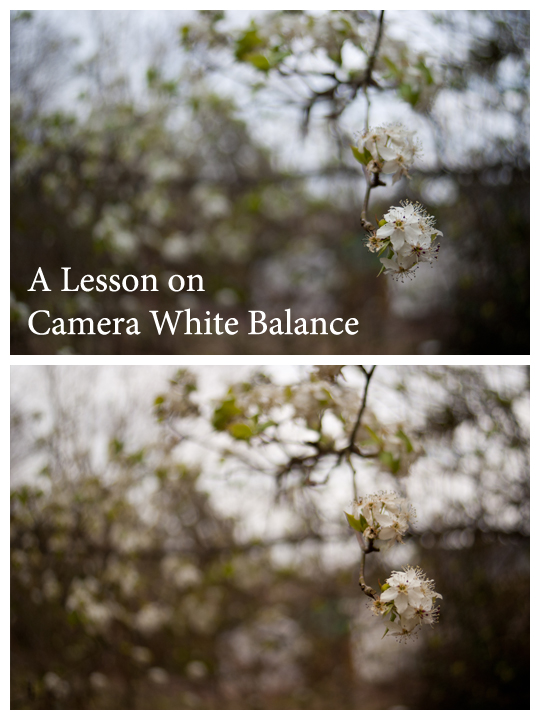

Today we’re going to focus on learning about Camera White Balance. First, here’s a few of my favorites from the last few weeks assignments taken from the our Group Flickr Pool.

Wander by TeddyBouch. He used spot metering here and thinks it landed on the bottom of the cliff making this image brighter than he likes. Oh, but I like it! I like how he’s lower than the subject, the blue of the sky, and the sharp contrast of her clothing on the otherwise natural surroundings. The only thing I crave is a few more clouds in the sky… but I don’t expect him to sit around all day waiting for them to come.

Glass Chandelier by SaraBeth. I know it says by Teddy, but these two played a joke on me and switched cameras/posted to the other’s account to see if I would notice the style changes. Tricky! And they totally got me! But I love that my class feels comfortable enough to tease me. Well played! Anyhow, I love the unique angle of this everyday object. I don’t like the yellow cast from the tungsten/incandescent lighting (which we’ll learn to correct in this post!). But I do love how the shot has rich contrast.

Stream by Andrew Aldrich. What drew me to this image is the strong leading line of the stream from the dark foreground to the lighter background. It seems like an invitation to adventure! Andrew used center weighted metering for this image.

Fungus/lichen at EV. -0.3 by Amber. Amber wishes that she had closed down her aperture to have more wood grain in focus for this shot, but it’s exactly the fact that the fungus/lichen is so much more crisp than the surrounding wood is exactly what caught my interest. I think it was good use of a shallow depth of field. She posted both this image and another at EV-0.7, but likes the brighter one better. Me too. I’m not sure I would change anything about the image: the swood fills the frame, the texture is stimulating, and the fungus/lichen is a clear subject. Well done.
White Balance
White balance is the process of making objects that are white appear truly white in your image.
Different lighting sources create unwanted color casts in your images. Have you ever taken a photo inside and had it turn out too yellow? Or taken one outside and noticed that everything looked blue? These are both situations where your camera’s Auto White Balance (AWB) has failed.
Changing Camera White Balance
There are two ways (that I’m aware of) to change white balance: using an 18% gray card and adjusting in post processing (editing software), or changing the white balance manually in camera.
18% Gray Card
If your card is large enough, you can actually use a gray card to set both exposure and white balance. Gray cards are relatively easy to use and relatively inexpensive, however it’s not ideal in situations where your subject is moving quickly or your light source is constantly changing (sunset, fast moving clouds bringing your subject in and out of the shade, etc).
To use a gray card to set exposure/white balance, you will hold the card near to your subject’s face and fill the frame with the card. Adjust your exposure value scale to 0 and you’ll nail exposure. You’d have to do this in manual mode, however, to avoid the camera re-metering the scene when you remove the card. To use a grey card for white balance you’ll also snap a picture of the card. Do this in each new lighting situation.
To change the white balance using the gray card, you’ll open your photos in your editing software along with the image you took of the grey card in that scene. You’ll need to sync all your photos and click on the grey card with your white balance tool. This can be done in Lightroom and the RAW editor of Photoshop Elements and Photoshop Creative Suite.
Using a gray card for exposure may suite your style in time, but the use of editing software to set white balance for even your casual shots is often more work than a casual photographer wants to do. It’s more work that I want to do for anything but my newborn work (because newborns have enough color casts naturally that I have to edit without added color casts from improper white balance)!
However, some camera’s allow you to change the white balance through your image of the gray card by importing the custom settings into your pictures until you change it again. I just found out I had this feature so I’m unfamiliar with how to use it (and I think my Manual is currently missing in action… ahem) If you’re lucky enough to be able to set your white balance from an image of a gray card in-camera, then feel free to take advantage of that process.
If you’d like to use a gray card, here are some that I recommend. I’ve used a simple cardboard gray card like this one since my high school film days for exposure and white balance; most of your local camera shops should carry a gray card like this. I recently purchased this set by Optek
for use when I am editing in Photoshop Elements Raw (thought it’s more useful in the Lightroom’s Raw and full Photoshops Camera Raw). Unfortunately, the Optek version is too small to fill your frame with for exposure. If you find that you really like your gray card for exposure and white balance this Lastolite -Grey/White
card looks super durable (compared to cardboard) and folds up for easier transport. (all of these links are affiliate links. I have tested and tried both the cardboard and Optek cards and will recommend them. The Lastolite card has good reviews, but I have not used it personally).
If the gray card option attracts you, then feel free to pick one up to experiment. If it doesn’t, don’t worry because you can do most of your white balance work in-camera.
In-Camera White Balance
So for most of us, the best day to day option for white balance is going to be switching our camera out of Auto White Balance when we notice a lighting situation that will create color casts (or even all the time if you feel so inclined!)
Like exposure value, each subcategory of white balance is going to have a scale from -2 to +2. This scale is in even integers unlike the exposure value scale. If you move toward the – negative side you’ll be allowing more of the color cast caused by that lighting situation. If you move to the + positive side you’d be erasing more of the color cast caused by that lighting situation. Adjust this scale as necessary if things still look a little off in your image.
The following are each of the typical In-Camera White Balance settings except for Auto White Balance (AWB).
All photos below this point are credited to TeddyBouch and Sarabeth. You can click on them to see who took which image if you like :).
Daylight

See how truly white the whites are? This is a great daylight white balance.
Use Daylight White Balance when you’re outside in bright sun with little clouds.
Shade

Do you see how the whites in these flowers have become a cool bluish gray? Using +1 or +2 might have lessened that effect.
Use Shade White Balance when you’re outside standing in the shade (under an awning, in a house’s shadow, under a tree). This white balance will sometimes produce a yellow/orange cast when too strong, if you see this just adjust your scale toward the negative.
Cloudy

You see how the whole world looks blue and angry? This is another AWB fail. However, I sort of like this effect in the case of documenting this storm about to prey upon this poor unsuspecting airport! Moving to +1 or +2 might have made this scene slightly warmer.
Use cloudy if you can hear Christopher Robin saying “Tut! Tut! It looks like rain!” You won’t need to use this if there are just a few clouds in the sky (use Daylight there), but if you’ve got a good cloud cover it’ll be your best bet. This white balance will sometimes produce a yellow/orange cast when too strong, if you see this just adjust your scale toward the negative.
Tungsten/Incandescent

Do you see how the white behind the main rose is more of a yellow tint? Tungsten/Incandescent lighting produces a very yellow light. AWB often fails to counteract that leaving the whole photo with a yellow hue. This was shot in Incadescent White Balance mode, but needed a little more push to the positive side.
Use Tungsten white balance in situations lit by old Edison filament style lightbulbs or Halogen light. This white balance will give a sharp blue/magenta cast when too strong, if you see this just adjust your scale toward the negative.
Florescent

This is a really great white balance for florescent lighting where it’s easiest to over or under correct your white balance.
Use this in situation lit by florescent bulbs of all types. In the newer “daylight balanced bulbs,” you may automatically adjust the scale toward the negative. When too weak this white balance will give you a blue/cyan cast, if you see this adjust your scale toward positive. Florescent, especially the daylight balanced bulbs is sort of in the middle of the scale. That is why I’ve changed this up here and told you weak rather than strong. The effect of messing this one up is more visual in not adjusting the white balance up enough.
Flash
We’re trying hard not to use flash right now… but when I teach you how to correctly use that annoying pop-up flash you may want to play in this white balance area 🙂
Color Temperature/Kelvin
This is highly technical and outside of the scope of this class… but if you’re really unhappy with your white balance, feel free to read this article about the Kelvin Scale to learn a bit more.
Custom
This is where you can set your white balance off your gray card or another neutral item in the frame. Read your manual (and I will too!) to find out how to use this if the gray card appeals to you.
White Balance Assignment
Both Point and Shoots and DSLR/DSTL have pretty much the same white balance settings. So the good news is that if you can find your white balance menu you should be pretty set from there.
- Notice your lighting source, adjust your white balance accordingly, and take 3-5 shots in different lighting situations. If you’re unsure whether you should have used positive or negative on the scale take a few shots and post one or two. But I bet the computer monitor will clear that up for you really quickly 🙂
That’s it! A simple assignment for a pretty simple concept! I’m looking forward to seeing your images in the Flickr Group. Feel free to join in at whatever point during this series 🙂
Next week we’re starting a 7-8 week break from all this highly technical camera knobs and settings stuff and moving on to storytelling with images. We’ll circle back and learn manual mode at some point, but I really want you to stay on program for awhile rather than get overwhelmed with adjusting every single setting. Let’s start having a little bit of fun, shall we?
Mar
13
2013I come upstairs from tossing the last of five sets of sheets in the washer to find the youngest of the three tossing his cookies (the figurative ones) right there in the high chair. Last night the wildest sleeper of the three had taken over our bed (and soiled two sets of sheets). The other twin had paid in 30 hours of not being able to keep in liquid and 48 hours of little food. My morning had started with the littlest one and I in the shower trying hard to wash away the sickly stench. I had to call Derek home from work so I could catch enough sleep to be able to handle the sick trio with sanity. He’s gone now while I clean up the baby and get them all down for naps.

Motherhood is far from glamorous. In fact, on days like this I might just want to pack up and run away. Oh, but what is puke if everything I have is grace? Grace. Puke is grace. But how?
I stop tapping at the keys a minute here while the three sleep and spend time in prayer with a bottle of diluted bleach over a high chair and my table. It’s not easy to see puke as grace. It’s not easy to choose gratitude over bitterness. Nothing worth doing is easy.
The table though cleaned with bleach still bears blue and yellow marks. And I am the same. This roiling boiling cauldron of selfishness and discontent and frustration seething just under the surface.
“But God!” Peter had preached these words just two weeks ago.
But God, being rich in mercy, because of the great love with which he loved us, even when we were dead in our trespasses, made us alive together with Christ—by grace you have been saved— and raised us up with him and seated us with him in the heavenly places in Christ Jesus, so that in the coming ages he might show the immeasurable riches of his grace in kindness toward us in Christ Jesus. Ephesians 2:4-7
Puke is grace because it shows me how much I need Jesus. How ugly and messy I am without the saving power of grace. How ugly and mess I am when I refuse to see even puke as the grace pointing toward the proudly self-sufficient heart beating violently within.
This messy smelly puke it is grace because it points me to Him. To “the immeasureable riches of his grace in kindness toward us in Christ Jesus.” To that place of blissful surrender that says the plans I have are not the ones that He has for me and His plans are in fact better for my own good.
Sometimes I need to be brought low to the reality of earthly motherhood so I can recognized the beauty of the perfect heavenly Father. So I can recognize just how much He loves me in all my filthy sin-soaked sheets and awake to the reality that He died to wash those sheets clean.
And, right here in this moment, puke contemplation gives me the grace to see what true love does. So I wrap the soiled clothes and rags in a towel and carry them down to the now finished washing machine. It’s time to be washed clean again.
