Apr
09
2013Last week we talked about how the Rule of Thirds creates a stronger composition through putting the main subject in one of the area’s a viewers eyes naturally land. This week we’ll introduce another key composition concept.
Leading Lines
Leading lines are any lines, straight or curved, the help move a viewer’s eye throughout the frame. Successful leading lines help to create a visual narrative causing the viewer to move from one important aspect of the image to another.

When I think of leading lines, the first example that comes to my mind train tracks photographed so that the viewer’s eye is led right off the horizon. It’s a classic effect that always gives the viewer a sense of journeying forward.
However, most uses of leading lines are more subtle. A horizon line or the curve of the oceans shoreline can be a leading line. A watermelon rind can be a leading line that points us to the smile of a still dripping face. A subject’s extended arm or leg may bring the viewer to examine more carefully. An insinuated line like the probable flight of a softball into the waiting outfielders mint could even qualify as a leading line.
How to Use a Leading Line
Let’s be honest, sometimes great leading lines in your image are a sheer accident.
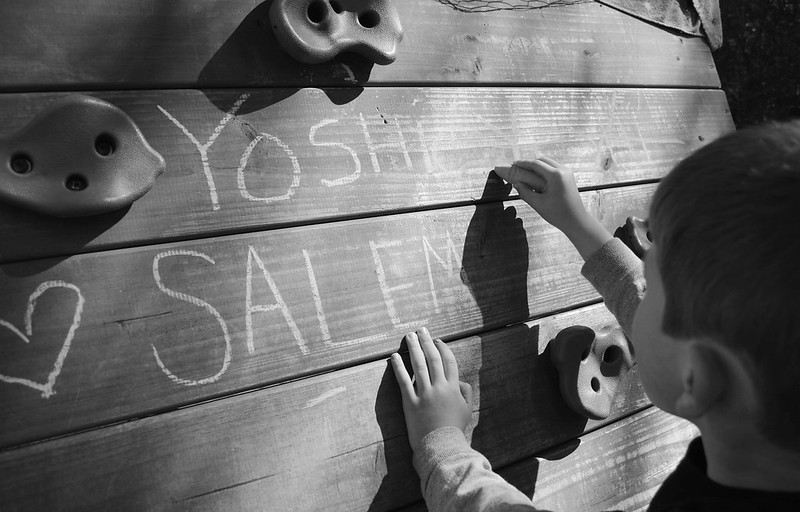
The horizontal lines of the writing surface draw the viewer straight to the subject writing. Jessica probably didn’t notice this effect when she snapped this photograph (kudos if she did!), but those lines contribute to the narrative of her son’s written words.
However, our assignment will be to notice and intentionally use leading lines, so lets jump into a few case studies of both obvious and more subtle leading lines.
Leading Lines Case Study
All of the following images were provided by SarahBeth and TeddyBouch. As I’ve mentioned before, these two class members have been gracious enough to fill in the photographic gaps created by my primary role of wife and mother. I’m so grateful for both of them!
When we’re critiquing photographs solely on the basis of leading lines, we’ll use the following questions:
- What is creating the leading line (or lines)?
- Where is the viewer’s eye led?
- What is the story this image is telling you as a viewer?
- Do the leading lines create a narrative that helps the viewer understand the story the image is trying to tell?
I’m going to answer each of these in the analysis of the following images.

- What is creating the leading line (or lines)? There are two sets of lines in this photo: the raised wooden path and the tall straight trees.
- Where is the viewer’s eye led? My eye is immediately led up the path, but once i reach the visual “end” of the path my eye catches the upward then downward movement of the tree trunks. At the end of this visual trip, my eye takes another trip up the path…
- What is the story this image is telling you as a viewer? I feel like I’m being quietly beckoned into an enchanted forest.
- Do the leading lines create a narrative that helps the viewer understand the story the image is trying to tell? The leading line of the path is what beckons me into the enchanted forest and is in fact the whole narrative as I understand it. The vertical lines of the trees effectively set the scene.
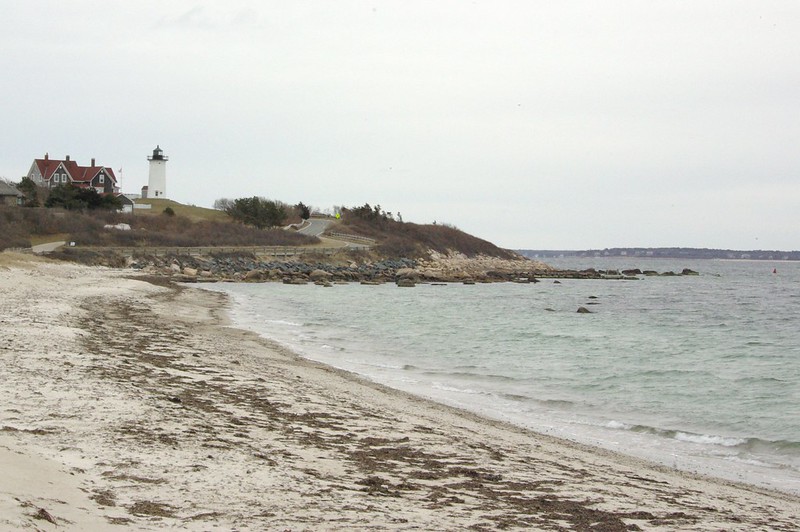
- What is creating the leading line (or lines)? The shoreline in the foreground, the horizon in the background, and the rim of the island.
- Where is the viewer’s eye led? Up the shoreline curving to the rocks, on to the horizon then back to the island, and finally to the lighthouse.
- What is the story this image is telling you as a viewer? The story I hear is of the importance of this lonely lighthouse.
- Do the leading lines create a narrative that helps the viewer understand the story the image is trying to tell? The leading lines here, although much more subtle than the prior image help the eye focus on the lighthouse.
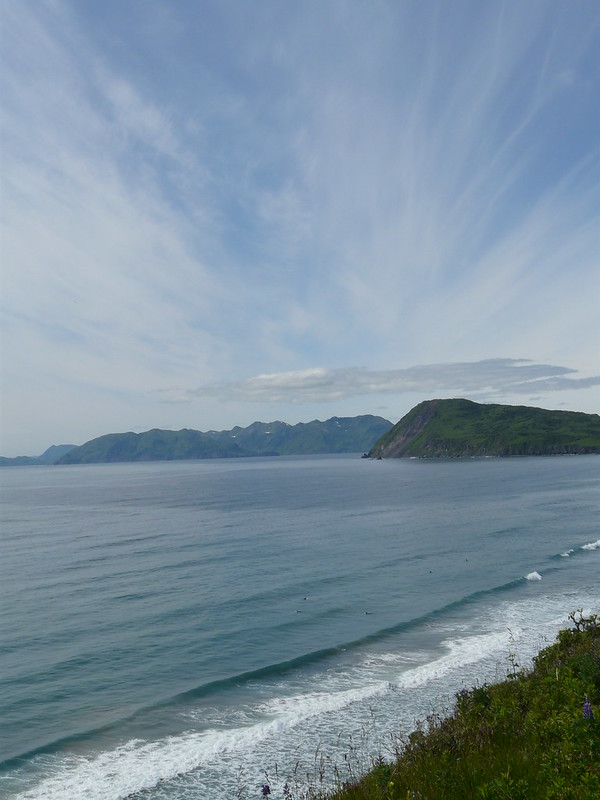
- What is creating the leading line (or lines)? The shoreline, the horizon, and the clouds.
- Where is the viewer’s eye led? The shoreline leads us to the water. The clouds and the horizon lead us to the mountains and the horizontal clouds.
- What is the story this image is telling you as a viewer? I just see the majesty of creation.
- Do the leading lines create a narrative that helps the viewer understand the story the image is trying to tell? The leading line in front shoreline sort of draws me right past the mountain in the foreground. I’m not sure that it’s a bad thing, but it doesn’t immediately point to the same area as the other leading lines. The clouds here are by far the most surprising lines and I do believe they point us right to the mountains off shore.
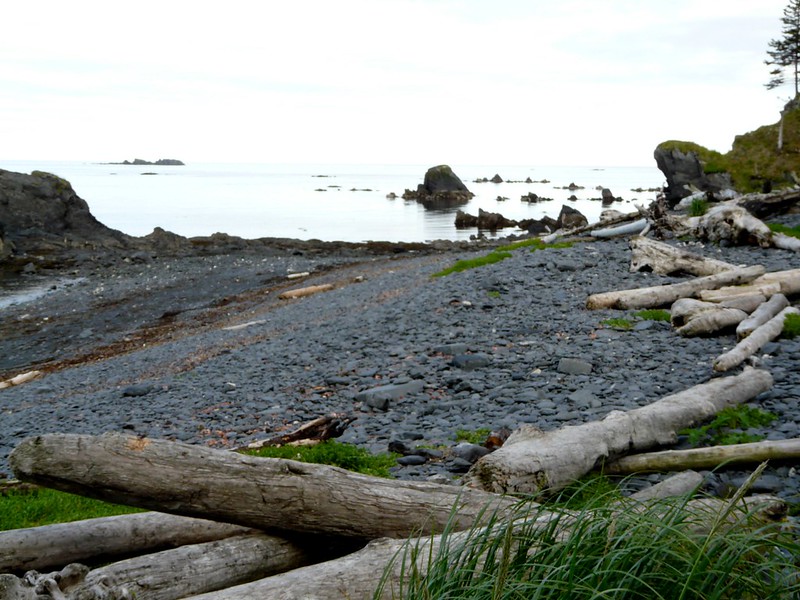
- What is creating the leading line (or lines)? The shoreline, of course, but the driftwood/fallen logs are a leading line as well.
- Where is the viewer’s eye led? Up the driftwood, along the shoreline, and back again.
- What is the story this image is telling you as a viewer? A sense of bewildered wonder at so many huge logs: What happened?
- Do the leading lines create a narrative that helps the viewer understand the story the image is trying to tell? The leading lines of the driftwood ARE the story. What happened?
Leading Lines Assignment
Now that we’ve looked at a few images with successful leading lines, lets go out and make a few of our own (1 or more). Pay attention to your surroundings when taking these images. Not only can a set of leading lines upgrade at image from snap shot to something special, but paying attention helps you make sure you’re telling the story you want to tell.
Once you’ve taken a few leading lines images, hop on over to our Free Beginner Photography Class Group and share with us and leave your answers to the following questions on a few leading lines images that catch your eyes.
- What is creating the leading line (or lines)?
- Where is the viewer’s eye led?
- What is the story this image is telling you as a viewer?
- Do the leading lines create a narrative that helps the viewer understand the story the image is trying to tell?
How are you feeling about Storytelling with Images? Did the last two “rule” based lessons help you focus on telling the story well-composed? The next couple weeks we’ll be discussing different ways to compose your images to tell your story better. And I might sneak in an extra post after that before jumping into a the culmination of this series.
Apr
08
2013Spring is here.

I have this incredible urge to change clothes like the trees and adorn myself and my space with beauty.
I push the plastic playground down our sloped yard and into the shade. My daughters pick clover ‘flowers’ and place them in an empty spice jar on the table. I move all the furniture around in our awkwardly shaped living/dining room, trying to find the arrangement that is most beautiful and most suitable.
My back hurts at the end. The baby breaks into a puddle of tears and when I lay him on the moved couch, he stays. It’s so unusual I touch him to find his temperature feeling a little higher than normal. I’ve said a few words in unkind tones trying to prod my daughters out of the way so I could move the next piece.
My real life is filled with beautiful-mess. Sure my living room is now vacuumed and rearranged… but there are nail polish stains on the carpet, a play kitchen topped with everything we want to keep out of Sedryn’s reach, and hurt feelings that had to be healed as I hustled the littles about in an effort to get this done.

Oh… and a pile of wet laundry still waiting to be hung out on the line.
So much of the time I only want to show you the newly rearranged space. The pretty manicured side of my life. I want to hide my sin. I want to step back from true community and sit smugly with my I’ve-got-it-all-together glance around the room.
But there are always two sides to my life. There is always the sweat and blood and tears and frustration and sin and dreaming and learning and encouraging words and the very hand of God behind anything “I” accomplish.
To show you the sin, the disappointment, the pain, the sorrow, the struggle, the fear, or the achy-furniture moving back as well as the God-glory moments of beauty, joy, love, sacrifice, and perfectly arranged furniture is to encourage you that your most beautiful moments really are the messy everyday vulnerable stories. Precisely because those moments are less than perfect. Precisely because those moments are yours alone by grace.
So when Holley asks me to share the why behind my dream… I almost what to shake her. Really? Why?! Why not, Holley? But then I remember, God wired us all differently.
This passion I feel to share with you my own messes and to hopefully be invited to photograph your messy real (and truly beautiful) life is mine. It’s a calling. It’s a gift. Holley or you may never fully understand the why, but here’s the most succinct way that I can share with you why.
When I finally reach out to community in my worst sin and tear filled moments, I am most encouraged to keep walking with Jesus the next day when I hear my community whisper these words:
“Oh, sweetie, I’ve been there, too. It’s so hard. But God is bigger than this and He’s growing you to be more like Him. Let’s pray that he will help you see the beauty in that very hard growth.”
I want to write and photograph in such away that the community around me (no matter how small or large) can hear that encouragement through my work. That is why I’m pursuing my God-sized dream, because I know the power of a voice that speaks grace.
That’s why you should pursue a God-sized dream (more of what God has for you), because only your voice can speak grace in the way He designed.

Apr
05
2013Sometimes I feel so unable and unworthy to tell His story. I find it more natural (but still scary) to share how my raw story intertwines with His because I am constantly processing His work with a pen.
Yet telling client stories is so much harder. I fear that I will tell the story wrong or that I will share too much or too little. I worry, perhaps very foolishly, that my words will not bring Him glory.
However, Jesus is sovereign over even my pen. And my clients read these humble words of mine before I ever press publish… so why should I fear?
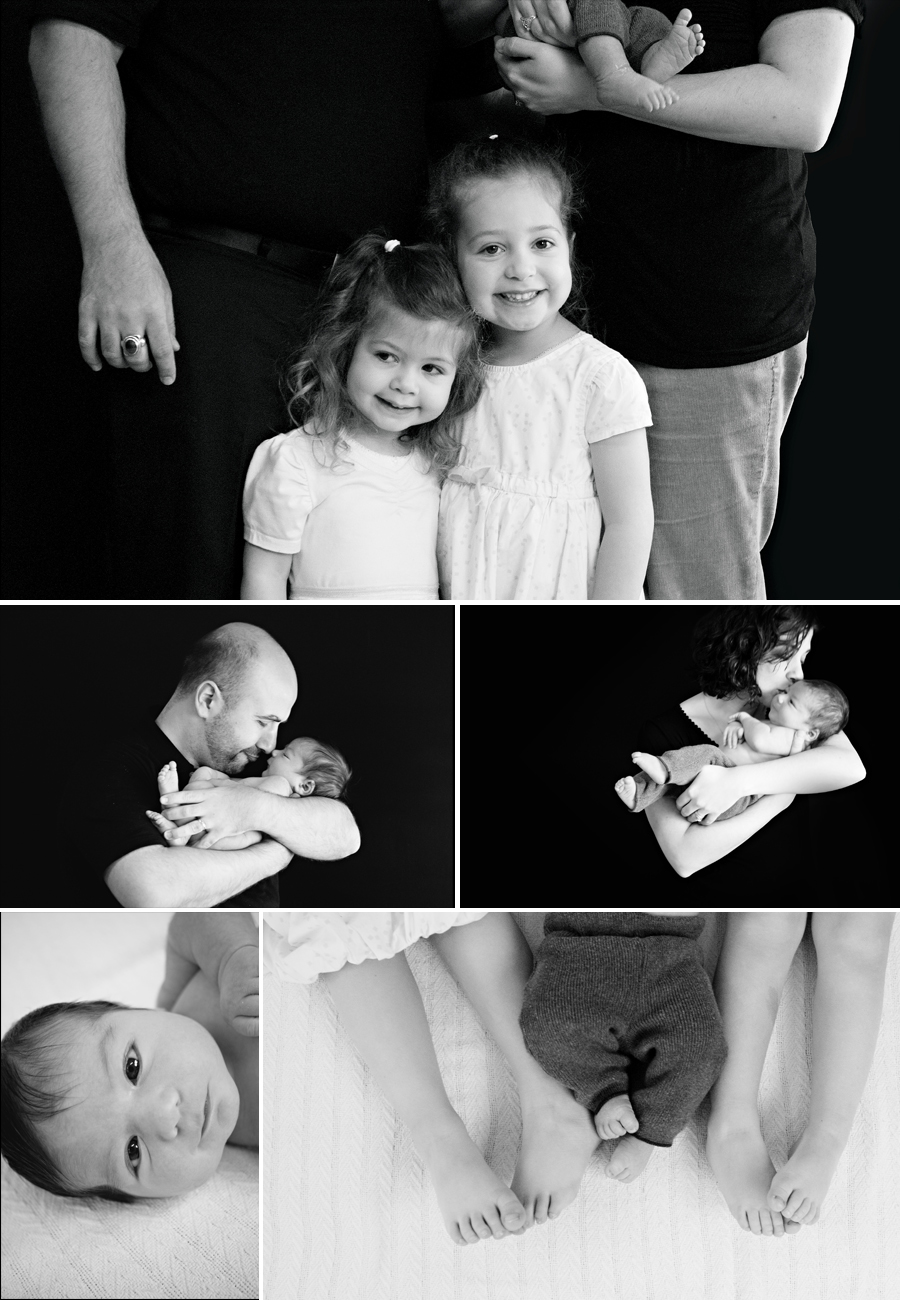
Mariam’s Story
I’m four stories behind. So let me start with Mariam.

Mariam, too, processes her world by placing ink on paper. With the onset of each season of morning sickness, Mariam selects a jouranl and scratches down words to encourage the new life within.
Her two beautiful girls, Isabella and Alista, have journals brimming with memories, laughter, and recorded words of prayer. Newborn Lazaro’s journal is already filled with nearly a year of the same writing gifts though he is only 2 months old at the time of this writing. But there is a fourth journal whose writing now is sparse: that dear child has departed to sit at the feet of Jesus.
The five in this family have walked a healing journey through Lazaro’s pregnancy and birth. A healing both painful and profoundly filled with the peaceful presence of Christ.
Relationship Focused Newborn Photography
When Mariam and I were planning this session, she specifically asked for relationship focused newborn photography. She wanted us to capture the journey of healing as a family and how precious their relationships have become through this season of intermingled grief and joy. My heart sang at this request because telling stories like these are why I clumsily pick up both a pen and a camera.
Mariam’s session has so many beautiful images that I have had a very difficult time narrowing down what I want to show you.
Lazaro’s many smiles, the shy smiles and then laughter of Isabella and Alista as I sang Pete the Cat, the way Haro has the power to have a whole room fall over in laughing tears, Mariam’s joy in knowing that His will is always the best…
I hope you’ll see glimpses of all these things in the following images.

Apr
03
2013I feel like your images are getting lost in the lesson so I’m going to round up your images on Wednesday Mornings to get everyone excited about their progress and completing the new lesson. I’ve missed a few student reviews… so I’ll label each of the following showcase images with the lesson that corresponded.
And let me just say that this class is the most incredibly encouraging bunch of people. Sarah and Teddy noticed that I sometimes struggle to get images up in posts because I have three kiddos/a crazy life and are voluntarily taking extra photos to illustrate concepts for me when I have heavy week. Amber reached out to me with much needed words of encouragement as we battled through an inexhaustibly sick season here in the house. Andrew… well, as my father-in-law, I just feel blessed that he’s engaged in the work I’m doing here and growing as a photographer. And Amanda keeps sticking with my class despite being on nearly equal footing with me technically (and more advanced than me in some areas since she learned cameras digitally and I started with film). Jessica was given her camera in February and just jumped right in with the rest of us bravely and is improving so much each week she’s able to post (her family was down with the same evil bug we were for the last week or so). I’m just so blessed by this group of people gathered around me to learn and grow together. Thanks, class, for making this magical.
SaraBeth
Sarah just purchased a DSLR to upgrade her Point and Shoot. So excited to see what she can do without the limitations of her P & S, because that girl was rocking her previous camera.

Taken with the point and Shoot, I love this self portrait of SaraBeth and her beau. She shot this with center-weighted metering mode to get the shadows to be that magic 18% grey color. The snow has great texture with highlights and shadows so she rocked exposure. I think this is a super fun portrait!

This girl is totally engrossed in her lollipop and the surrounding parade. This was taken for our exposure value lesson and SaraBeth used +.3 stop to make sure the image was bright and airy.

Taken with her new DSLR, this image was a practice in white balance. The hallway is lit by flourescent light and the wainscoting is indeed a creamy yellow. What I love about this image is the really wonderful use of leading lines. Your eye is drawn by the hallway straight out to the door.
MyOhManda
Amanda is currently launching her own photography business in the Greenville area. I’m actually pretty flattered that she’s continuing in my class 🙂 She too had a camera upgrade to a full frame camera. We haven’t covered what that means… but lets just say it’s a super expensive pro-level camera capable of taking wonderful images in low light/high ISO because of a super large sensor. I’m slightly jealous (okay… super jealous).

Amanda uses the Kelvin Scale for White Balance. This was taken at 6000 Kelvin and I love the creamy skin tones on the adorable little girl resulting from this white balance. I’m might just start playing with Kelvin myself…

This was from last weeks assignment to write a mission statement regarding how you want to tell stories with your images. Here is Amanda’s statement, “I want to capture raw emotional interactions between families and couples in a way that pulls away from the technicalities of a picture and pulls into one of the most important aspects of a memory: Love.” The facial expressions here encapsulate this. His smile, her whisper, the timeless setting: just beautiful.
Andrew Aldrich
Andrew has been so busy chasing birds with his camera during the start of spring migration and the visit of some of his grandchildren, that his image contributions have been few and far between. I’m sure once spring migration ends we might see more of him 🙂

This is from the metering assignment and is using center-weighted metering. I love the face framing effect of the two hoods, the warm sunshine-y hue of the image despite the cold snow, and the sort of annoyed/amused expression of his grand-daughter (my niece!).

Andrew popped in for the mission statement assignment with this image of a snow bunting. I’m really proud of him for writing out a mission statement because writing is far harder for him than even learning how to use Photoshop Elements! Here’s his statement “To capture beauty as the eye sees it, and as the imagination remembers it.”
TeddyBouch
Ever since the beginning of class, I’ve admired Teddy’s eye for details (his horizon lines are always as straight as possible) and his love for contrast in light. He keeps developing these skills in each set of images he submits.

This image of this forlorn boat just grabbed my full attention when I logged onto our Flickr Group. I love the colors and that sense of loneliness. Teddy shot this for our program mode/exposure value lesson at +1 to covey the scene as it would have looked had it not been an overcast day.

Another dreamy wall-worth image aptly titled “Narnia”. This is a very tricky white balance. It was taken at dawn so Teddy wanted to convey the darkness of the snow while at the same time making us see the yellow of the tungsten/incandescent bulb.
Amber
Amber has been snowed in for the entirety of our class with two little ones 3 and under. She’s bravely managed to get at least one photo up each assignment. Amber was a true beginner at the beginning of the class, never having dared to take the camera out of Auto mode. I’m ridiculously impressed with her growth.

This landscape photo of the backyard was a very careful study in exposure value. She liked the blue sky better in this image at -0.7 but the overall exposure at -0.3. Sometimes we just have to pick which one we like better (or get very well acquainted with our camera’s capability for combining multiple exposures or our editing software). I liked this deep blue sky best, but I also love the staggered composition of the trees.

What drew me to this image was nail polish over carpet in the hands of a three year old. Lets just say my carpet has a very pink and very teal spot from situations like this one… I also loved how this is a detail shot. Taken for the white balance assignment, Amber chose the shade present for this warm image.

This is one image that represents Amber’s Storytelling with Images Mission Statement. I was drawn to the image because of her daughters proud expression at the work of her hands. Here’s Amber’s Mission Statement: ” I want to capture the beauty of this earth and the love, emotion and every day interactions of my family and those around me.” I think she rocked it right here!
Apr
02
2013Typically Rule of Thirds is one of the first composition rules that a new photographer learns. Let me be honest. This may be my shortest lesson in this whole series!
Rule of Thirds Defined
To use the rule of thirds we must mentally divide the image, both horizontally and vertically, into thirds.

Dividing the image in thirds helps us decide where to place the important aspects of our images.
The points where the lines intersect are where a viewers eye will naturally land when first viewing an image; therefore, the most powerful place to put our subject is at one of these intersections.
Additionally, aligning an important aspect of our image alone one of these four lines creates a stronger composition. For example, if shooting a landscape scene with a clear horizon line, you’d want to place the horizon on one of the horizontal lines dividing the image into thirds for the strongest composition. Or placing a standing figure along that line if doing a portrait.
And that’s the whole rule. Some photographers do this naturally without even knowing the rule of thirds and the rest of us spend a lifetime honing this skill.
Rule of Thirds Image Study
Lets take a look at some of my recent work and analyze it with the Rule of Thirds.
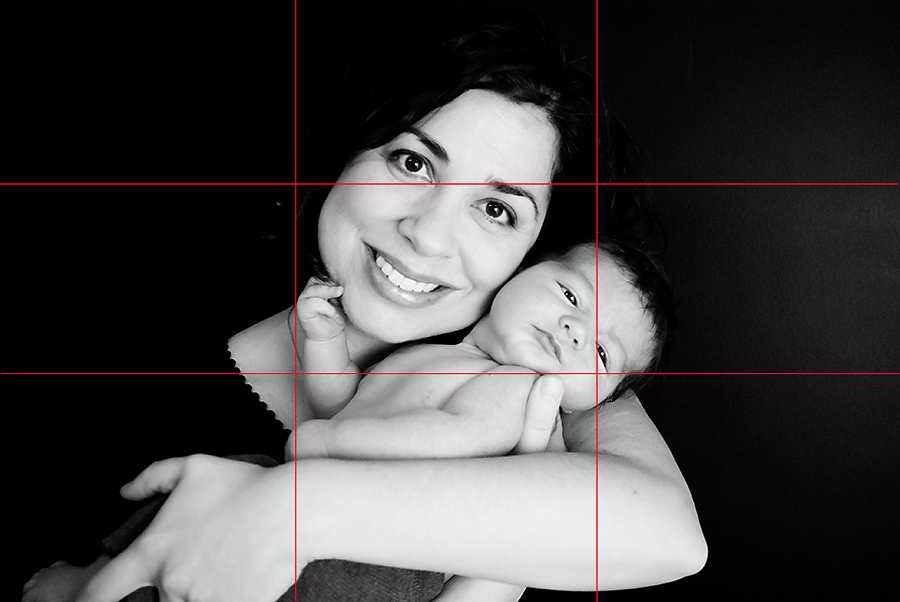
While this is a really beautiful image that I’m sure my client will love, it definitely has some flaws. I cut off her fingers and the baby’s toes in my (in-camera) crop. It’s also a little lacking on the rule of thirds. An important part of the image does fall in one of the intersection points: baby’s eyes. But mom is directly in the center. Her eyes do fall on the top third line… but still this image’s composition is seriously lacking compared to the following image.

This composition makes me really proud. Mom and baby are lined up along a third line and the kiss/both faces fall at the top right intersection. And the little dude’s smug smile… priceless.
Sedryn’s eyes line up with the top line of thirds and his right eye falls right in the top-right intersection. His body is lined up with a vertical line and his fierce snaggle tooth grin falls at the bottom-right intersection.

While not as strong as Sedryn’s image, this image of Aeralind also follows the rule of thirds. Her body aligns with the left vertical line and her eyes with the top-horizontal line. I missed putting an eye at the intersection of these lines, but all and all, not too bad.
Rules are Meant to Be Broken
Do I follow the rule of thirds all the time? Nope. So I don’t expect you to either! Here are two images where I intentionally broke the rule of thirds and my reasons why.
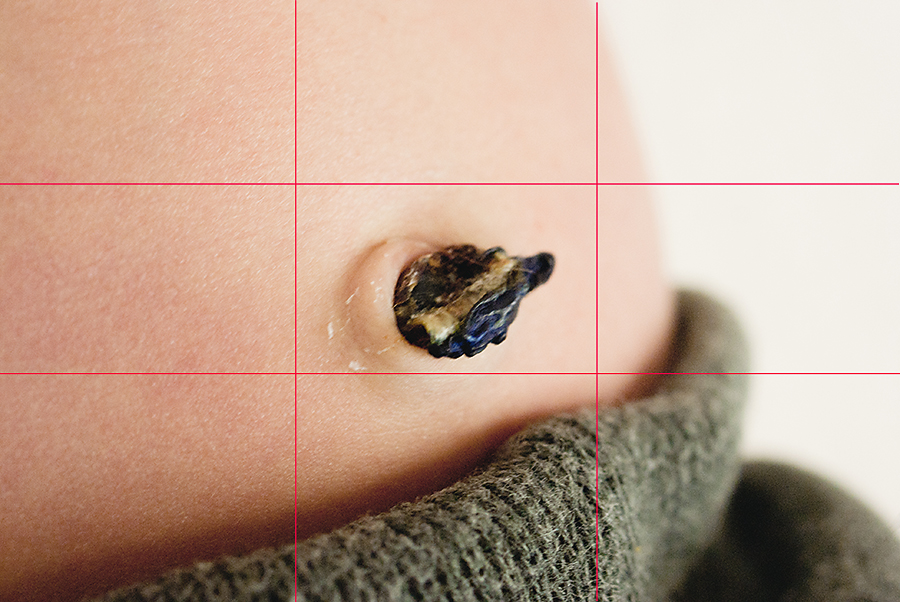
I put this little boy’s belly button right in the middle of the frame. I chose this placement because this type of image usually ends up in a square collage with other little details in either an album or a single print. I needed to know I would be able to get a great square crop from this image so I chose a middle alignment.
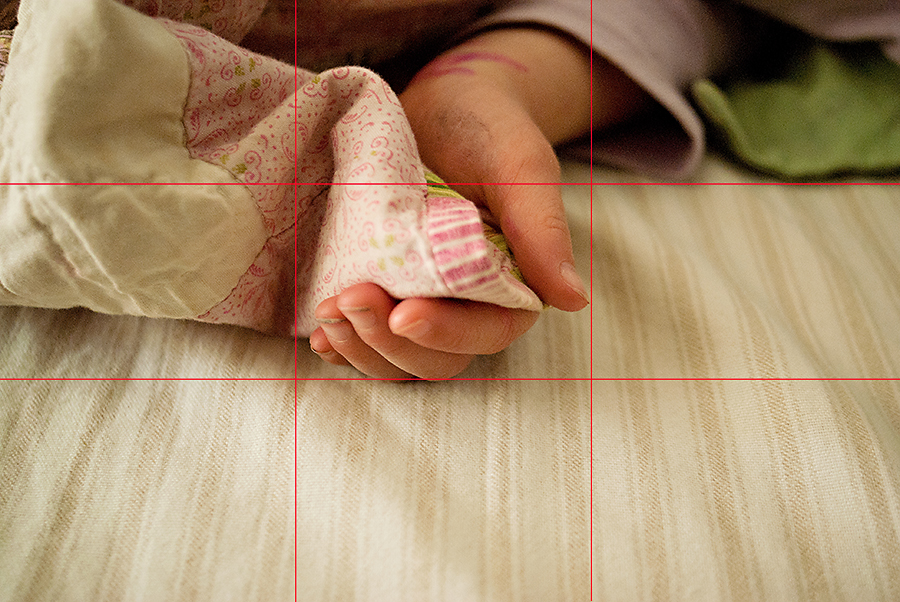
If I’m honest… I was not even thinking about the rule of thirds in this image. I just wanted to grab this blanket corner rubbing memory before my waking child stopped doing it! However, I do love that all of the important aspects of this image occur above the bottom-horizontal line. I also love that her little fingers are in the middle and that the lines on the sheet do a great job of drawing your eye up to her hand.
Rule of Thirds Assignment
The part of the storytelling with images assignment that corresponds to this lesson is to:
- Take 1-3 images following the rule of thirds.
- Take 1 image intentionally breaking the rule of thirds.
Post these images in our Flickr Group for some friendly critique. I look forward to seeing you apply this concept.
As I promised, this is most definitely my shortest lesson yet! Have you used the rule of thirds in your photography before? If so, let me know in the post comments. 🙂
