06
2011My sweet bloggy friend Julia is doing a Linky Party called Mama Loves. She’s found that she’s learned so much from other Mama bloggers that she felt she wanted to create a place for us to all share the items that have helped us the most. I think it’s a fantastic idea.
I’m a pretty independent person. I do things my own way. My mother loves to tell the story about my first day in Kindergarten where all these kiddos were clinging to their mommies crying and I looked her in the eye and said: “I can do it myself.” She went back to the car in tears. My teenage years were probably worse from her perspective. I often heard the ultimate mother-curse: “I hope you have one just like you.”
Well, fortunately for me, the egg split into identical twins and I have two… with portions of their personality just like mine.
Aeralind is the independent, do her own thing, I-don’t-want-your-snuggles-right-now-thank-you-very-much portion of my personality. But she also hates discipline. She’ll do just about anything not to receive a scolding or a spanking. Generally, she’s pretty compliant, though she has her moments.
Bronwyn received the full measure of her mother’s strong will (and I think some of her Aunt Kaykers’ strong will, too). Bronwyn’s single goal in life is to discover where the boundaries are and then to push them just to make sure you’ll enforce them. But she’s also the snugly please-spend-time-with-me baby.
In any case, we’re entering the 2’s and 3’s where some of their behavior and a lot of their boundary testing needs to be answered with a heaping portion of parental control and another heaping portion of parental love. They need to know both that we mean business and that they’re never going to lose our affection.
Enter James Dobson’s The New Strong-Willed Child (as well as Dare to Discipline
). These books are helping me to both find and maintain that delicate balance so that I can help them learn that boundaries are for their good while also keeping from crushing their delicate spirits. I can’t recommend these books enough… especially if you have a strong-willed child (and you know if you do… trust me :-p)
05
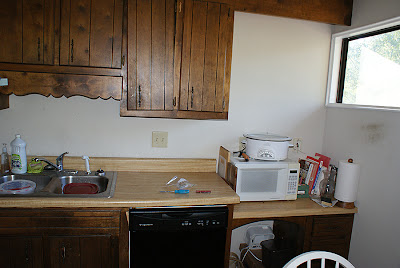
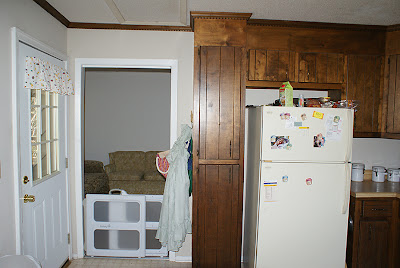
2011My kitchen was a cave.
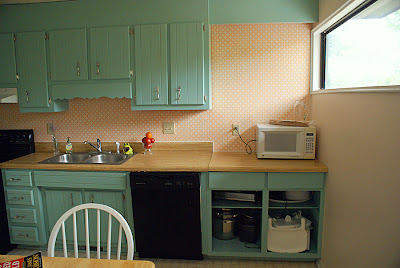
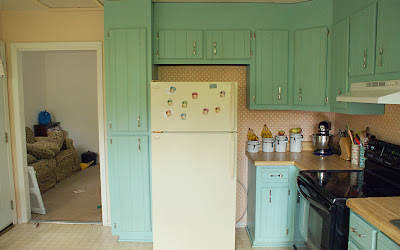
Dark cabinets, super old fake wood laminate counter tops, dark dental molding all the way around the room, and dirty flat painted beige walls were sucking out the light from the 4 windows in the huge room. Here’s proof:
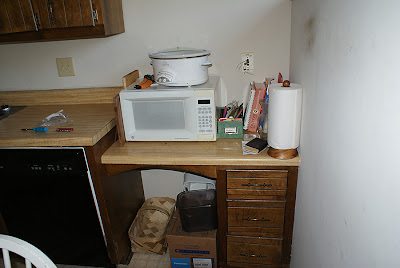
Additionally, there was this little desk in the corner that really served me no purpose. And the final straw was that no drawer in the whole kitchen was wide enough for a silverware sorter except for one of those desk drawers.
After we ripped out the wallpaper in the master, prepared the girl’s nursery, and spontaneously redid the guest bathroom, I set my sights on the kitchen. Our budget was (is) tiny so I knew we’d have to do work in stages. For Stage 1, I wanted the most visual change for the least amount of money (especially since midway through this process we found out about our Surprise Baby!).
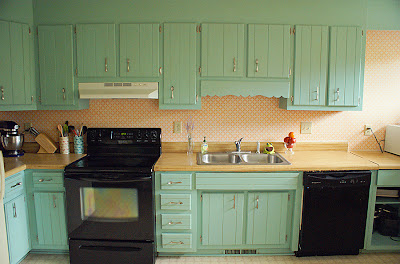
Can you believe that most of this change is paint?! I hardly recognize the space when I pulled out the before pictures!
Breakdown of costs:
Removal and Replacement of Desk: Free!
Derek pulled out the desk saving the fake wood counter-top. My father-in-law built the new cabinet using scrap wood and materials. The two of them attached a piece of wood to the back of the old counter top to make it as long as the rest of the counter tops and replaced it ontop of the new cabinet. Obviously it still needs doors… but right now everything down there is for the girls to play with 🙂
Primer, paint, glaze small rollers for the cabinets: approximately $60.
We used a gift card for the primer/supplies and only had to pay for the paint and glaze. All work was done ourselves.
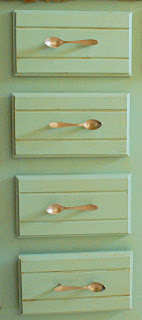
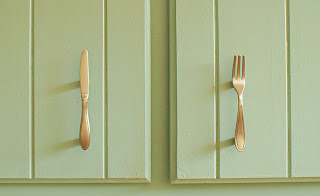
Whimsical fork, knife, and spoon pulls for the cabinet doors: Free!
They were a Christmas Gift from my parents!
New hinges for the Cabinet Doors to match pulls: approximately $15.
It would have cost more, but a couple sets of the hinges came with the pulls at Christmas 🙂
Paint for the walls: approximately $30.
That dirty beige flat paint sucked up paint like a sponge so we actually needed two cans. However, I bartered sewing skills for the second can of paint (thanks, Jessica!) and we ended up having enough in the second can to also paint my entryway. Bonus! 🙂
Stencil, brush, and acrylic paint for the back splash: approximately $35.
The stencil (found here) cost about $29 with a coupon code from an ad on The Nester’s blog. The brush and cheap acrylics made up for the rest of the price.
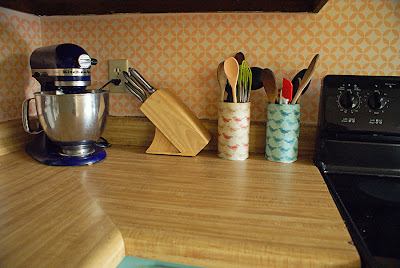
Cute bird containers: Free!
The containers are actually entertaining cookie tins that we’ve had since we got married and used for the same purpose of holding spoons and such. I had Mod Podge leftover from the girl’s bird art and the fabric is from the remnants of a dress I just finished. I have some more of this bird fabric and I’m debating between putting some on the bottom of kitchen towels or making hot pads. I may have enough for both…
Total Cost: $140
Stage 2 Plans include:
- New Curtains
- Doors for the Cabinet
- Replacing the Crown Molding we tore out in the whole room (should it be cabinet color… or white?)
- A Sturdy Shelf for the Microwave between the cabinets and wall (a built-in won’t fit above the stove)
- A Storage Bench for kiddos to sit on at the dinner table
- And I’m trying to talk Derek into letting me paint and stencil the linoleum since redoing the flooring is last on our to-do list. I don’t think I’m succeeding… but I can keep trying. 😉
- Oh, and eventually all our appliances will be black… we just don’t replace until they die. Though getting a new stove hood is pretty tempting… especially knowing how cheap they are.
And just a little recap:
02
2011So I totally took step by step pictures of the entire process of making this nursing dress when I made the fabric flower tutorial…. but it appears that I somehow deleted each and every one of them before getting Derek to take pictures of the dress on me. Sigh. So you’ll have deal with very non-visual instructions on making yourself this dress. 🙁
1. Try on a tank and mark about 1″ below a good empire waistline for you. Cut the bottom of tank off. (in retrospect I might have cut it so that the back was shorter than the front since you can see how it’s longer in the back)
2. Cut a 4″ strip from the top of the remaining bottom half of the tank. Fold in half. With right sides together pin and sew to the bottom of your Empire waist-ed tank top.
3. Measure around the fullest part of your hips if you’re making this for nursing or the fullest part of your tummy if you’re expecting (or if your hips are wider than your tummy measure that). Add 6-12″ of ease (less if you’re nursing, more if you’re expecting and making this near the beginning of your pregnancy). Divide the measurement in half and add one inch.
So the formula looks like this Hip/tummy measurement + 6-12″ / 2 + 1″ = X or the width of the front and back skirt panels.
4. Now measure from the seam you made on your tank to the length you’d like the skirt to be. Add 2.5″ for the seam and hem allowances.
Formula for length: Desired length + 2.5 = Y or length of skirt panel.
5. Cut 2 skirt panels X by Y. If you do full length like I did, you may want to taper the skirt out in a trapazoid fashion so that it’s about 3-6″ wider at the bottom than the top. I can’t take too long of a stride in this dress because I didn’t do that.
6. Sew skirt front and backs together at the side seams.
7. Make a tiny hem at the top of your skirt piece.
8. Hand wind a bobbin with elastic thread. Sew two lines of stitching around the top of the dress with the elastic thread in the bobbin and high tension on the top thread. (if you’re making the dress nursing friendly, you may want to sew a couple extra lines of elastic in the front panel: especially if you’re pregnant when you make the dress).
9. Pin the skirt to bodice seam right sides together with the waistband itself turned up and out of the way. (this is the hardest step without a picture. Basically, the skirt will be inside the front of the dress with the waistband turned out of the way. Your waistband will be sandwiched between the skirt and tank. I’m probably over explaining…)
Leave most of the skirt gathers at the front and back of the dress leaving the sides straight. If you want the dress to be nursing friendly, do NOT pin the front of the skirt to the bodice. The elastic thread should hold it up. If you’re not concerned about nursing access then go ahead and pin the front down.
10. Try on the dress and adjust as necessary. Mark your hem placement and then turn up and sew your hem.
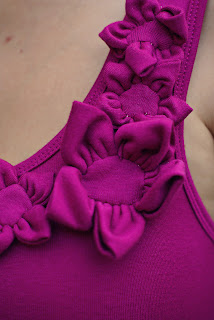
11. Embellish as desired. Enjoy your dress!
01
2011I didn’t stop much to say “Thank You” this week. It was a blur of activity and sleeplessness. I suffered for my discontent later in the week as the ongoing trial of sleep deprivation continued.
Oh, Lord, help me to count the moments as good graces that you give!
Counting 2120-2128 of the Quiet Gifts He Gives Each Day
- Seeing a humming bird up close with Bronwyn
- 2 nights of consequetive sleep
- Waterpark fun with the UMoMmies
- Snuggling Aeralind on a tube in the lazy river
- Bronwyn doing the same with daddy
- The girls asking to play dress up
- Hysterical girl chosen outfits
- Derek’s patience with me
- The Lord’s patience and kindness to me
30
2011The months are tumbling by in rush, but each day with you two lingers on. Each moment containing an eternity of memories.
In six weeks, you will have wiggled upon this earth for 2 years.
For 2 years, you have been shaping me,
training me,
teaching me to love,
teaching me what it means to be a mother.
I’m pretty hard headed most of the time… so I appreciate your patience in undertaking that task. I appreciate your blossoming spirits teaching my own to continue to grow.
Aeralind Grace
My sweet girl, each day it becomes more apparent that God gave you a servant’s heart. I (or daddy) have taught you to sweep (sort of), mop up a mess with a rag, clean up after you eat, feed your sister when she’s being slow to eat, throw trash away, and even to kill the harmless ants I can’t seem to conquer in our kitchen. Not only do you take great joy and pride in doing these tasks (sometimes yelling “Yay!” and clapping when complete), but often times you initiate these tasks without my prompting. I can only imagine where that heart will lead you.
The one image of you that I hope to freeze in my mind is your handing me something and with great joy saying “Tank oo!” You picked that up since I say thank you when you hand me something… but you seem to have the order a bit mixed up. I’m not correcting you though. I often times relish hearing those little words.
Bronwyn Hope
You have made it very apparent this month that you are a very strong willed girl. You have challenged authority, you have whined for up to 5 hours at night (either because you just wanted to be up or because of some residual attachment to your now gone pacifier), and you have thrown a million temper tantrums. I want you to know that I love your strong will. Yes, it’s difficult. Yes, it’s hard for me to manage sometimes, but you are growing your momma. You are teaching her how to love you best.
One the things I’ve noticed the most is that you demand structure. Part of that is in your strong willed nature (Will I get away with this? Where are my boundaries?), but part of it is your love for figuring things out. You have memorized every single snack box in the cabinet and will yell out what I’m getting or what you want: “daker!” “Pune!” You will inform me of when and where I need to put something away. You have no problem telling your sister of a boundary that she is crossing that you know is wrong… and wrestling her to the ground to get your “no” across (we’ll work on finesse a little later :-p). Structure is your friend and it’s what you desire most.
The one image I want to hold in my mind is of you reaching up your little hand to walk with me up the stairs or in a parking lot. Browyn, as much as you fight to establish boundaries, I can see that in your heart you’re really just asking to be led patiently and gently. I’ll hold your hand and lead as best as I can by the grace of God.

