Christmas Ornaments with Heart

Edited Nov. 29:  The Cart is Open!  Click here to purchase.

Last week I mentioned I’d be offering Christmas Ornaments for sale.  If you’re interested in purchasing an ornament and haven’t subscribed to my newsletter yet, please do that now.  Newsletter subscribers will have the first opportunity to order and orders will be limited! (Not to mention newsletter subscribers get a cool little ebook that will help you take better images of your children on Christmas morning…)

Today I wanted to talk a little about the heart behind this Christmas Ornament project. I don’t know about you, but in the midst of all the presents and the hurried chaos of this season, I struggle to put Jesus right at the center of it.  This little baby who humbled himself to come as a man.  Born of a woman and laid in a feeding trough so that by His sacrifice we might be able to come before a holy God and live loved by Him eternally.

So last year my husband and I started a new tradition.  We threw a birthday party for Jesus.  Our little girls invited their friends and we encouraged them to clean out their unwanted toys to donate to a local ministry. We also encouraged this little army of 2-5 year olds to dig through couch cushions and under furniture looking for loose change or to bring a part of their own allowances/birthday money.  With that money, we sat down and ordered a playground for children living in poverty.  This year we’ll have more little friends come and I’m excited to learn what they will pool their money and pick this year.

20% of the profit from each ornament will be spent at this little Christmas party where the kiddos will order a birthday present for Jesus from the Compassion Catalog.

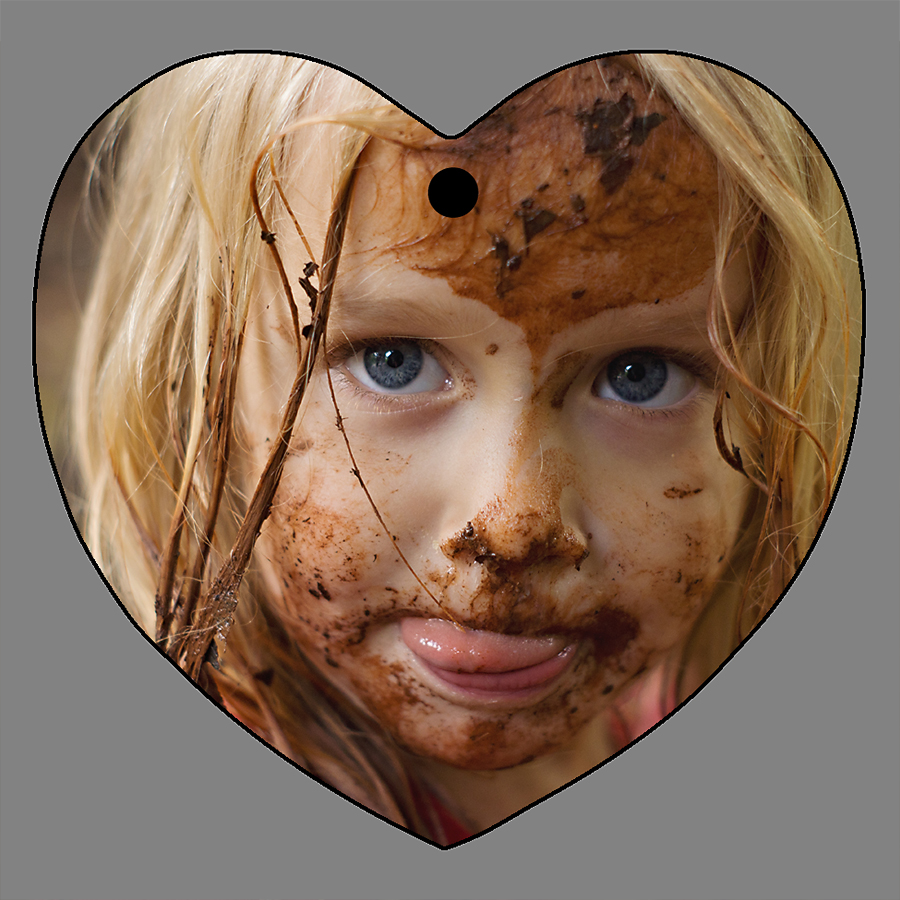
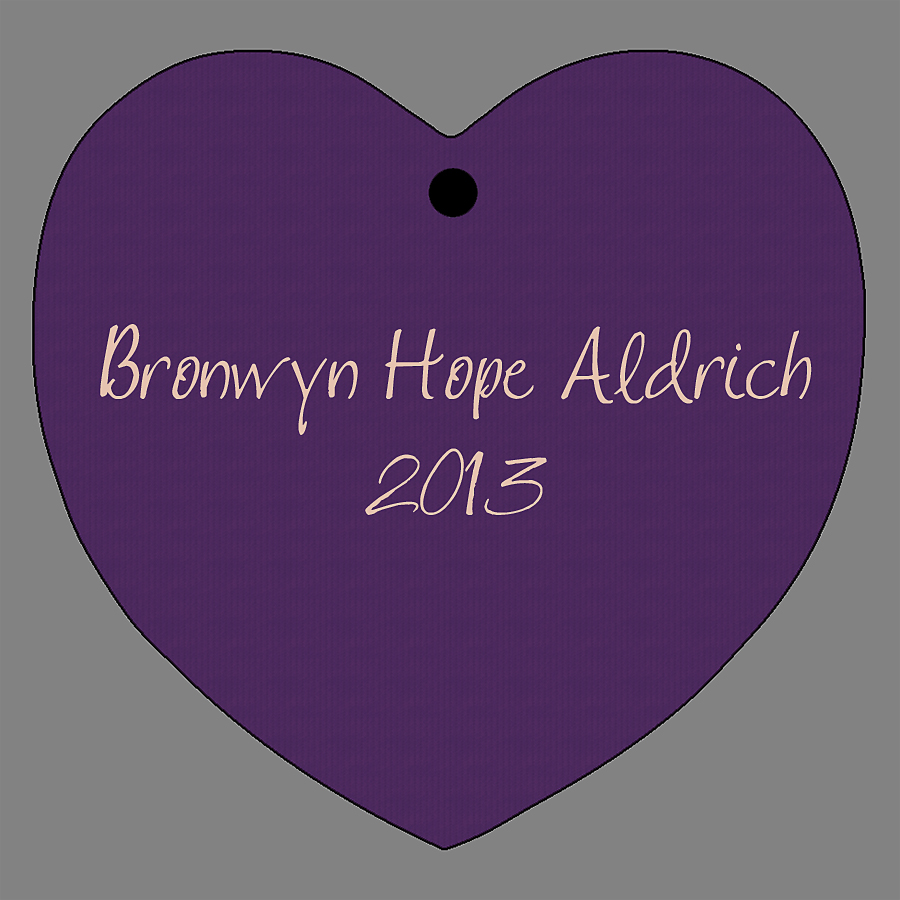
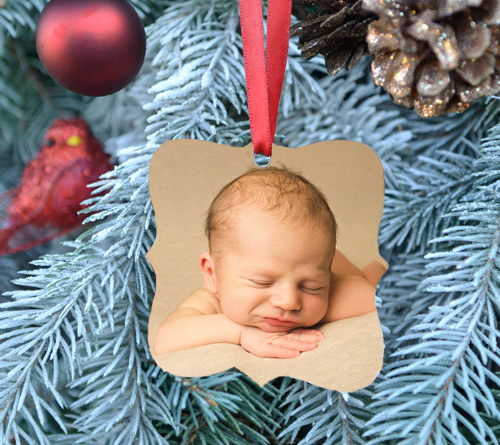
Oh, and by the way, these ornaments really do have heart. See?  I look forward to introducing all the shapes on Wednesday!

Heart Christmas Ornament Heart Christmas Ornament

Sunset Family Photography Simpsonville SC: Amin Family

Authentic Documentary Photography Greenville SC

The Amin Family were great sports for their Sunset Family Photography Simpsonville SC session. It was well over 85 degrees for this mini-session. Not once did anyone complain.

Sunset Family Photography Simpsonville SC

Lia had such ready smiles. She wasn’t people-shy at all, but Lia wanted to have Amanda or Mital in sight at all times.

Sunset Family Photography Simpsonville SC

Watching these three interact was really special. Amanda is a surgery resident, so this time away for their family where they could relax was so precious to them. There was a sweetness to their interactions that really blessed me.

Sunset Family Photography Simpsonville SC


Sunset Family Photography Simpsonville SC

My favorite image from this mini-session is this family portrait where even Noodle is making the same face trying to get Lia to laugh.

Sunset Family Photography Simpsonville SC

And Noodle really is laugh worthy. She fell right into the pond at the end of our time together. She thought the algae on the surface was grass and fell right in. Hilarious.

Black Friday Special: Christmas Ornaments

ornament


Edited Nov. 29:  The Cart is Open!  Click here to purchase.

I’m having a little Black Friday Sale featuring double sided die cut metal ornaments.  You don’t have to be a past client to get in on the deal.  I’ll happily use your images to create your perfect ornament.  To use images from another professional photographer, I will need to see their print release because I want to keep this above the board 🙂

Want to learn more?  Subscribe to my newsletter and I’ll make sure you hear all the juicy details on Monday.  Hurry! Offer will begin on Black Friday and end on Cyber Monday. Ornament orders are limited so collect your images of choice and be ready for the sale to open!

Basic Editing: Brightness and Contrast {Free Beginner Photography Class}

Editing tutorials from this class will have the following components: Definition of the functions to be highlighted, recommended uses, and a visual section where I show you how it’s done in Photoshop Elements (or maybe Lightroom if it’s similar).  There will not be a lot of words in the sections showing you how to use these functions so if you need help using them comment and I’ll respond.

Definitions

I’ll try to make this visual.  This is the SOOC image I’ll be working with.

Editing Brightness and Contrast

Brightness

Brightness is really what it sounds like: how bright an image will be. It deals mainly with the quantity/quality of the whites in an image.  The brightness slider will not fix under or over exposure but it will make your image brighter or darker when used.

Added Brightness (exaggerated)

Brightness copy

Subtracted Brightness (exaggerated)

Brightness Low

Contrast

Contrast is the amount of difference between black tones in an image and white or lighter tones.  An image that is either all dark, all midtones, or all light lacks contrast; we call these types of images flat. Flat images lack depth.

Added Contrast  (exaggerated)

Contrast High

Subtracted Contrast  (exaggerated)

Contrast Low

Final Image

Final

I added brightness and took away contrast for this final image.

Here are the two together and the following is the screen shot of my adjustments in Photoshop Elements.

Comparision

Final for this image

Recommended Uses

One of the ways I use the brightness slider is to lighten up skin tones.  Usually I use this with a layer mask (tutorial coming) to make sure I don’t overdo it.  But really brightness can be used to make any image have brighter or darker.  Here I’d really recommend you experiment to learn what you like.

Contrast is best used to make a flat image deeper or to reduce contrast in an extremely contrasted scene.  Most of the time you’ll find that your flattest images will be those which have lots of midtones and no white or black.  Using the contrast slider will help you create depth with these flat images.  Likewise, reducing contrast in a scene where you have lots of white and black will emphasize the midtones.

Visual Instructions for Use in Photoshop Elements

***Note: I use Photoshop Elements 9 which is almost 3 years old.  Your interface may look slightly differently.

Brightness Contrast

To launch Brightness/Contrast in PSE, you click this half circle thing and then select “Brightness/Contrast”.  Depending on how your interface is set up, either PSE will bring up an adjustment layer beneath your Layers Palette or you’ll have to click the Adjustments tab next to your the Layer Palette.
Brightness Contrast


Moving the sliders to the right will increase brightness/contrast and moving to the left will reduce brightness/contrast.

Preparing Toddlers for a Photography Session

Preparing Toddlers for a Photography Session

I photograph babies and toddlers frequently. Sometimes on their own or with their family and sometimes as the proud big sibling of a newborn. I’ve noticed some commonalities between the ones who do very well and thought it might be nice to share with you what I’ve learned about preparing toddlers for a photography session.

Preparing Toddlers for a Photography Session

Tips for Preparing Toddlers for a Photography Session

  • Schedule the session for their best hours. Pick the time when they’re naturally happiest. Photographers love to schedule during the hour before sunset because of beautiful lighting, but if your baby is grumpy at bedtime rather than just silly/giddy schedule for an alternate time.
    Greenville SC Lifestyle Family Photography
  • Tell your photographer about your child in your pre-session phone consult. Share what makes them happy and sad. Tell about their favorite toys. Tell about their favorite TV or book characters. What are their favorite songs or games? The more your photographer knows about your child, the easier it will be fore them to connect with your child. I’m personally a fan of my toddlers showing up with their favorite toys, lovies, or even rain boots on. I sometimes run to the library to check out their favorite book to read to them before pulling out the camera.
  • Talk to your child frequently about the upcoming photography session Tell them your photographers name. If you’re having an outdoor session, tell them about how you’ll play and tickle. If you’re having a studio session talk to them about how the lights flash and make noises. Even one year olds understand a significant amount of what you’re saying. Two year olds will be much more comfortable with the photographer and the session with this type of verbal processing.  Three and four year olds will likely walk right into the session and start asking the photographer questions based these talks and your pretend play.
  • Use your imaginations to play photographer Dress them up in their photo clothes and use your camera. Have them follow your instructions. “Climb up on this.” “Stand on one foot.” “Put your hands on your cheeks.” Practice getting them to smile with jokes or stories and refrain from teaching them to “Say cheese!” Show them the pictures and then allow them to play photographer with a pretend or child safe camera.If you’re doing a newborn session with a young toddler (under 3), practice having your toddler lay on her back with a baby doll swaddled over their arm. Once baby is born, let them hold baby on your bed in this same way.
    Preparing Toddlers for a Photography Session
    With a child older than 3, have them sit criss-cross applesauce (Indian style for us old schoolers) or with legs extended, lay the swaddled baby on heir laps, and have them support the baby’s back. Always stay close to your newborn when practicing these scenarios.Preparing Toddlers for a Photography Session
  • Talk about behavior expectations. Children don’t know what is expected of them unless you tell them. Tell them they’ll need to follow directions and not throw fits. Be silly and show them what throwing a fit looks like. Reiterate these expectations while driving to your session.
  • Consider positive reinforcement. A matchbox car or a tube of Chapstick should easily do the trick for a younger child. Chocolate chips or a special treat after the session are also good motivators for older children.
  • Bring food. There is nothing worse that a cranky hungry toddler. Enough said. Try to stay away from food that will leave marks or crumbs on your child. Cheese, cheerios, grapes, or raisins are all great choices.
  • Once you arrive at your session, introduce the photographer by name and make them feel like the session is all about them. “Child, this is Melissa. She is so excited to take pictures of you just like we’ve been practicing. She’s going to be so excited to see how fantastic you are behind the camera!”  Your excitement should be contagious.
  • When the photographer is shooting, let him/her get your child’s attention and direct them. The only exception to this should be if the photographer asks for your help or if there is a discipline issue you need to correct.
  • Know when to say that’s enough. The average baby/toddler attention span is 10-20 minutes. A great photographer will have any more formal posing done in that time or be wise about interspersing tons of play between specific instructions. When you bring an older child(ren) to a newborn session, have dad or grandma take the bigger siblings to a park or home after the family portraiture.Preparing Toddlers for a Photography Session

I hope these tips help to create a great child photography session for you.